Overview
TimeBook is a desktop application that is morphed from AddressBook Level 3 (AB3). TimeBook is a scheduling application that aims to help busy NUS undergraduates keep track of schedules of their friends and them, and find the best meeting times and venues. TimeBook will have the following features:
-
A beautiful graphical user interface (GUI) with most of the user interactions via the command line interface (CLI).
-
Allows users to add the schedules of his or her friends and organise them into groups.
-
Deconflict different schedules of different people and different groups to find the common free time among them.
-
Integration with NUSmods API to allow users to enter their NUSmods timetable link to add it to their schedule.
-
Integration with Google Maps API to allow the application to evaluate the best venue for the group to meet up during the free time in their schedules.
This document summarizes my contributions to the TimeBook project in terms of the code, user guide and developer guide.
Summary of contributions
This section documents a summary of the major and minor contributions I have made to this project.
-
Major enhancement: implemented the ability to add NUSMods timetables to schedules
-
What it does: This feature allows the user to add their own NUSMods timetables by providing their NUSMods link or by adding individual modules.
-
Justification: This feature improves the product significantly given our target user of busy NUS undergraduates as they can quickly setup their timetable just by using pre-existing data from NUSMods rather than creating their own schedule from scratch.
-
Highlights: This implementation was challenging as it required the development of a new API component to query, transform and store external data. Extensive checks have to be done to make sure the data is correctly handled. It also required an analysis of multiple design alternatives in order to find a balance between the complexity of the implementation and robust offline support. A caching mechanism to store query results and a pre-processing program was written to store all relevant NUSMods data for offline support.
-
Credits: The NUSMods API was used for retrieving NUSMods data. The JSON.simple library was used to encode and decode the JSON data that was retrieved from the NUSMods API.
-
-
Minor enhancement: added a
showmodcommand that allows the user to open up the https://nusmods.com/MODULE page on the browser, so that the user can view a module’s details on NUSMods. -
Code contributed: See on Reposense
-
Other contributions:
-
Project management: Managed releases
v1.1-v1.4(4 releases) on GitHub -
Wrote tests for features that I implemented (#189)
-
Documentation:
-
Added documentation for the Developer Guide and User Guide, for the sections related to NUSMods and External API that I implemented. (#135, #137, #144, #172, #174)
-
Updated documentation for the Developer Guide for the Design → Architecture, Design → Model component and Design → Api component. (#278)
-
-
Community: Reported bugs and suggestions for other teams in the class during the practical exam dry run.
-
Tools:
-
Integrated Github plugins (Coveralls & Travis CI) to the team repo
-
Set up a Telegram Bot for Travis build status notifications (#45)
-
-
Contributions to the User Guide
Given below are some of the sections that I contributed to the User Guide, namely the |
Add Modules via NUSMods Link: addmods
Already have your modules timetable on NUSMods?
Great, you can easily add your modules timetable into TimeBook with the addmods command!
Format: addmods [n/NAME] link/NUSMODS_SHARE_LINK
-
Reads the specified
NUSMODS_SHARE_LINKto get the modules and classes, then adds the classes into the person’s schedule. -
If the NAME is not provided, then the modules will be added to the default user, which is you!
-
Currently supports academic year 2019/2020 and semester 1 only.
-
 : Just like adding a normal event via
 addevent, the module will only be added if the specified classes does not clash with any events in the person’s schedule.
Examples:
-
addmods link/https://nusmods.com/timetable/sem-1/share?CS2101=&CS2103T=LEC:G05&CS3230=LEC:1,TUT:08&CS3243=TUT:07,LEC:1&GEQ1000=TUT:D17
This will add the modules in the NUSMods link to your schedule. -
addmods n/John link/https://nusmods.com/timetable/sem-1/share?CS2101=&CS2103T=LEC:G05&CS3230=LEC:1,TUT:08&CS3243=TUT:07,LEC:1&GEQ1000=TUT:D17
This will add the modules in the NUSMods link to John’s schedule. -
addmods n/Bob link/https://nusmods.com/timetable/sem-1/share?CS2101=&CS2103T=LEC:G05&CS3230=LEC:1,TUT:08&CS3243=TUT:07,LEC:1&GEQ1000=TUT:D17
This will add the modules in the NUSMods link to Bob’s schedule.
How do I add my team member John’s NUSMods timetable to TimeBook?
-
Well that is simple, add John’s NUSMods timetable by first typing
addmods n/John link/into the command box, then copy and paste his NUSMods link. Finally, press Enter to execute it.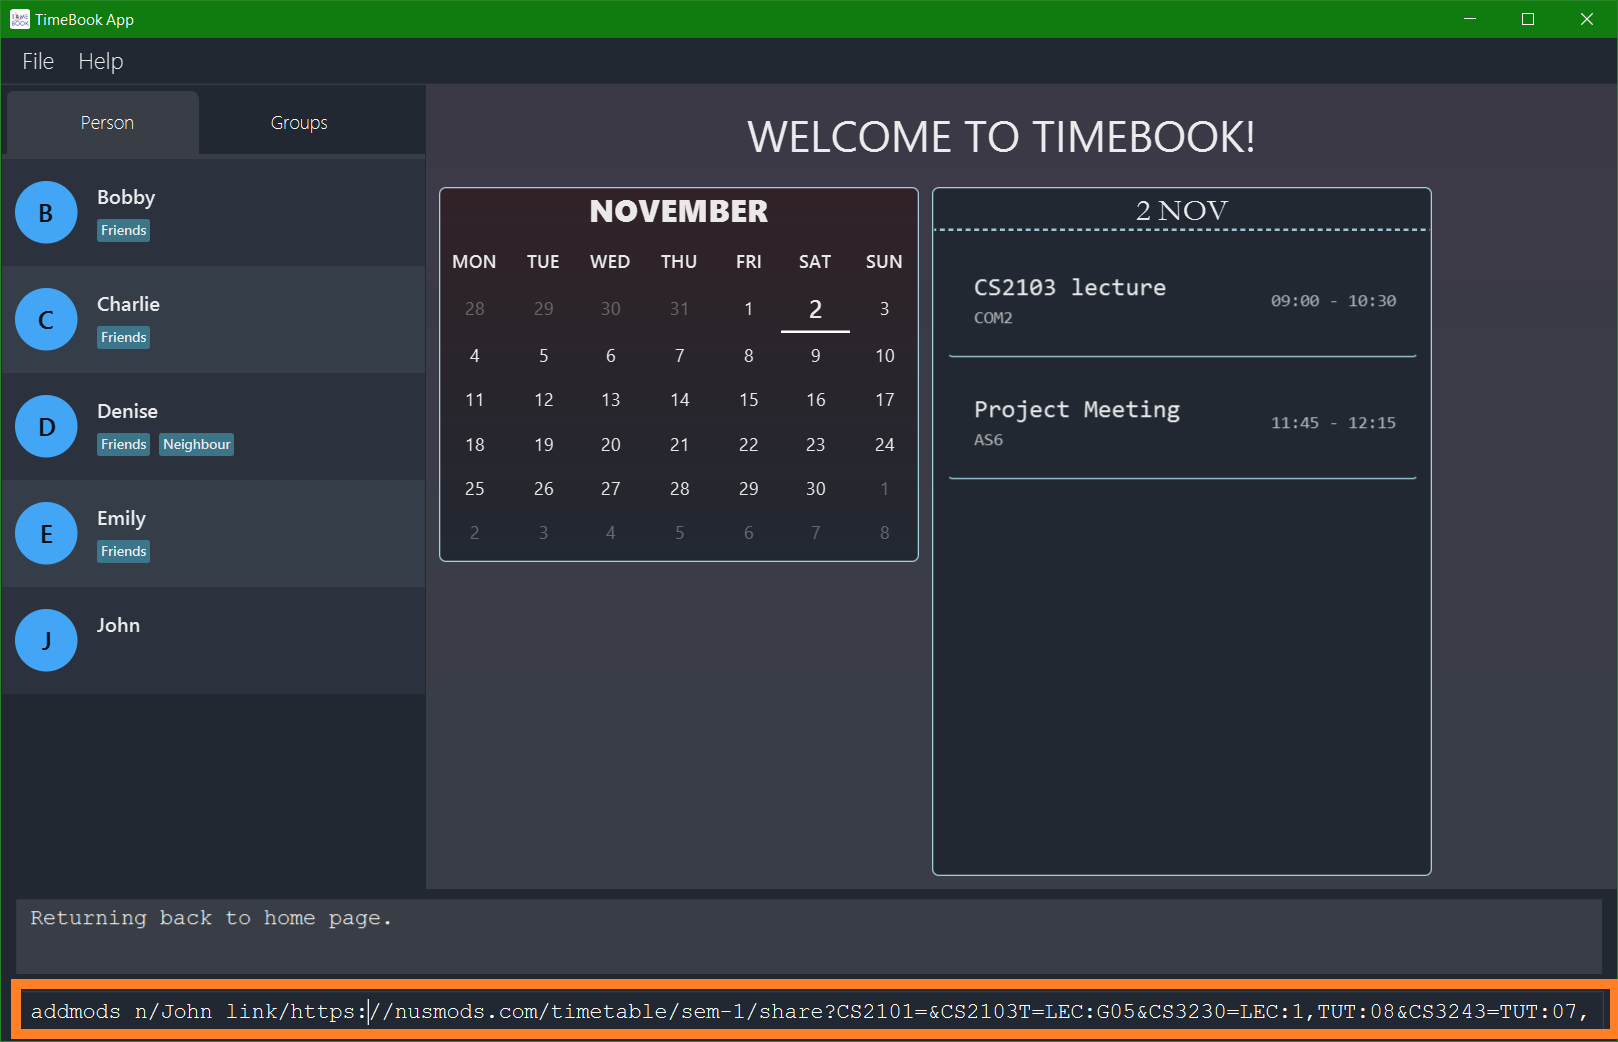
-
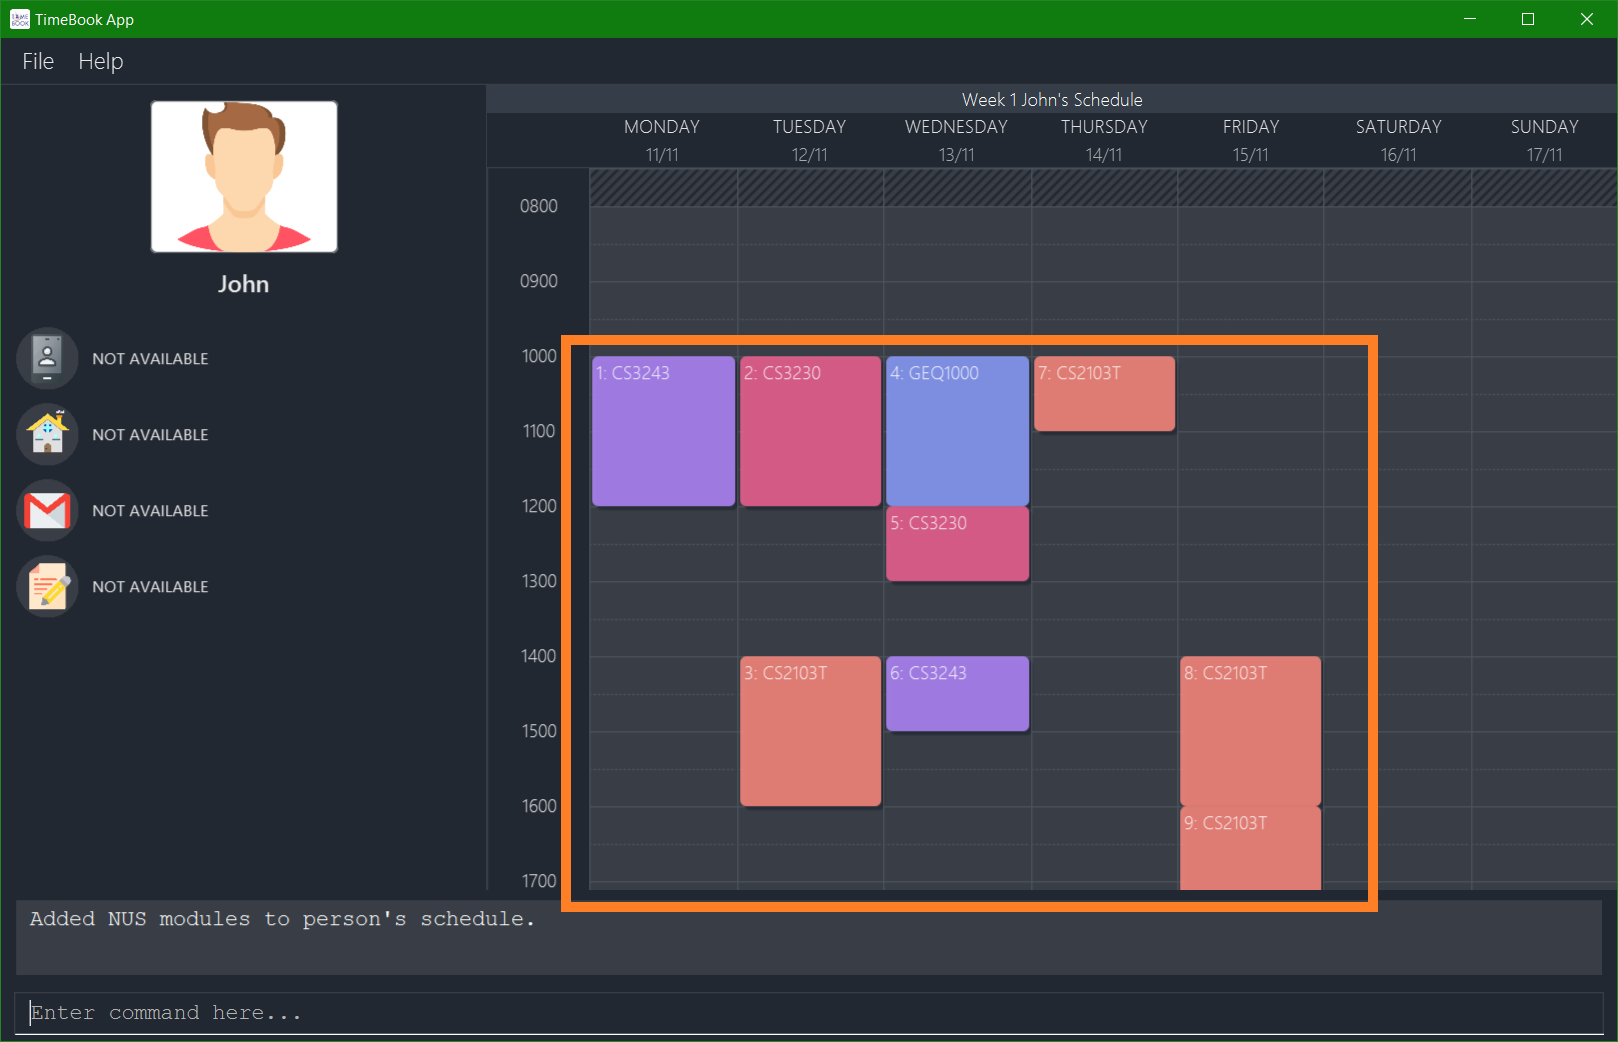
If the command succeeds, you will see John’s schedule update with the newly added timeslots from his NUSMods timetable:
Add Module to Schedule: addmod
Want to add an NUS module to you or your friend’s schedule on TimeBook? You can do so with the addmod command! If you already have your timetable on NUSMods, check out the addmods command!
Format: addmod [n/NAME] m/MODULE_CODE cl/CLASS_1_TYPE:CLASS_1_NUMBER,…
-
Currently supports academic year 2019/2020 and semester 1 only.
-
If the NAME is not provided, then the modules will be added to the default user, which is you!
-
: Just like adding a normal event via
addevent, the module will only be added if the specified classes does not clash with any events in the person’s schedule.
Examples:
-
addmod m/CS2103T cl/LEC:G01
This adds CS2103T lecture G01 to your schedule. -
addmod n/John m/CS3230 cl/LEC:1,TUT:08
This adds CS3230 lecture 1 and tutorial 08 to John’s schedule. -
addmod n/John m/CS2100 cl/LEC:1,TUT:01,LAB:08
This adds CS2100 lecture 1, tutorial 01 and lab 08 to John’s schedule.
Show Module: showmod
Want to know more information about an NUS module? Use showmod to quickly open up the NUSMods page for a specific module on your browser!
Format: showmod m/MODULE_CODE
-
: This command requires internet connection.
Examples:
-
showmod m/CS2103T
Opens up https://nusmods.com/modules/CS2103T on your default browser. -
showmod m/CS2101
Opens up https://nusmods.com/modules/CS2101 on your default browser.
…[more in UserGuide]
Contributions to the Developer Guide
Given below are parts of the Add NUSMods To Schedule section and the External APIs section that I contributed to the Developer Guide. They showcase my ability to write technical documentation and the technical depth of my contributions to the project. |
Add NUSMods To Schedule
Implementation
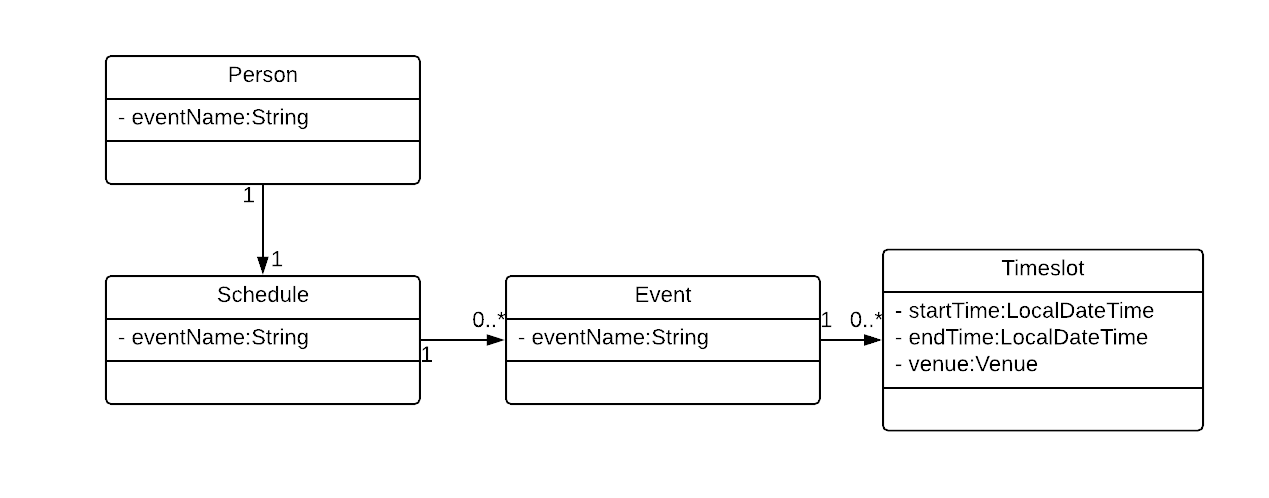
This feature allows users to add their NUSMods timetable (using the AddNusModsCommand or AddNusModCommand) to their TimeBook schedules.
The AddNusModsCommand can be executed by the user through the CLI with the following syntax addmods n/NAME link/NUSMODS_SHARE_LINK. The share link contains semester number, module codes, class types and class numbers, which are used for creating and adding events to the person’s schedule.
The AddNusModCommand can be executed by the user through the CLI with the following syntax addmod n/NAME m/MODULE_CODE cl/CLASS_TYPE_1:CLASS_NUMBER_1,CLASS_TYPE_2:CLASS_NUMBER_2,…. This allows the user to add individual modules but requires the user to manually specify the class type and class numbers.
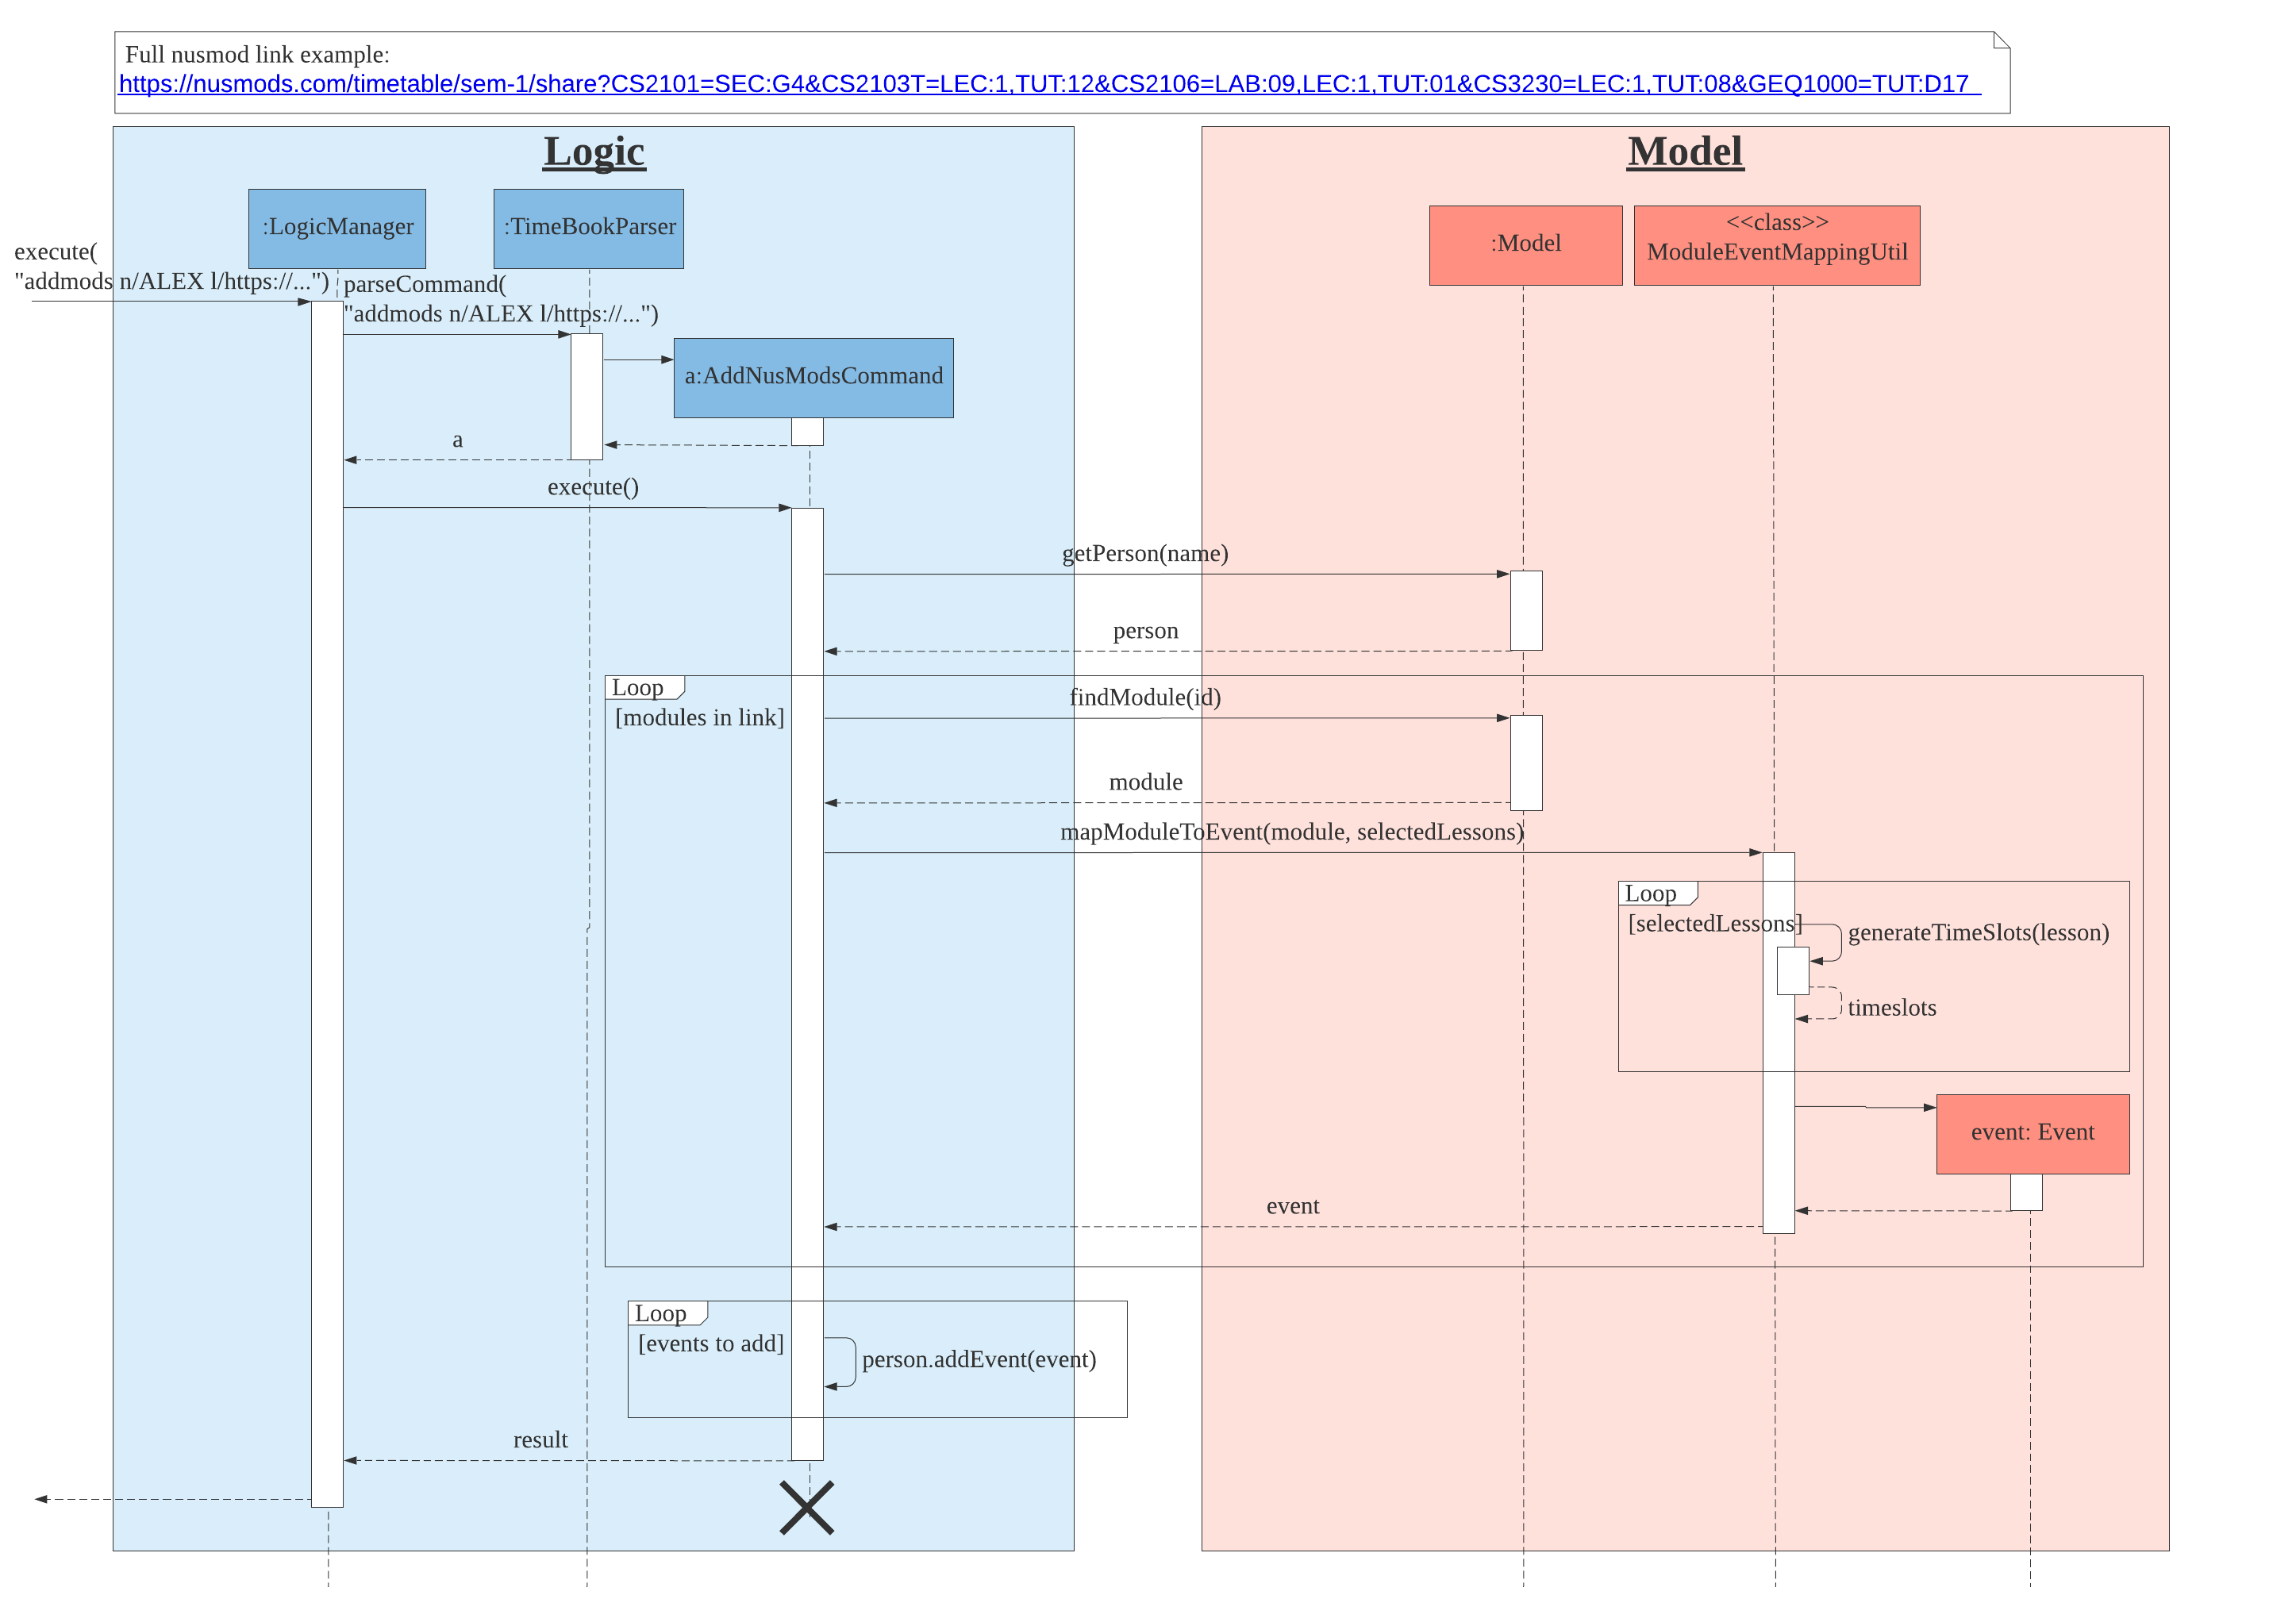
Since the AddNusModsCommand is less complex than AddNusModsCommand as it only adds 1 module at a time and does not require URL validation and parsing, we will walk through the implementation of the latter instead. The following sequence diagram shows what happens when AddNusModsCommand is executed:
-
User enters
addmods n/NAME link/https//nusmods.com/…. The command string will be passed toLogicManagerwhich callsTimeBookParserfor parsing into anAddNusModsCommandobject. -
The
TimeBookParserdelegates the parsing toAddNusModsCommandParser. The name parameter will be parsed into aNameobject, while the link parameter will be passedNusModsShareLink#parseLink, which validates and parses the link to create anNusModsShareLinkobject containing theSemesterNo, each module’sModuleCode, and their corresponding lessons'LessonTypeandLessonNo. TheAddNusModsCommandParserthen creates anAddNusModsCommand, which takes in theNameandNusModsShareLinkobjects, and passes the command back toLogicManager. -
The
AddNusModsCommand#executeis then called by theLogicManager. In theAddNusModsCommand#executemethod,-
AddNusModsCommand#getPersonis called to get from the model thePersonwhose schedule will be added with the modules. -
AddNusModsCommand#mapModulesToEventsis then called to map each module to an event. EachModule-LessonType-LessonNoentry in theNusModsShareLinkis iterated through and the following is executed,-
Call
model#findModuleto get theModulewith the given module code. -
Pass the
Moduleand pairs ofLessonType-LessonNotoModuleEventMappingUtil#mapModuleToEventto generate anEventbased on the module and lesson type-number pair. OneModuleis mapped to oneEvent, and eachLessonin the module is used to generate multipleTimeslotsfor an event.
-
-
The created events will then be iterated through and executed with
person#addEventto add the events to the person’s schedule.
-
-
The command result is returned to
LogicManagerand feedback is displayed to user.
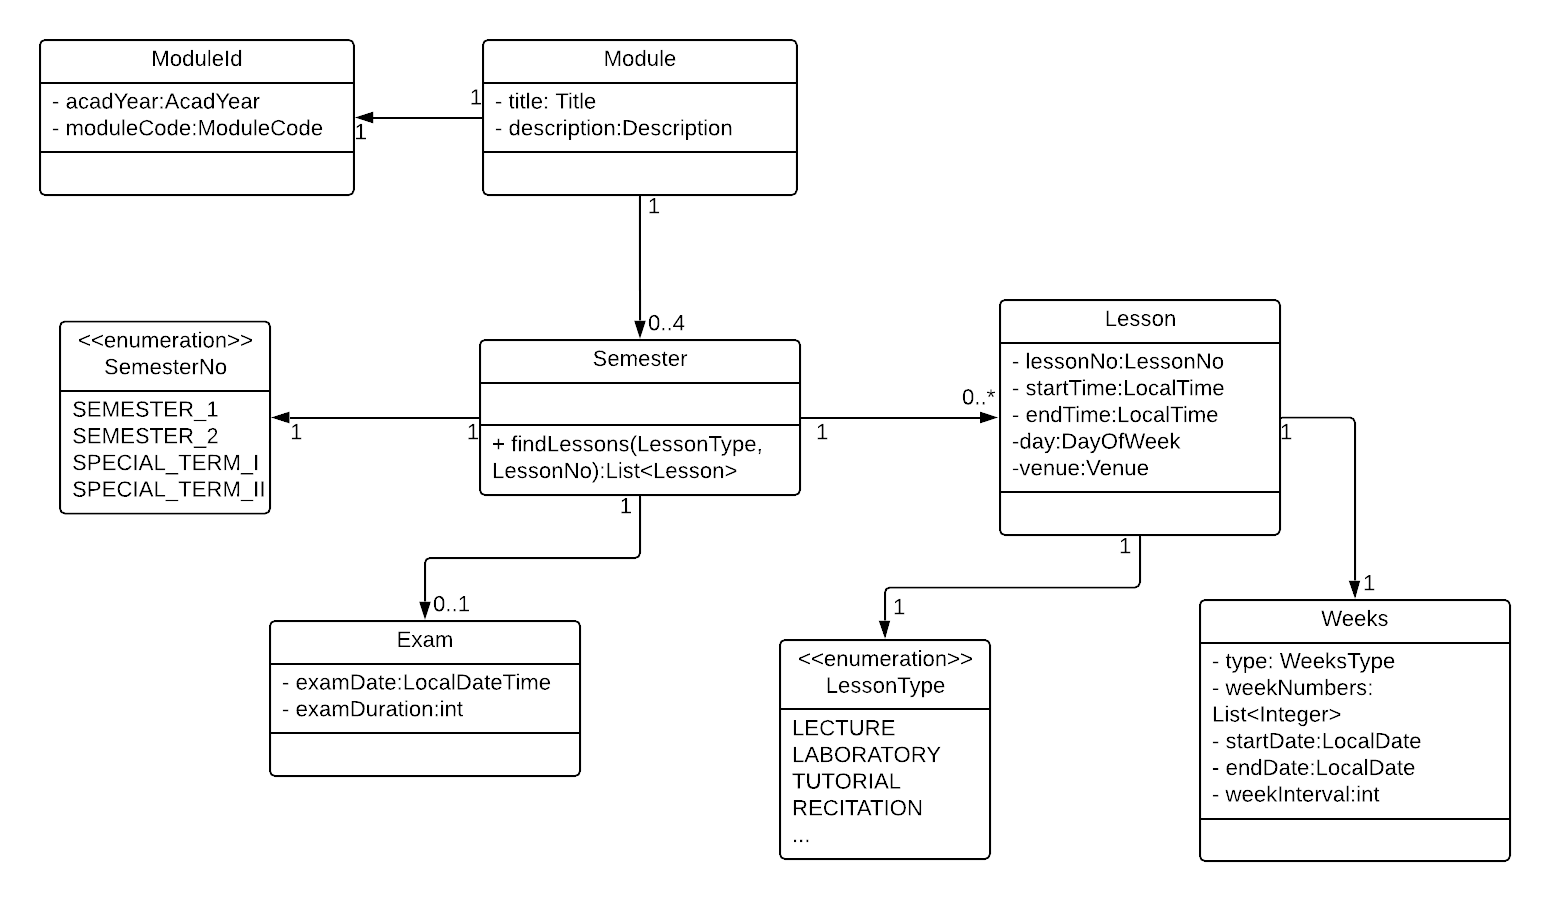
The following class diagram shows the Module class and its associated classes. The structure follows closely to the data retrieved from NUSMods API with some changes to suit the needs of our application.
Module and associated classesThe following class diagram shows the Event class and its associated classes relevant in the context of this feature.
Event and associated classesDesign Considerations
Aspect: |
Choice |
Pros |
Cons |
Ease of use |
1. Allow user to add modules individually |
Easier to implement. |
Tedious for user, as user has to specify the module code, lesson types and lesson numbers in the command. |
2. Allow user to add modules via NUSMods share link (current choice) |
User can easily get the NUSMods share link of his/her existing NUSMods timetable and copy/paste the link into the command. |
Require implementation of complex URL validation and parsing. |
|
3. Allow user to import the downloaded iCalendar file from NUSMods |
Opens up the possibility of importing generic iCalendar files. |
Harder to implement, need to deal with file IO and .ics file format parsing. Also, user is unlikely to get the iCalendar files of his/her group members (due to tediousness) |
|
We chose to implement choice 2 as it is the most user-friendly one. The bonus is that choice 1 has been implemented as well as it is easy to adapt what we have already implemented for choice 2 to make choice 1 work. |
|||
External APIs
The application requires data from the NUSMods API for the Add NUSMods To Schedule feature and data from the Google Maps API for the Closest Common Location feature. The following subsections describe the implementation of the Api component:
APIs
We have implemented an Api component to contain the logic of interfacing with external APIs, the architecture diagram of this component can be seen in Design → Api component.
The websocket.NusModsApi class contains methods for querying different endpoints of the NUSMods API and parsing the query results into JSONObject or JSONArray objects.
The websocket.GmapsApi class contains methods for querying different endpoints of the Google Maps API and parsing the query results into JSONObject or JSONArray objects.
The websocket.Cache class handles the saving and loading of cached API results in the resources folder.
The websocket.util folder contains various utility classes for querying external APIs.
Caching API Results
To support limited connectivity in our application, the results of all API queries are preprocessed and saved into the resources directory. This is managed by the Cache class. The following activity diagram shows how the caching feature works when external data is required for the execution of a certain command:
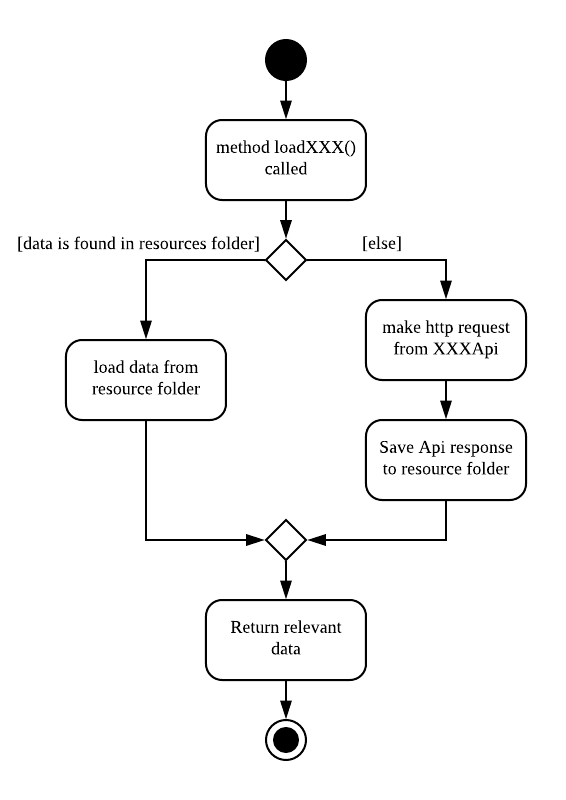
loadXXX methodsPreprocessing NUSMods API
We preprocess the data collected from NUSMods API so that we can cache the data for offline usage and perform some early computation steps (e.g. validation, parsing) to reduce the computation cost during actual use in the application.
Notably, the key information that we require for each NUS module is the timetable information. However, there is no available API endpoint which provides the timetable information of all modules at once. Rather, there is only an endpoint which provides the timetable information of one module per query. Thus, we developed a small program in logic.internal.nusmods.ImportMods, which is executed prior to the main application itself, to query the timetable info for every module and save the data in the resources folder.
Design Considerations
Aspect: |
Choice |
Pros |
Cons |
Limited Connectivity Support |
1. Preprocessing API results and storing it in resources folder. |
Can achieve complete offline support, also avoids the issue of providing API keys in production (current choice). |
Have to run the preprocessing programs in |
2. Caching Query Results |
Achieves limited connectivity support (call once and save result, then use saved result for future calls). Also, needs less work to support future data/API changes. |
Not so useful in cases where a large number of queries is required to be preprocessed first in order to handle a single user command, e.g. finding common location requires building a |
|
3. Direct API queries |
Easy to implement, minimal work to support future data/API changes. |
No limited connectivity support. |
|
The choice of implementation was progressive - it was initially choice 3 for prototyping, then enhanced to choice 2, and finally adapted to choice 1. Choice 1 suits our needs the best as it can achieve complete offline support and avoid handling API keys in production. Additionally, the cons of choice 1 is manageable. However, a mix of choice 1 and 2 will be required moving forward if we intend to support non-NUS locations or multiple academic semesters. |
|||
…[more in DeveloperGuide]