By: Team TimeBook Since: Aug 2019 Licence: MIT
1. Setting up
Refer to the guide here.
2. Design
2.1. Architecture
The Architecture Diagram given below explains the high-level design of the App:

Given below is a quick overview of each component.
The .puml files used to create diagrams in this document can be found in the diagrams folder.
Refer to the Using PlantUML guide to learn how to create and edit diagrams.
|
-
At app launch: Initializes the components in the correct sequence, and connects them up with each other.
-
At shut down: Shuts down the components and invokes cleanup method where necessary.
Commons represents a collection of classes used by multiple other components.
The following class plays an important role at the architecture level:
-
LogsCenter: Used by many classes to write log messages to the App’s log file.
The rest of the App consists of five components.
Each of the five components
-
Defines its API in an
interfacewith the same name as the Component. -
Exposes its functionality using a
{Component Name}Managerclass.
For example, the Logic component (see the class diagram given below) defines it’s API in the Logic.java interface and exposes its functionality using the LogicManager.java class.

How the architecture components interact with each other
The Sequence Diagram below shows how the components interact with each other for the scenario where the user issues the command addmod m/CS3230 cl/LEC:01.

addmod m/CS3230 cl/LEC:01 commandThe sections below give more details of each component.
2.2. UI component
This section describes the various UI components that make up TimeBook’s Graphical User Interface. The diagram below shows the full structure of the UI component.

API : Ui.java
In general, TimeBook’s UI consists of a MainWindow that is made up of the following main parts:
-
CommandBox— The box that users would key in commands to execute. -
ResultDisplay— The box that would show response to the user after every command has been executed. -
TabPanel— The tabs at the left side of the window. It displays the list of groups or persons that have been added to TimeBook. -
ScheduleView— The display that contains the graphics of schedules belonging to individuals or groups. -
GroupInformationDisplay— The display that contains in-depth information about the group. -
PersonInformationDisplay— The display that contains in-depth information about the person.
Additionally, TimeBook also has a separate window for popups when users executes the select or selectfreetime commands.
The major ui components for this separate window are LocationView and TimeslotView.
All these components, including the MainWindow, inherit from the abstract UiPart class. Note that not all of these ui components are shown
at any one point in time. For example, the TabPanel gets displaced with either GroupInformationDisplay or PersonInformationDisplay
when a user executes commands such as addgroup or addevent. In a nut shell, the MainWindow will show different ui components depending on the command executed.
The UI component uses JavaFx UI framework. The layout of these UI parts are defined in matching .fxml files that are in the src/main/resources/view folder. For example, the layout of the MainWindow is specified in MainWindow.fxml
The UI component,
-
Executes user commands using the
Logiccomponent. -
Listens for changes to
Modeldata so that the UI can be updated with the modified data.
2.3. Logic component
The Class Diagram below shows the structure of the logic component:

API :
Logic.java
-
Logicuses theTimeBookParserclass to parse the user command. -
This results in a
Commandobject which is executed by theLogicManager. -
The command execution can affect the
Model(e.g. adding a person). -
The result of the command execution is encapsulated as a
CommandResultobject which is passed back to theUi. -
In addition, the
CommandResultobject can also instruct theUito perform certain actions, such as displaying help to the user.
Given below is the Sequence Diagram for interactions within the Logic component for the execute("delete 1") API call.

delete 1 Command2.4. Model component
The following diagram provides a high-level overview of the Model component:

API : Model.java
The Model,
-
stores a
UserPrefobject that represents the user’s preferences. -
stores a
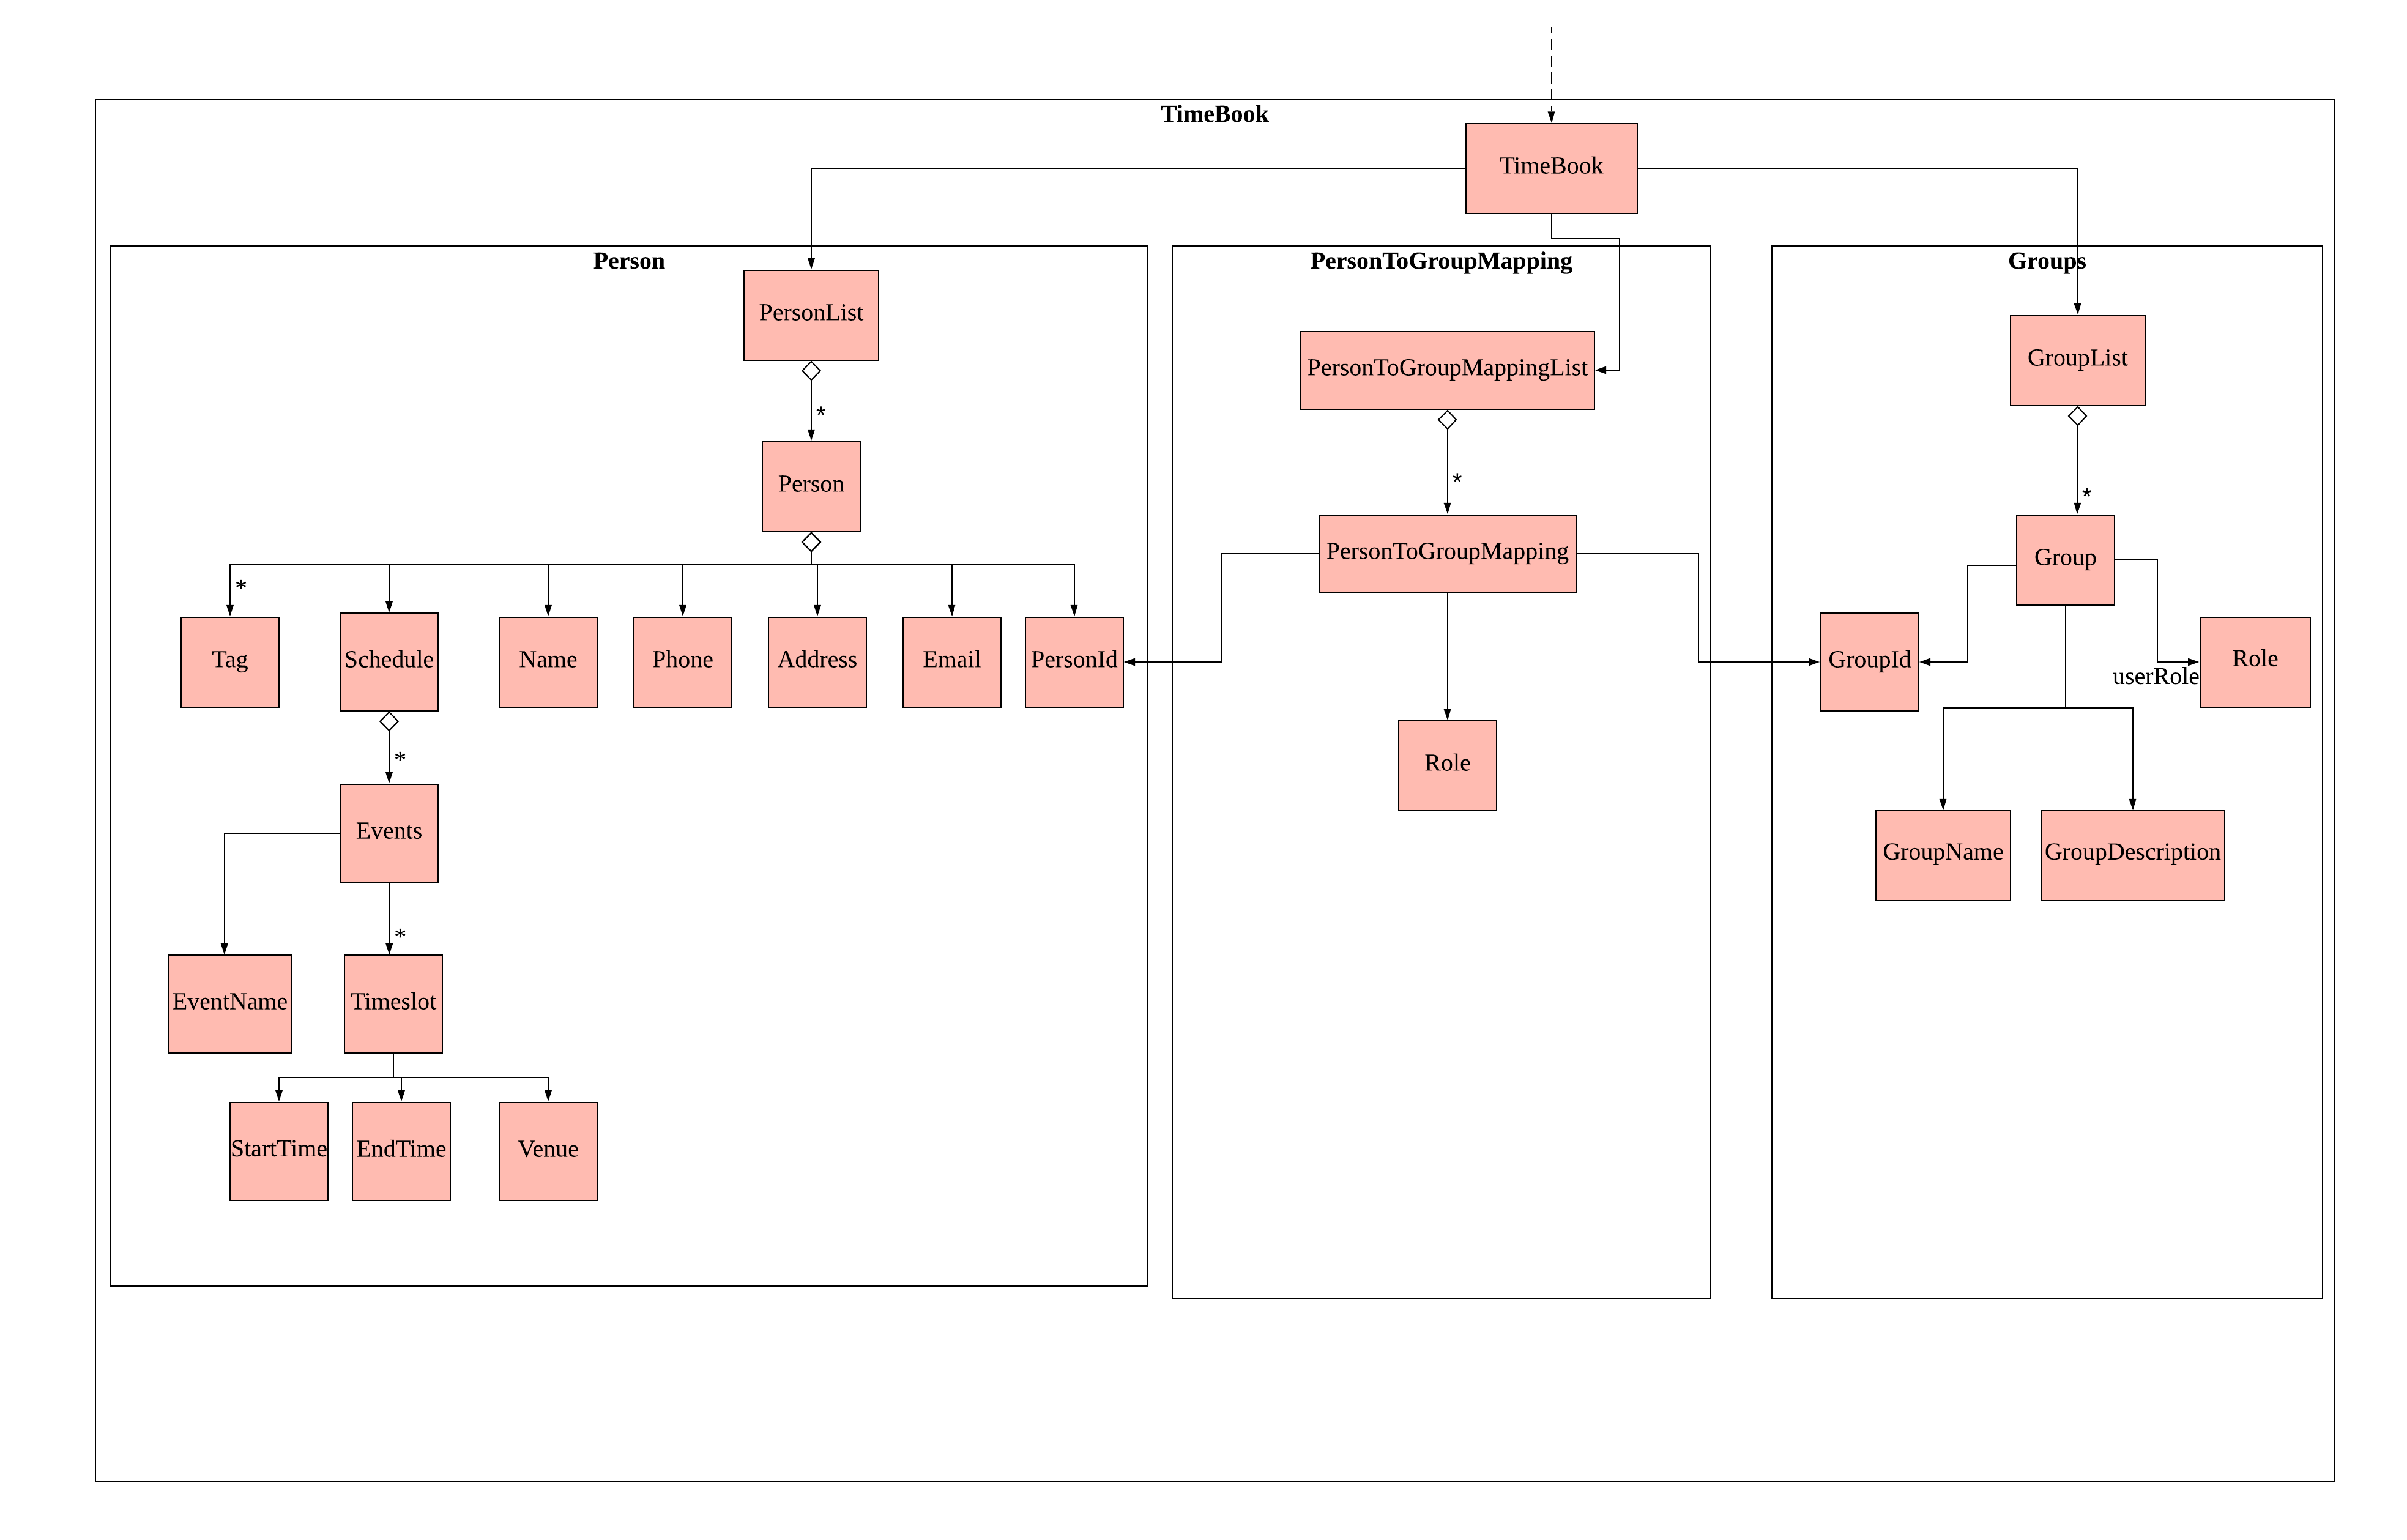
TimeBookobject which contains data related to persons, groups and the mappings between them. -
stores a
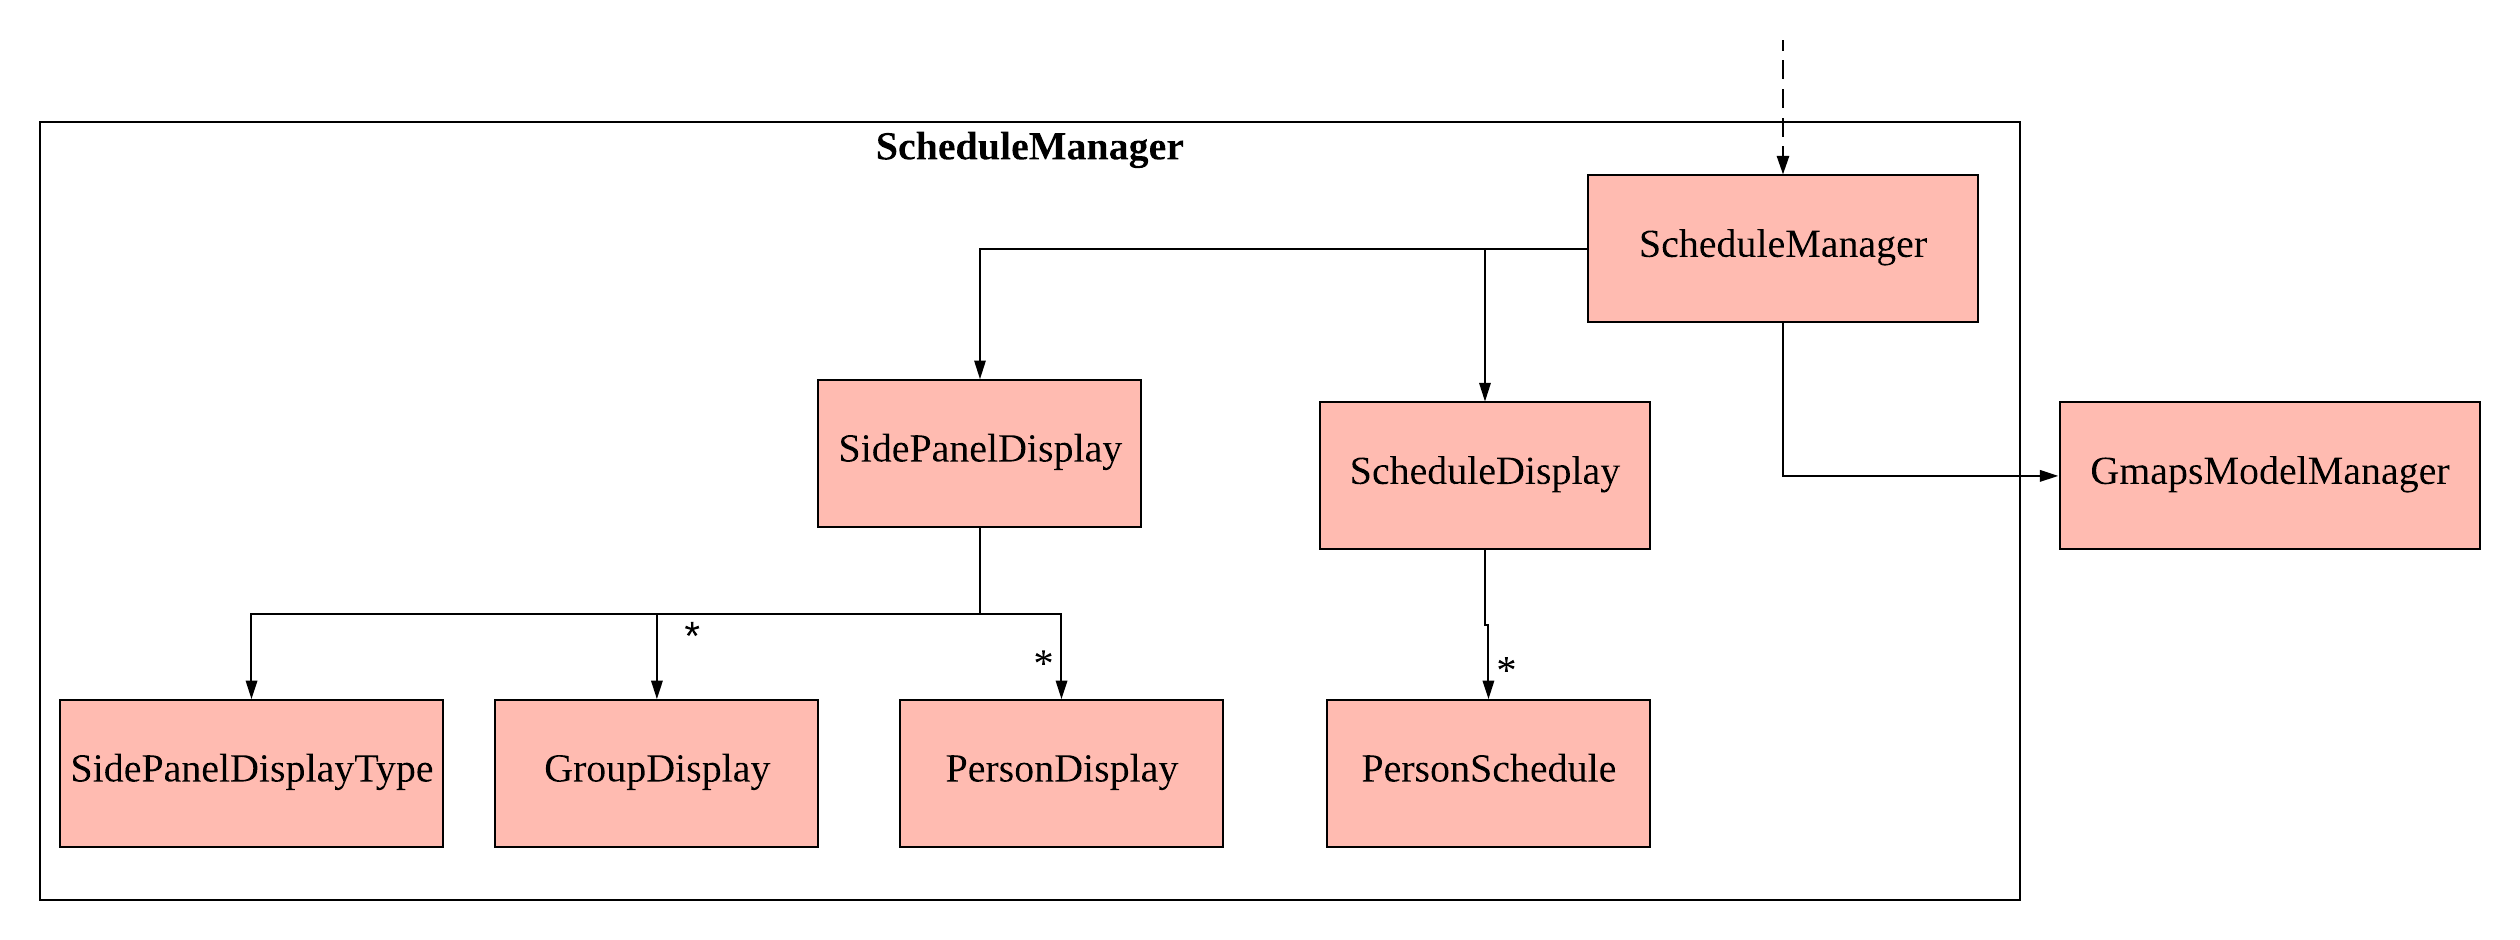
ScheduleManagerobject which contains data related to stateful UI. -
stores a
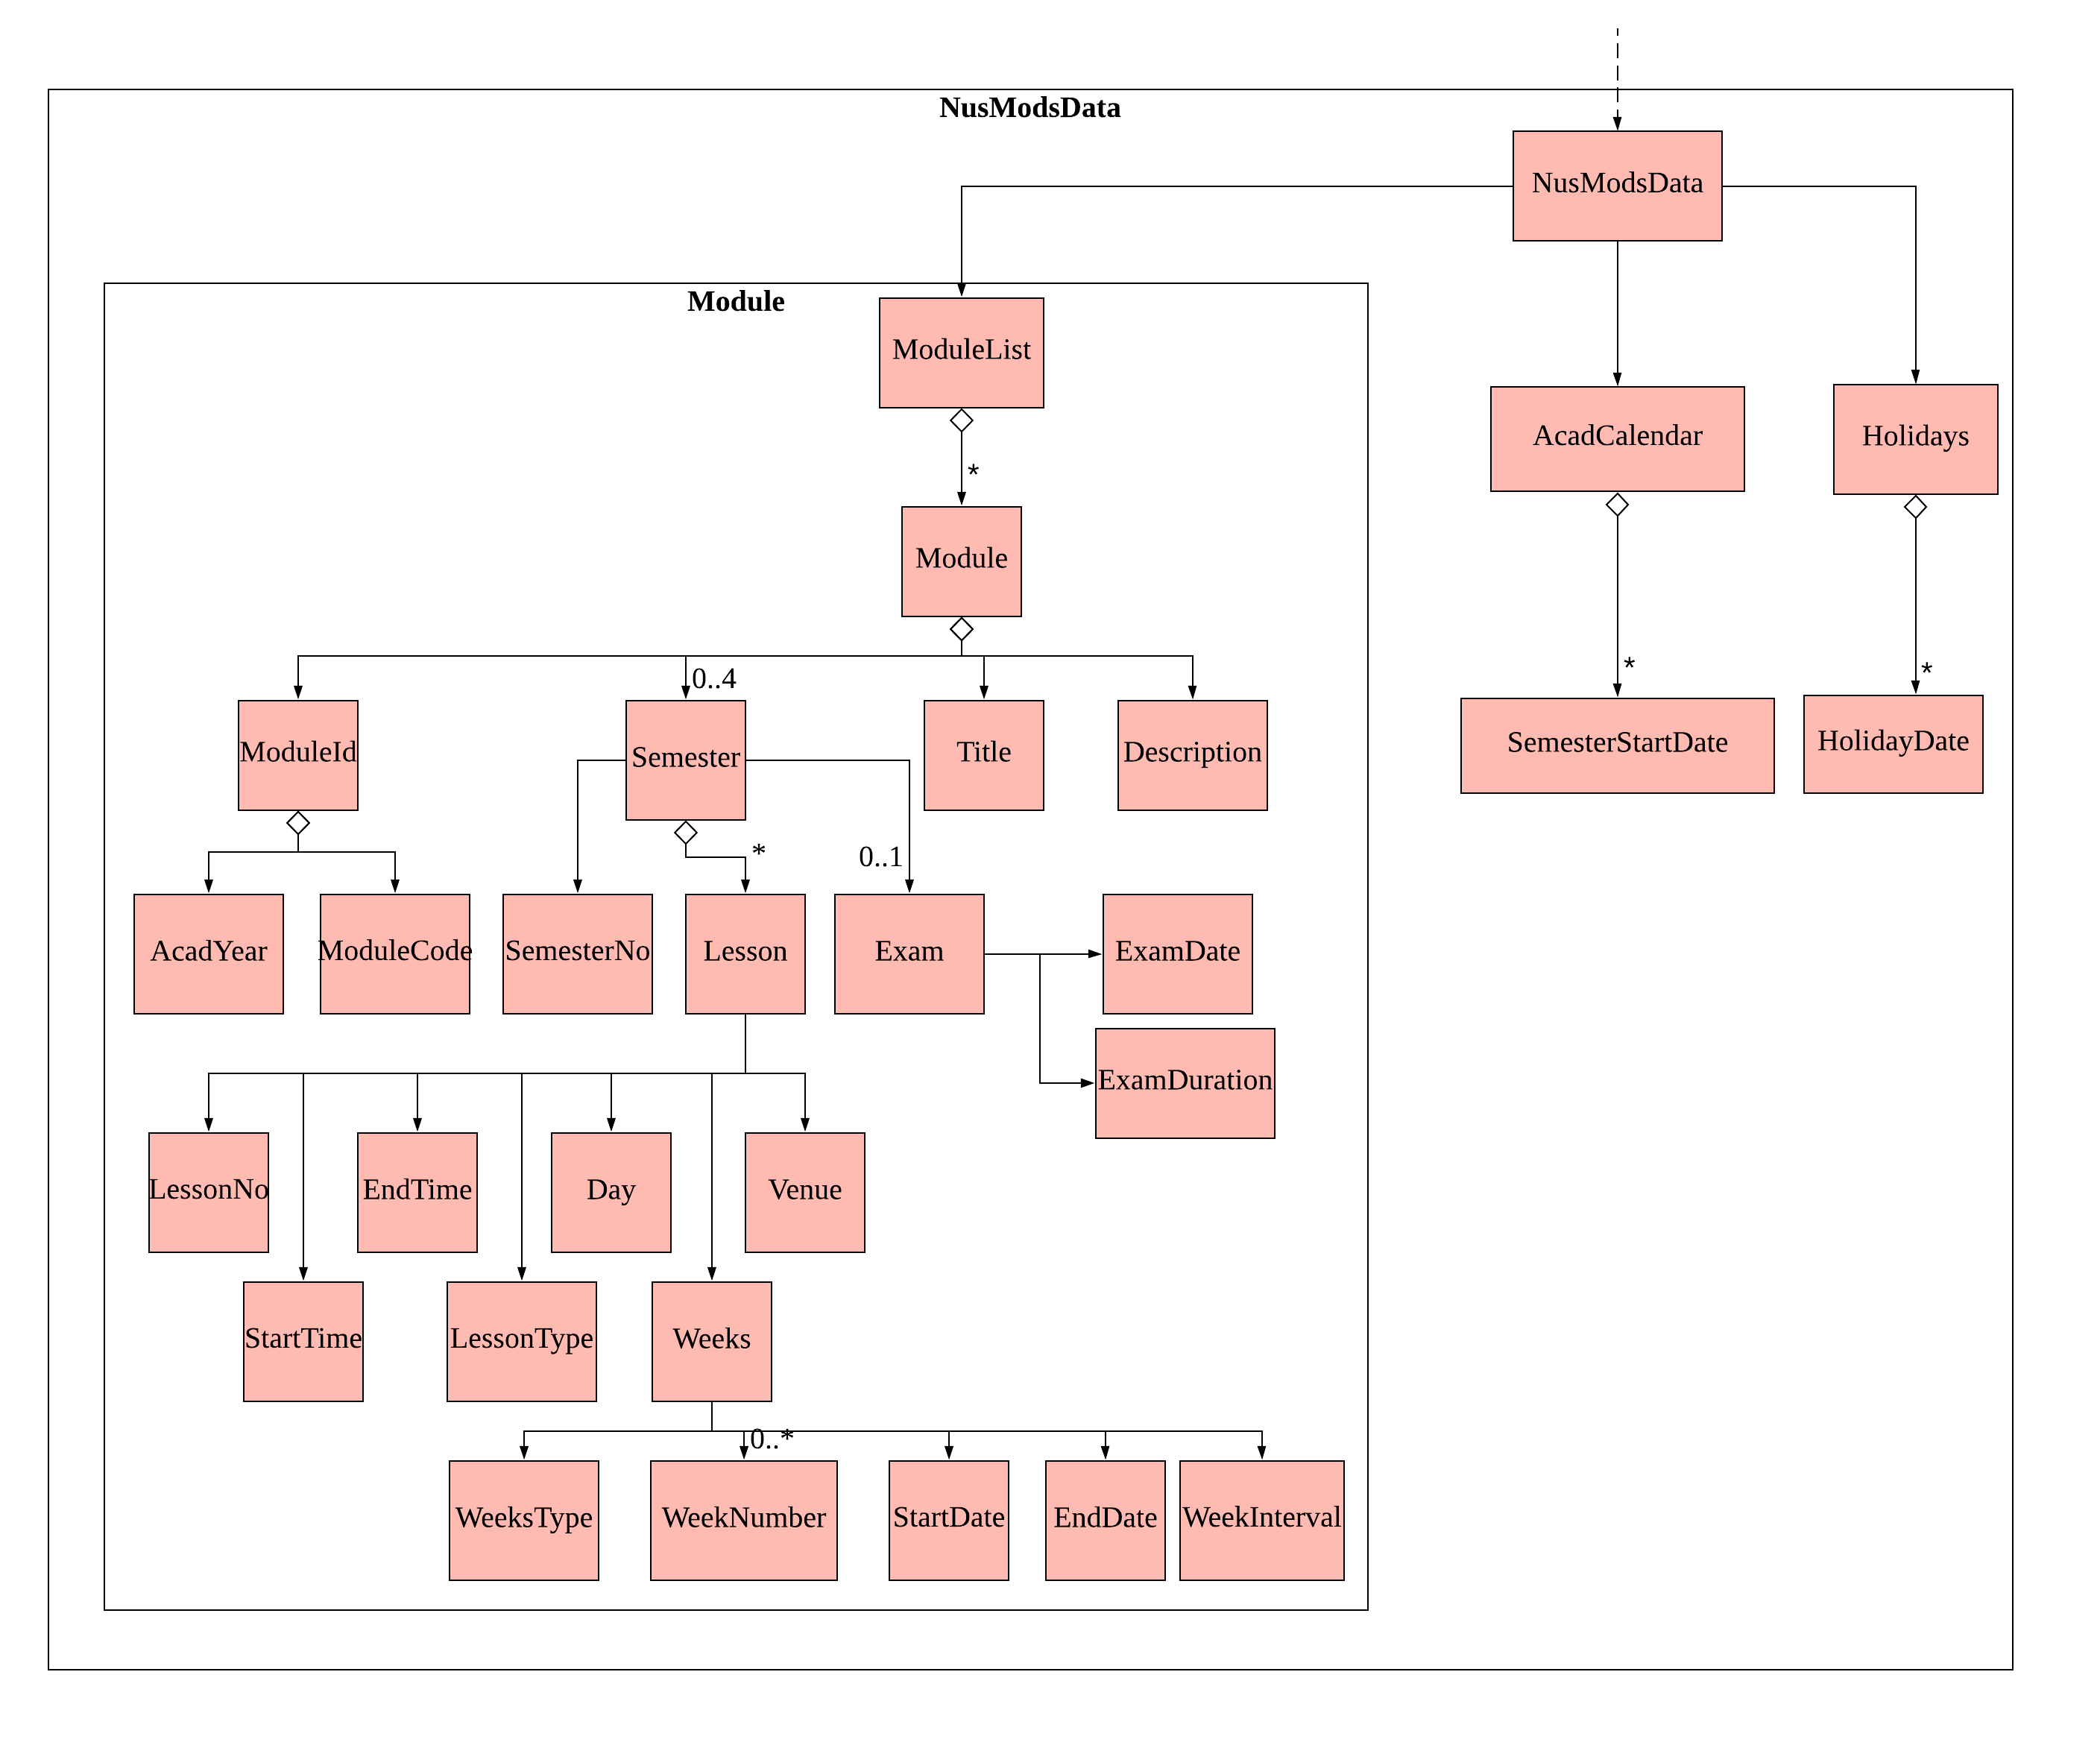
NusModsDataobject which gets data related to NUSMods modules from the Api component and transforms them to be used by other components. -
stores a
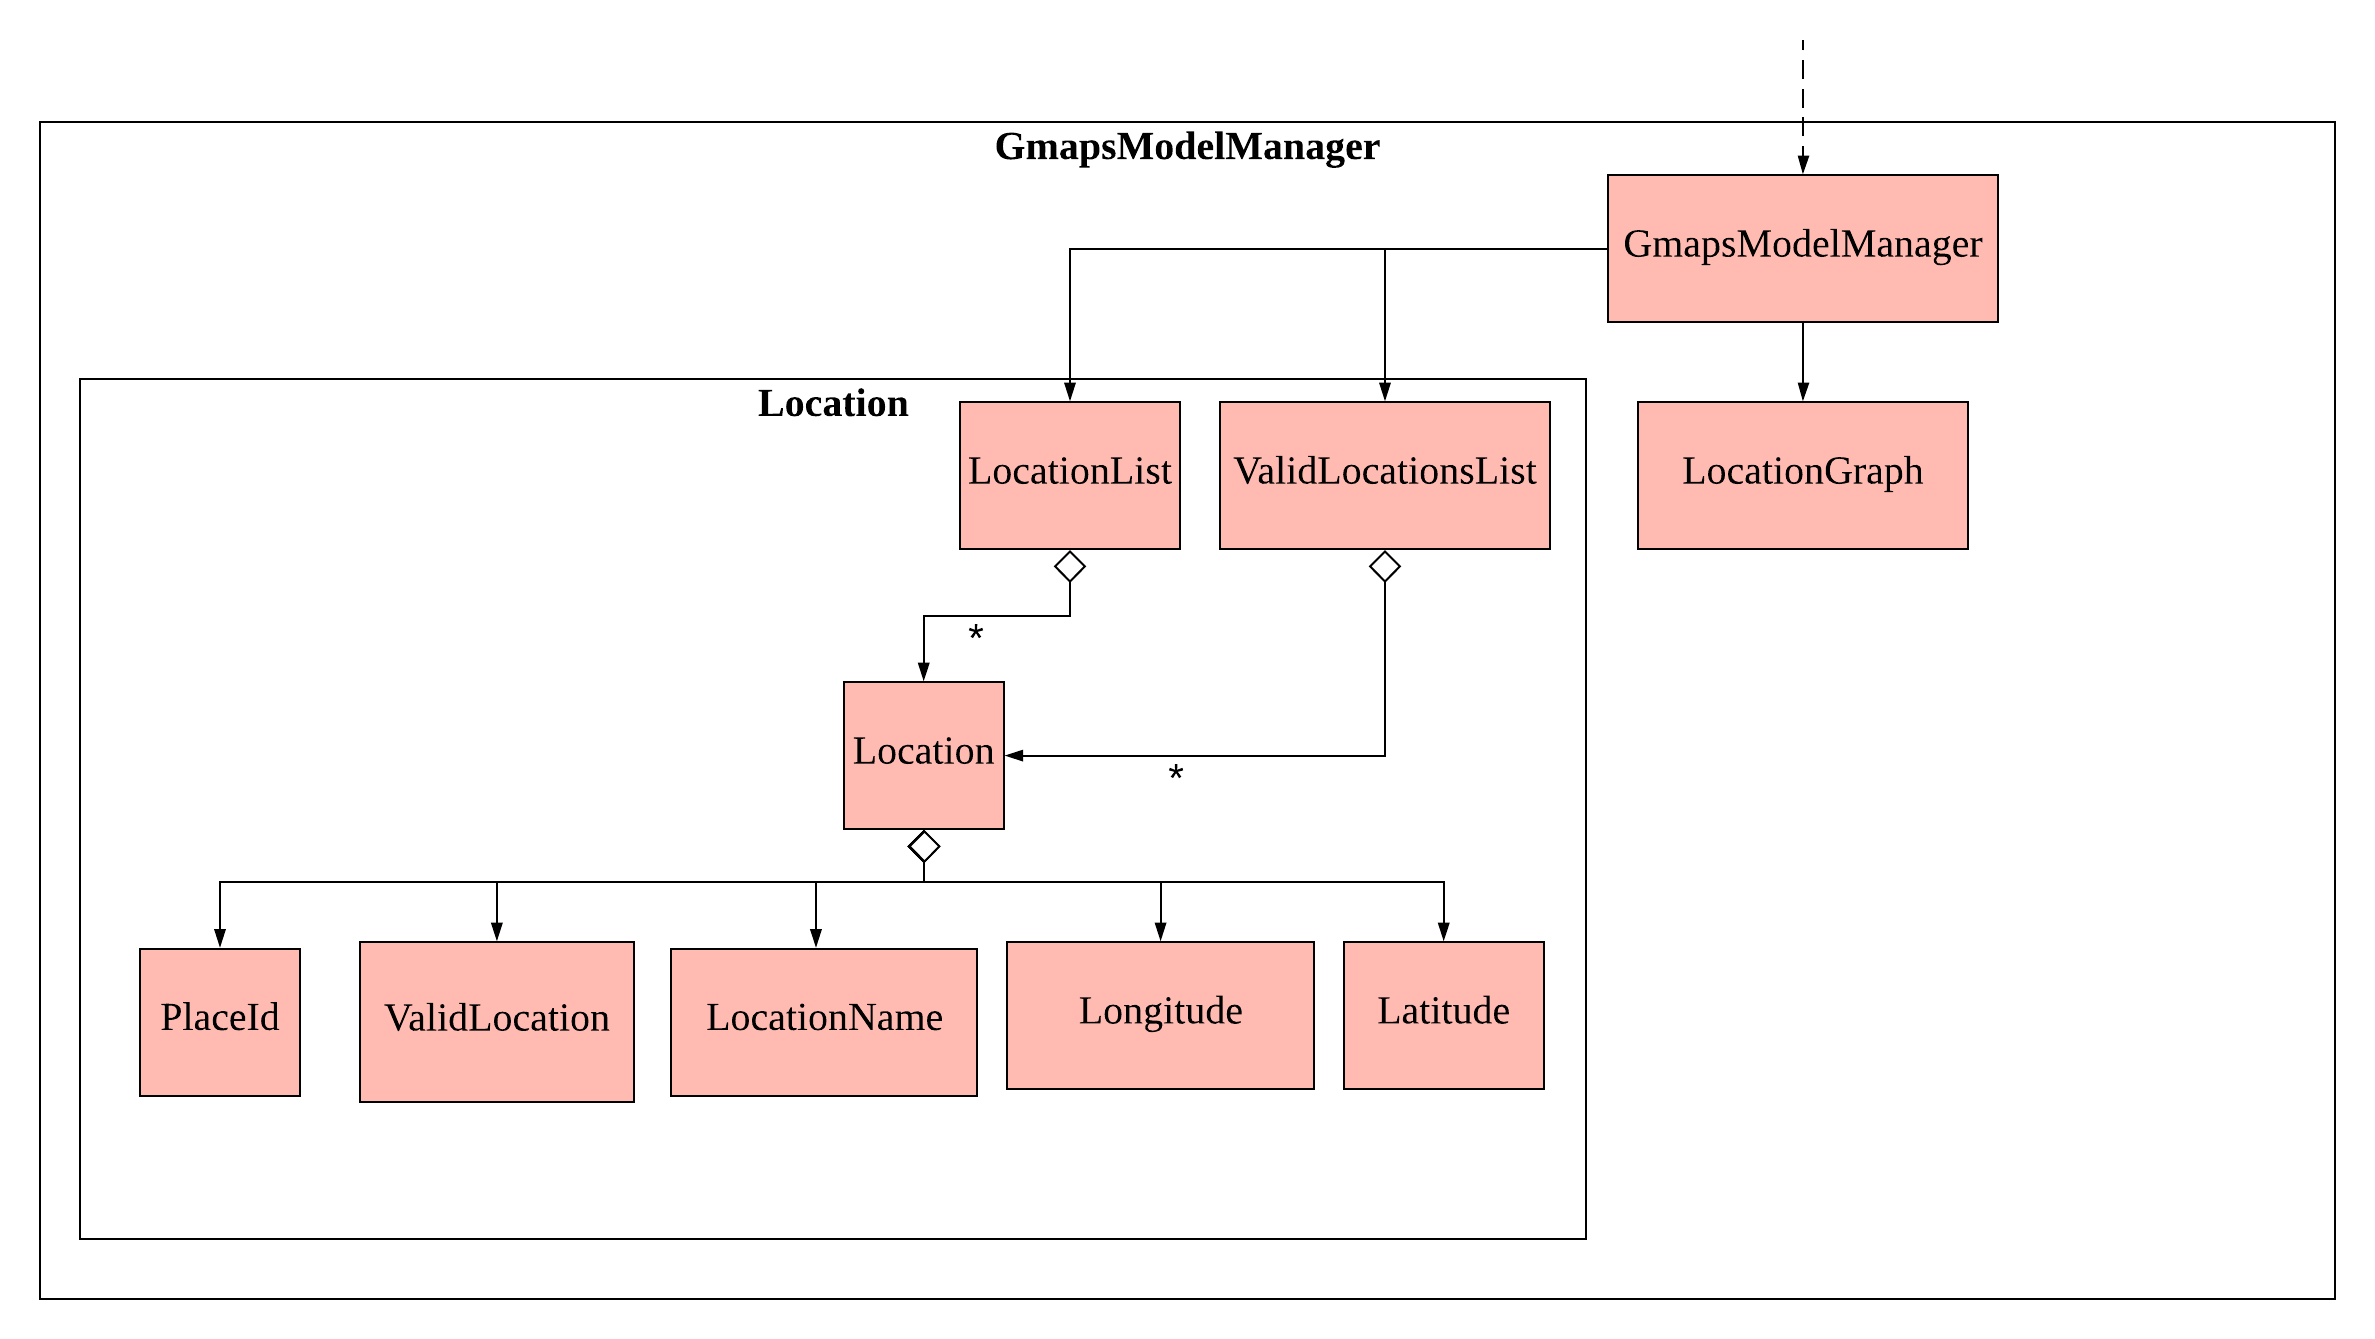
GmapsModelManagerobject which gets data related to Google Maps from the Api component and transforms them to be used by other components.
The following diagram provides a more detailed look into the TimeBook sub-component:
The following diagram provides a more detailed look into the ScheduleManager sub-component:
The following diagram provides a more detailed look into the NusModsData sub-component:
The following diagram provides a more detailed look into the Gmaps sub-component:
2.5. Storage component

API : Storage.java
The Storage component,
-
can save
UserPrefobjects in json format and read it back. -
can save the Time Book data in json format and read it back.
2.6. Api Component
The following diagram explains the design of the API component:
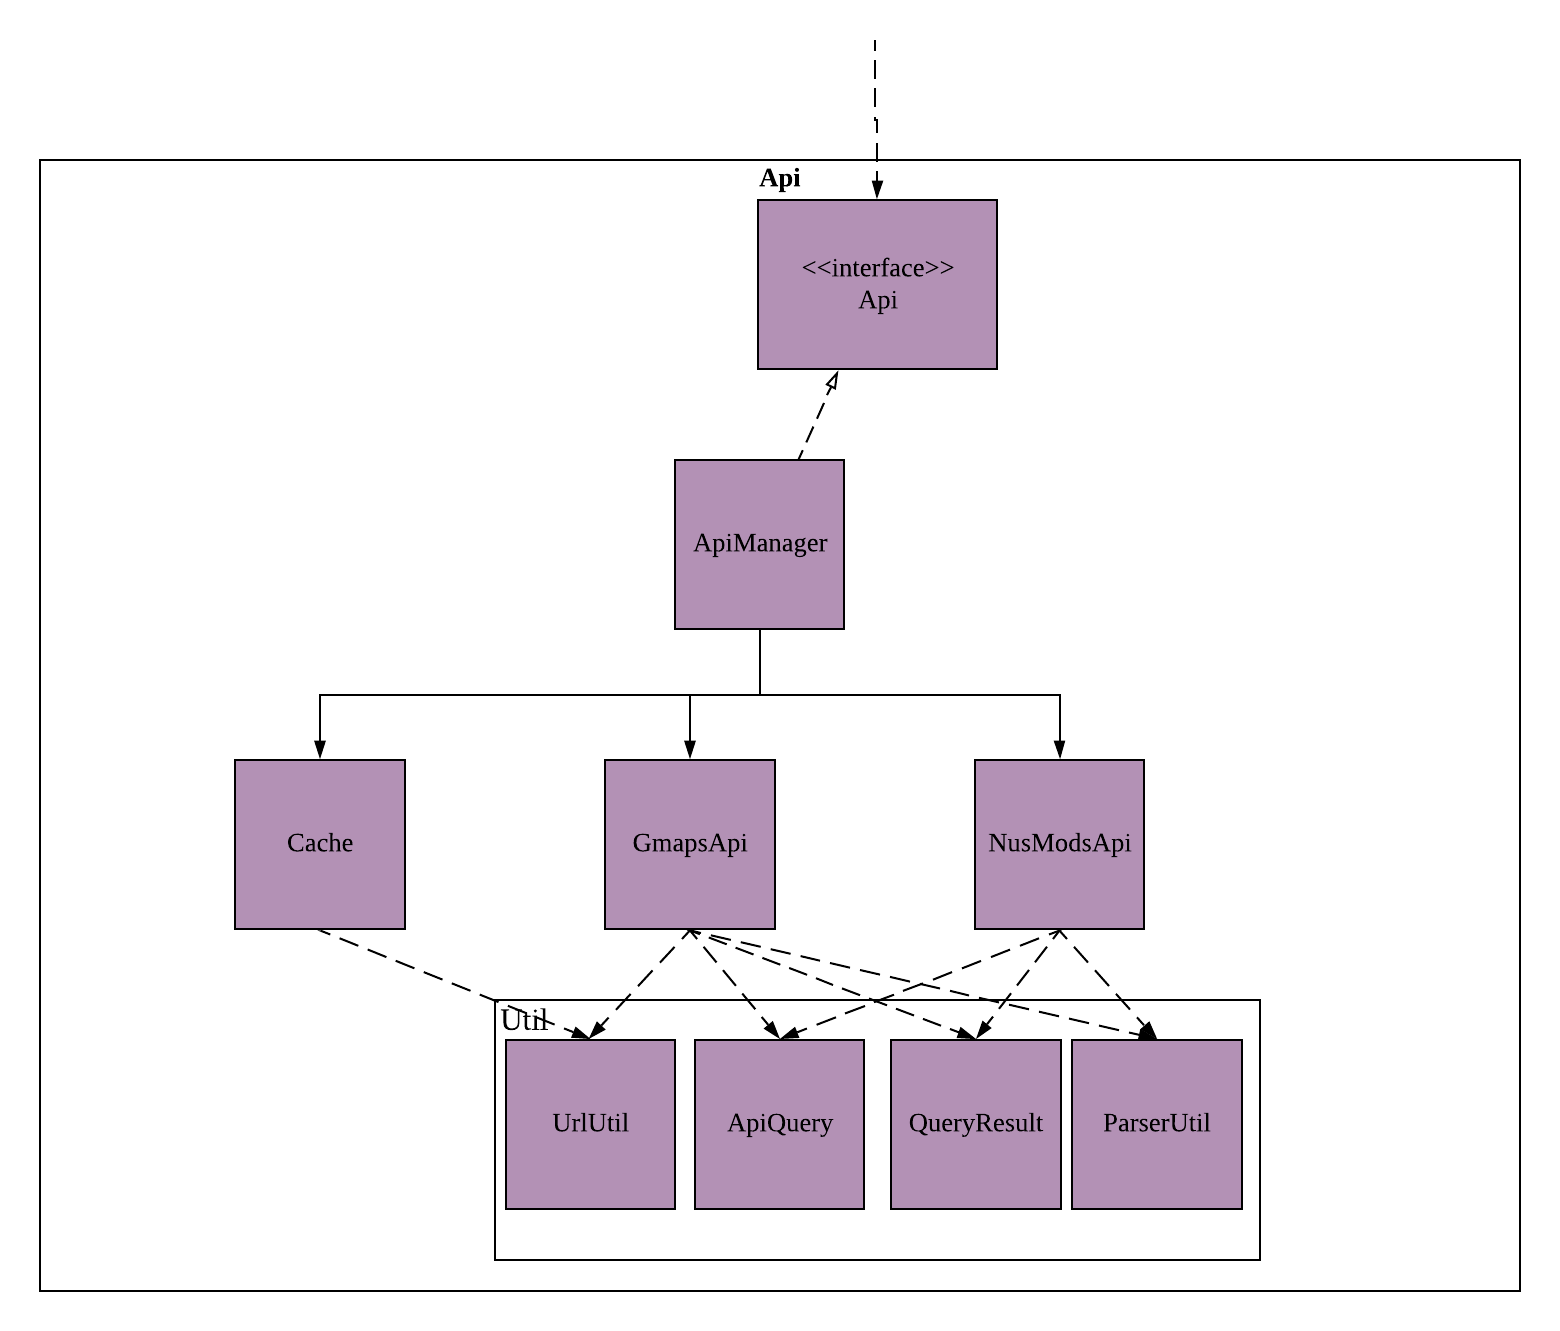
v2.0.
Currently there is no Api interface or ApiManager to manage the external interactions with other components. Other components are directly accessing static methods in the xxxApi classes and Cache class for accessing API data. We intend to refactor the component to make it more OOP as shown in the figure above in v2.0.
|
The Api,
-
handles queries to external APIs such as Google Maps and NUSMods.
-
handles caching of API results for limited connectivity support.
2.7. Common classes
Classes used by multiple components are in the seedu.address.commons package.
3. Implementation
This section describes some noteworthy details on how certain features are implemented.
3.1. Schedule Generator
The Schedule Generator feature allows users to generate a combined schedule of any number of people. It combines these schedules together, generates the common free time slots and packages it into a visual representation for the user.
This allows the user to quickly identify the common free time slots among the user and the members of the group.
3.1.1. Implementation
The Schedule Generator feature is facilitated by ScheduleManager. It implements the following operations:
-
ScheduleManager#updateScheduleWithPerson()-
This method takes in the following as inputs:
-
Personperson: the schedule of the person to be generated -
LocalDateTimetime: The start date and time of the schedule to be generated from -
ScheduleStatetype: The type of schedule to be generated
-
-
Generates a
ScheduleDisplayoftypeof theperson, spanning fromtimeto 4 weeks later -
Updates the ScheduleDisplay with the generated schedule
-
-
ScheduleManager#updateScheduleWithUser()-
This method takes in the following as inputs:
-
Useruser: The schedule of the user to be generated -
LocalDateTimetime: The start date and time of the schedule to be generated from -
ScheduleStatetype: The type of schedule to be generated
-
-
Generates a
ScheduleDisplayoftypeof theuser, spanning fromtimeto 4 weeks later -
Updates the ScheduleDisplay with the generated schedule
-
-
ScheduleManager#updateScheduleWithGroup()-
This method takes in the following as inputs:
-
Groupgroup: The schedule of the group to be generated -
ArrayList<Person>persons: The list of Person in the group -
ArrayList<PersonToGroupMapping>mappings: Represents the role of each Person in the group -
LocalDateTimetime: The start date and time of the schedule to be generated from -
ScheduleStatetype: The type of schedule to be generated
-
-
Generates a
ScheduleDisplayoftypeof thegroup, spanning fromtimeto 4 weeks later -
Generates the
FreeScheduleof thegroup -
Updates the ScheduleDisplay with the generated schedule
-
-
ScheduleManager#updateScheduleWithPersons()-
This method takes in the following as inputs:
-
ArrayList<Person>persons: The list of Person to generate the schedule from -
LocalDateTimetime: The start date and time of the schedule to be generated from -
ScheduleStatetype: The type of schedule to be generated
-
-
Generates a
ScheduleDisplayoftypeof the list ofperson, spanning fromtimeto 4 weeks later -
Generates the
FreeScheduleof the list ofperson -
Updates the ScheduleDisplay with the generated schedule
-
ScheduleDisplay is an object that contains all the schedule information to be shown to the user.
There are 3 types of ScheduleDisplays that extends from ScheduleDisplay.
The type of ScheduleDisplay that is generated is based on the ScheduleState.
-
PersonScheduleDisplay:-
A
ScheduleDisplayobject that only shows the Schedule of a singularPerson
-
-
HomeScheduleDisplay:-
A
ScheduleDisplayobject that shows the Schedule of theUserobject
-
-
GroupScheduleDisplay:-
A
ScheduleDisplayobject that shows the Schedule of a group ofPersonsincluding theUser -
It contains a
FreeScheduleobject that tells the user the commonFreeTimeslotsamong thePersonsin the group
-
3.1.2. Usage Scenario
Given below is an example usage scenario of how the ScheduleManager behaves when a schedule command is executed.
-
Step 1: User enters command-
User enters a command:
schedule n/NAME1 n/NAME2
-
-
Step 2: LogicManager parses the command-
The
TimeBookParser#parseCommandis called would parse the input and create a newScheduleCommandParserobject and calls theScheduleCommandParser#parsemethod to parse the command arguments -
The
ScheduleCommandParserwould parse the arguments into a List ofNameobjects (i.e. NAME1, NAME2) and create a newScheduleCommandwith the List ofNames. -
The
ScheduleCommandParserthen and returns theScheduleCommandtoLogicManager
-
-
Step 3: Execute the command-
LogicManagercallsScheduleCommand#executemethod -
ScheduleCommandcreates a new List ofPersons -
ModelManager#getUsermethod is called to get theUserobject andScheduleCommandadds it to the List ofPersons -
For each
Nameis the List ofNames,ModelManager#findPersonis called by supplying aNameobject to get thePersonobject specified by theNameobject. -
ScheduleCommandthen adds thePersoninto the List ofPersons -
ScheduleCommandcalls theModelManager#updateScheduleWithPersonsmethod with the List ofPersons
-
The following sequence diagram shows how the ScheduleCommand is executed:
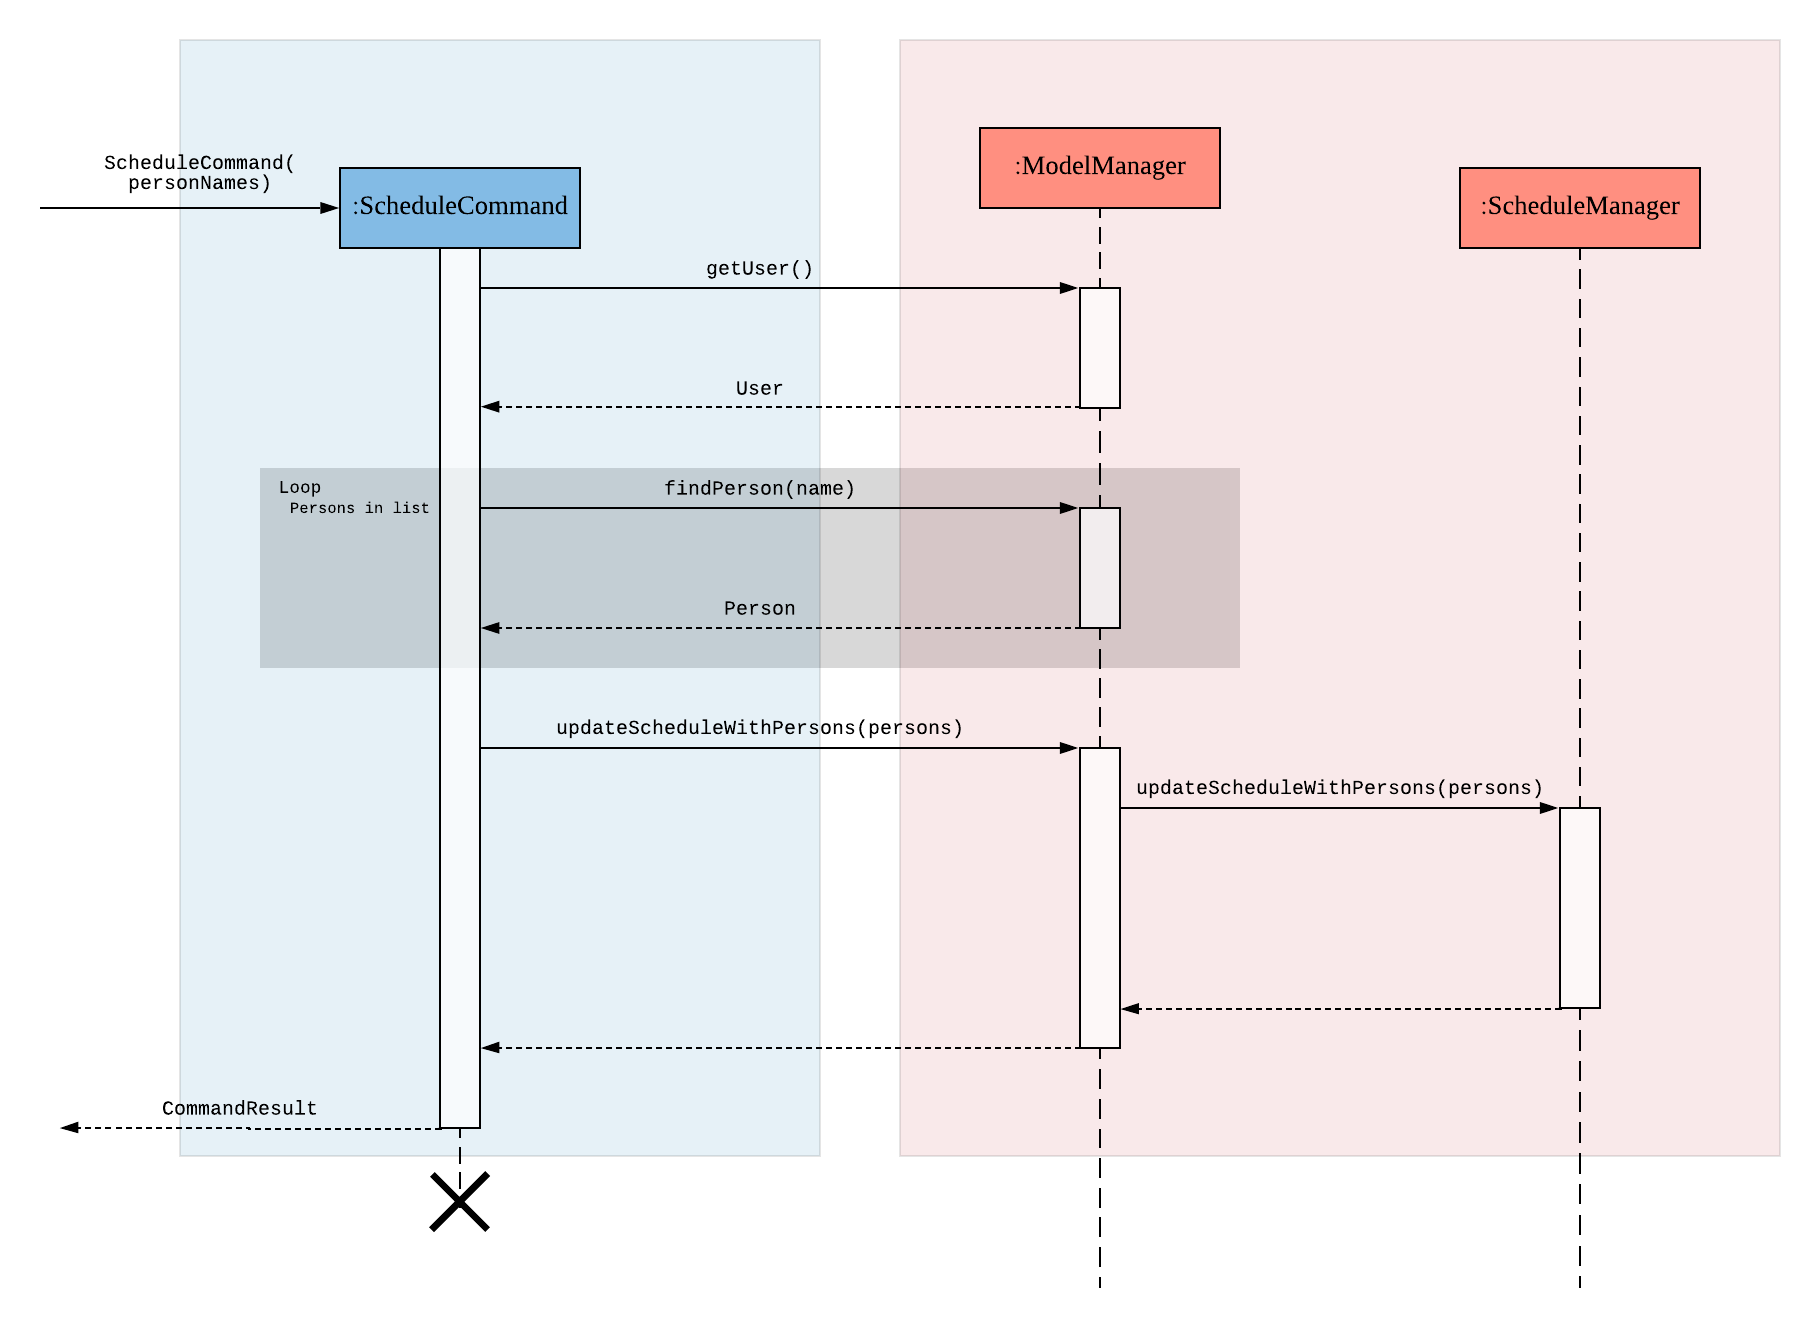
-
Step 4: Generate the Schedule-
ModelManagercalls theScheduleManager#updateScheduleWithPersonsmethod with the List ofPersons -
The
ScheduleManagernow generates the combined schedules of the List ofPersonsas well as the free time slots and packages it into aGroupScheduleDisplay-
This is done by first extracting the schedule and details of each person to generate a list of
PersonSchedule -
With the list of
PersonSchedule, the#generateFreeSchedulemethod is called and it will generate aFreeSchedule. AFreeSchedulewill contain all the details of eachFreeTimeslotsuch as previous location data of each person, start time and end time. -
The
ScheduleManagerthen packages all these information into aGroupScheduleDisplay
-
-
-
Step 5: Update the ScheduleDisplay-
ScheduleManagernow updates the currentScheduleDisplayto be shown to the user
-
The following sequence diagram shows how the ScheduleDisplay is generated:
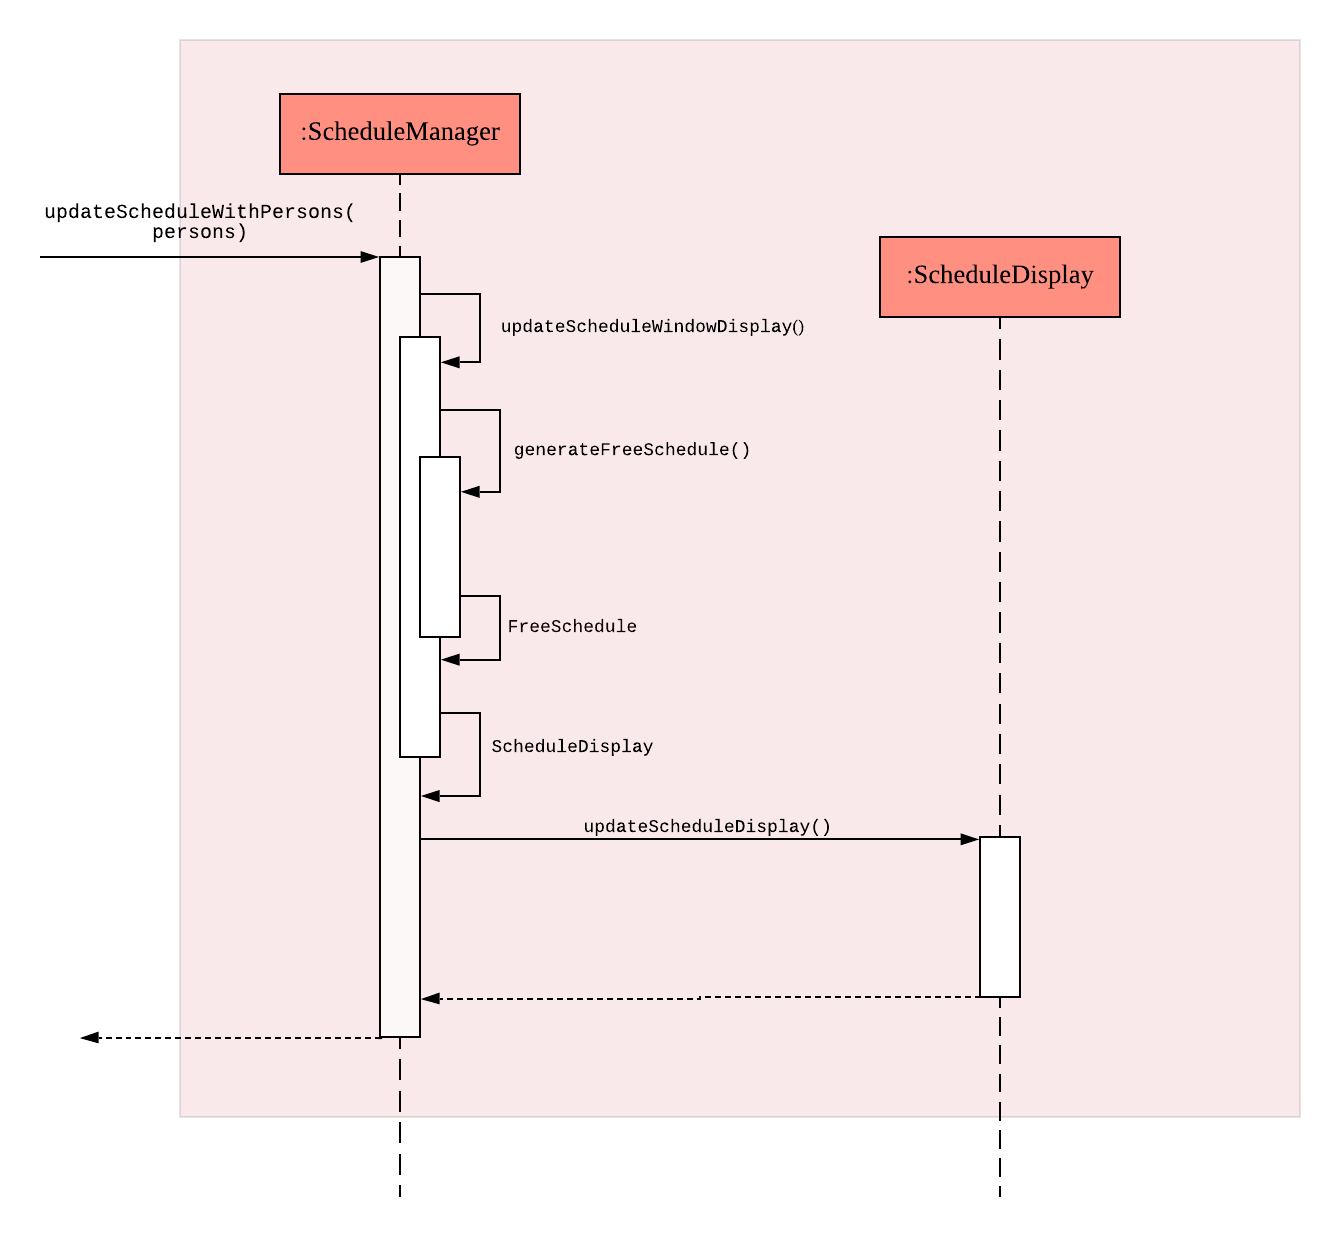
-
Step 6: Return feedback to user-
The
ScheduleCommandhas finished executing and returns aCommandResultwith the feedback to user toLogicManager
-
Apart from generating a GroupScheduleDisplay, the ScheduleManager is also able to generate
Schedules of a Person or a User as well.
The following activity diagram summarizes what happens when the ScheduleManager is invoked to
generate a ScheduleDisplay:
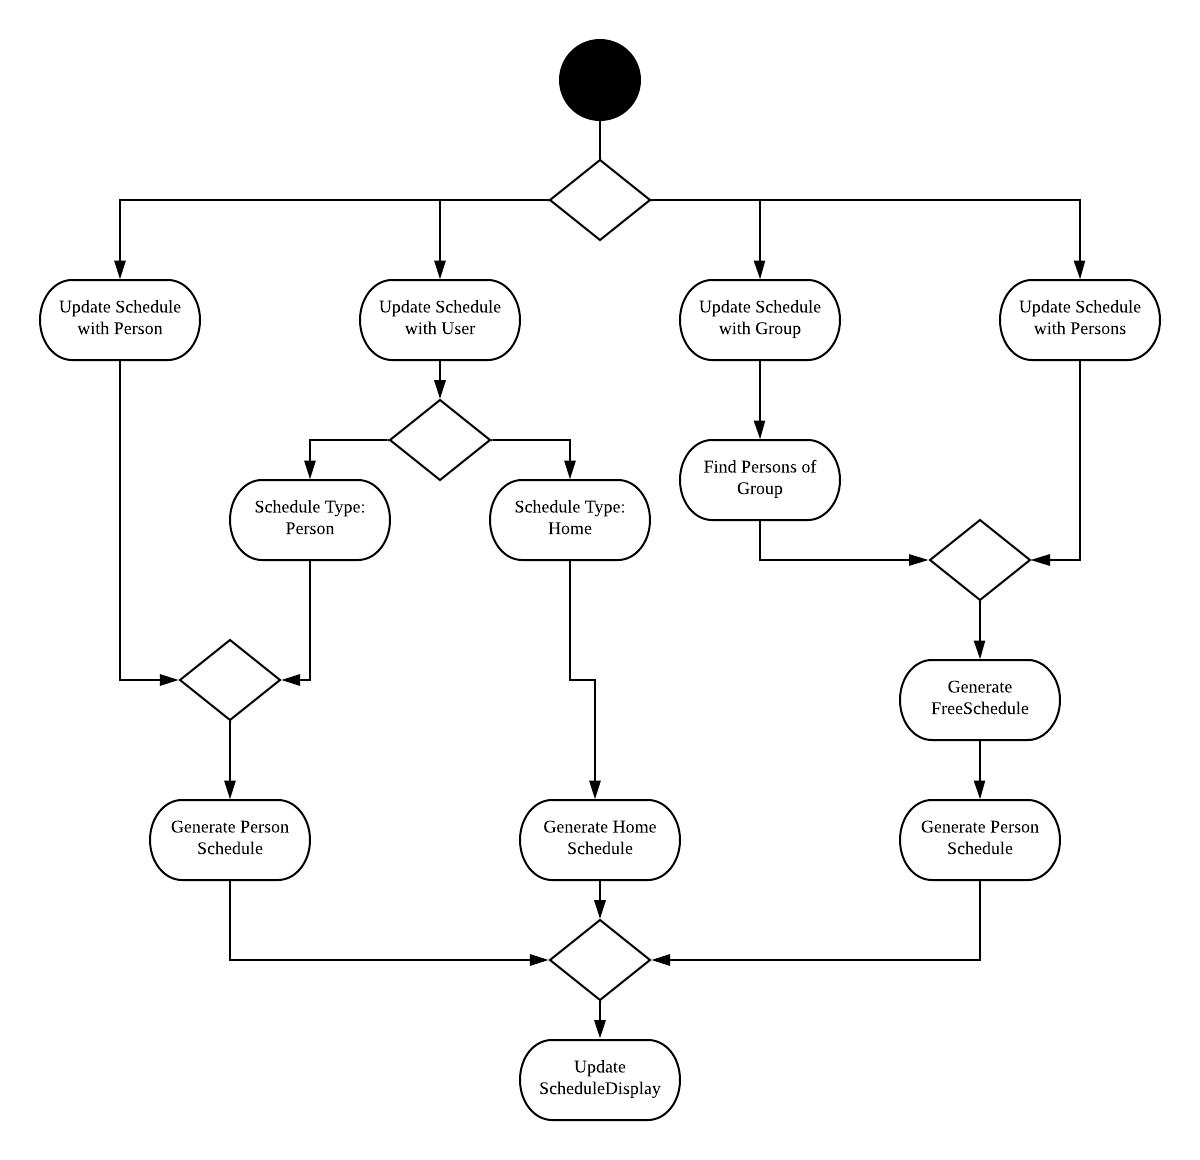
3.1.3. Design Considerations
Aspect: |
Choice |
Pros |
Cons |
How the |
1. Generates the |
1. Saves memory space, and does not need to compute the |
1. May have performance issues in runtime as the |
2. Upon startup, generate each Group’s |
1. Better runtime performance as the |
1. Will have perfomance issues in terms of memory usage. Each Group’s and Person’s |
3.2. Command Suggestions feature
3.2.1. Implementation
The command suggestions mechanism is facilitated by SuggestionLogic.
Through user-interface events provided by SuggestingCommandBox, it parses the command that was entered to provide context-sensitive suggestions.
It does this by identifying the commandWord (e.g. deleteperson, addperson, etc.) and arguments provided (e.g. n/Alice, g/CS2103T) and by using the caret position, provides command suggestions if the caret is located within the commandWord section or provides argument-specific suggestions by delegating to the Suggester registered for the specific commandWord.
Given below is an example usage scenario and how the command suggestions mechanism behaves at each step. Ultimately, this is what the user will see:

Step 1. The user types in the command deleteperson n/| and the SuggestingCommandBox UI class passes the command text (i.e. deleteperson n/) and the caret position index (i.e. 15) to SuggestionLogic.
The vertical line/pipe character (i.e. |) denotes the position of the caret and is not part of the entered command itself.So for the above example, the command entered is deleteperson n/ with the caret at the end of the command.
|
SuggestingCommandBox UI class passing UI data to the SuggestionLogic class to obtain suggestions.Step 2. The SuggestionLogic asks the TimeBookParser to tokenize the command text into its two parts: the commandWord and the arguments. This is needed so the SuggestionLogic knows which Suggester to use later.
Step 3. The SuggestionLogic then checks where the caret is currently positioned, either within the commandWord or within the arguments section. In this case, the caret is placed after the n/ so it is within the arguments section. To read how the behaviour changes if the caret was placed within the commandWord section, click here.
Step 4. The SuggestionLogic asks the static Suggester class which Prefixes are supported by the current commandWord (i.e. deleteperson) for tokenizing the arguments. This list of supported Prefixes, together with the command arguments, are passed to the static ArgumentTokenizer to parse it into an ArgumentList containing CommandArguments. Each CommandArgument contains the type of Prefix and the user-entered value.
Step 5. The SuggestionLogic then asks the static Suggester class to create the relevant Suggester object based on the commandWord. In this case, the static Suggester class returns a new DeletePersonCommandSuggester because the commandWord is deleteperson.
SuggesterStep 6. The SuggestionLogic asks the ArgumentList object which CommandArgument is currently selected based on the user’s caret position. In this case, it is the CommandArgument with the Prefix of PERSON_NAME and value of an empty string because the caret is positioned within the n/ text and no value has been entered.
CommandArgument is currently selected
Step 7. The SuggestionLogic asks for the suggestions from the DeletePersonCommandSuggester by providing three things to it. First, the current Model object, second the previously parsed ArgumentList object and finally, the CommandArgument to provide suggestions for. After obtaining the list of suggestions, the SuggestionLogic class returns it to the SuggestingCommandBox UI class for display.
The following sequence diagram condenses all the above diagrams into one, given the input deleteperson n/|:
deleteperson n/|The SuggestionLogic behaves differently when the caret position is within the commandWord section. The sequence diagram below shows the behaviour for the case of find|person n/. To read how the behaviour changes if the caret was placed within the arguments section, click here.
commandWord sectionThe result is the following:

commandWord sectionThe following activity diagram summarizes what happens when a user interacts with the command input box:
3.2.2. Design Considerations
Aspect: |
Choice |
Pros |
Cons |
How command suggestions gets its suggestions |
1. Ask |
1. Easy to implement. |
1. May have performance issues in terms of CPU and memory usage as |
2. Cache suggestions based on entered command and caret position |
1. Will use less CPU, may use less memory. |
1. Difficult to properly account for all the conditions that should cause a cache invalidation/recalculation of suggestions. |
|
Correctness of suggestions is preferred over additional CPU/memory usage as caching suggestions but improperly invalidating them can lead to user (and developer) confusion. In this design, |
|||
Aspect: |
Choice |
Pros |
Cons |
Data structure to pass around the command arguments |
1. Create an |
1. Provides |
1. Increased complexity in extracting command arguments for simpler |
2. Reuse |
1. We do not need to maintain a separate data structure due to reuse, and developers familiar with how |
1. |
|
The chosen design allows for more complex |
|||
3.3. Logging
We are using java.util.logging package for logging. The LogsCenter class is used to manage the logging levels and logging destinations.
-
The logging level can be controlled using the
logLevelsetting in the configuration file (See Section 3.4, “Configuration”) -
The
Loggerfor a class can be obtained usingLogsCenter.getLogger(Class)which will log messages according to the specified logging level -
Currently log messages are output through:
Consoleand to a.logfile.
Logging Levels
-
SEVERE: Critical problem detected which may possibly cause the termination of the application -
WARNING: Can continue, but with caution -
INFO: Information showing the noteworthy actions by the App -
FINE: Details that is not usually noteworthy but may be useful in debugging e.g. print the actual list instead of just its size
3.4. Configuration
Certain properties of the application can be controlled (e.g user prefs file location, logging level) through the configuration file (default: config.json).
3.5. Visual Representation of individual’s or group’s schedule
Visual representation here refers to the graphics you see when you view a group or an individual’s schedule in TimeBook. We will first describe how the graphics are created.
All of these graphics are created in the ScheduleView class. The object oriented domain model below illustrates the problem domain of the ScheduleView class in TimeBook.
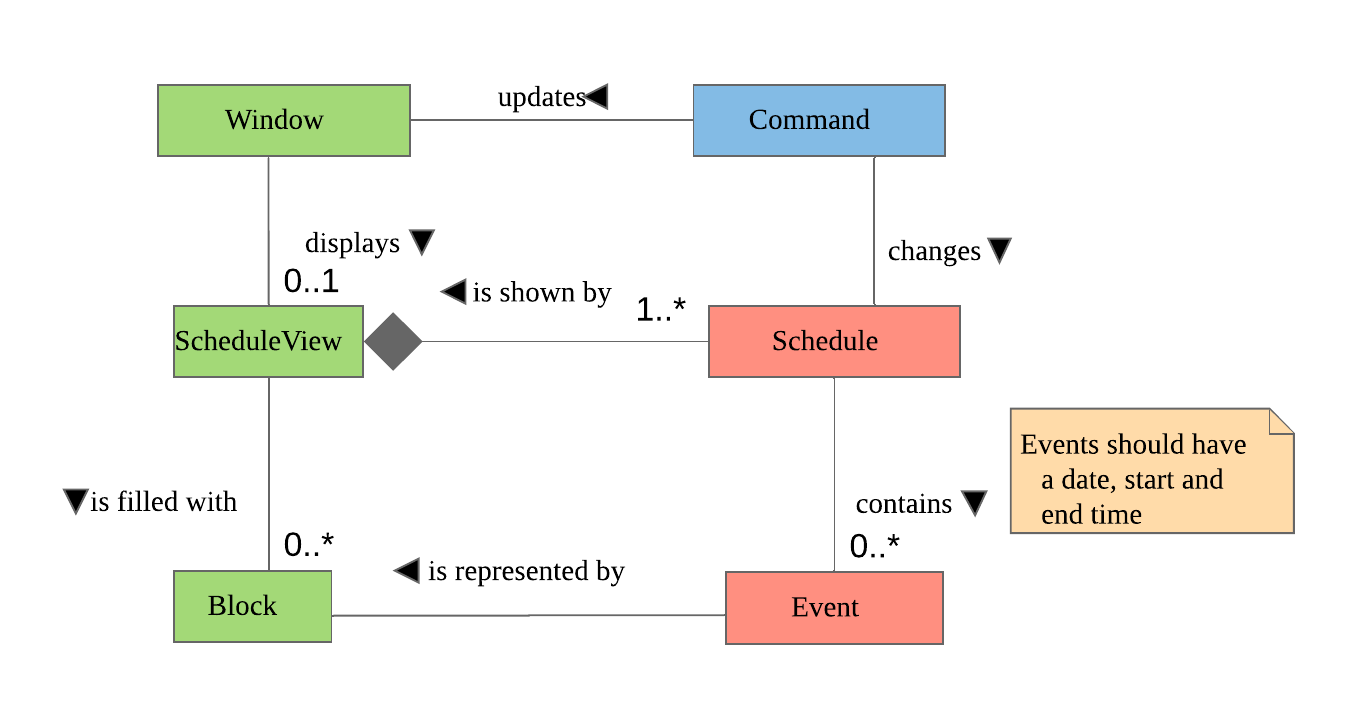
ScheduleView.The ScheduleView class in TimeBook follows the above model closely. Let’s walk you through how the graphics are created.
-
Following the model, we have a class
PersonTimeslotthat behaves like an event time slot. EachPersonTimeslotobject thus have a date, a start time and an end time. -
Separate the given
PersonTimeslotobjects into lists by dates and sort the time slots according to start times. Each list acts as aSchedulefor a particular date. -
For each date, create a VBox (a container to to stack
Blockobjects vertically). Eventually, each VBox will contain all the time slot blocks for the a particular date.-
Condition: If the first
PersonTimeslotin the list starts after 8am (TimeBook’s schedule start time), stack an emptyBlockin the VBox with the same height as the duration between 8am and the start time of thisPersonTimeslotobject to represent the initial offset region.
-
-
Loop through each
PersonTimeslotobject in the list, stack a colouredBlockin the same VBox. Each of theBlockshould have the same height as the duration between the start and end time of its correspondingPersonTimeslotobject. -
Stack in empty
Blockto fill the gaps between the end time of the currentPersonTimeslotand the start time of the nextPersonTimeslotin the list.
Now that you have seen how the graphics for TimeBook are created, the next step would be to control what graphics to show. As such,
we made use of an abstract class ScheduleViewManager to control the creation of ScheduleView objects.
The two classes that extend from ScheduleViewManager are IndividualScheduleViewManager and GroupScheduleViewManager.
The following methods are implemented in ScheduleViewManager to control the schedules displayed in the window.
-
ScheduleViewManager#getInstanceOf(ScheduleDisplay)— Instantiates theScheduleViewManagerwith a givenScheduleDisplayobject. TheScheduleDisplayobject contains all the information needed to generate a schedule view. -
ScheduleViewManager#scrollNext()— Scrolls the schedule shown down. Once it reaches the bottom, it will start back at the top. -
ScheduleViewManager#toggleNext()— Modifies the schedule shown to show the next week’s schedule. The schedule shown can at most show up to 4 weeks in advance. Once the fourth week is reached, it will start back at the first week. -
ScheduleViewManager#filterPerson(List<Name>)Filters the schedule shown to the given list of names. This method only works when the schedule shown belongs to group.
A sample usage of the ScheduleViewManager is described below.
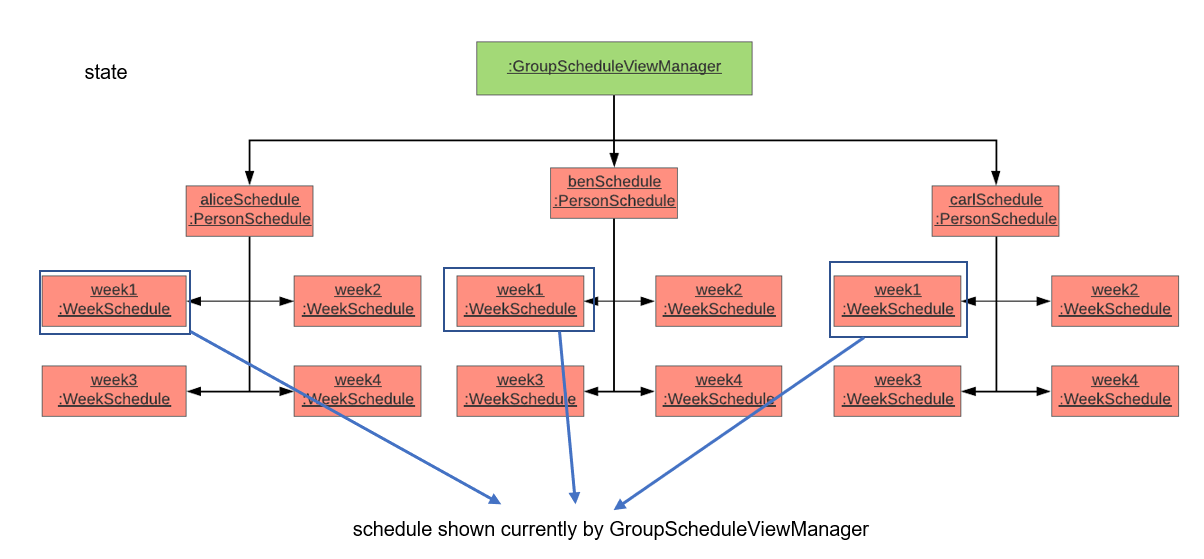
Step 1. The user wants to view a group called "Three musketeers" consisting of 3 members, Alice, Ben and Carl in TimeBook and executes the command
show g/Three musketeers in the command line. The state of ScheduleViewManager will be initialised to show only the group’s schedule for the first week as shown in the object diagram below.
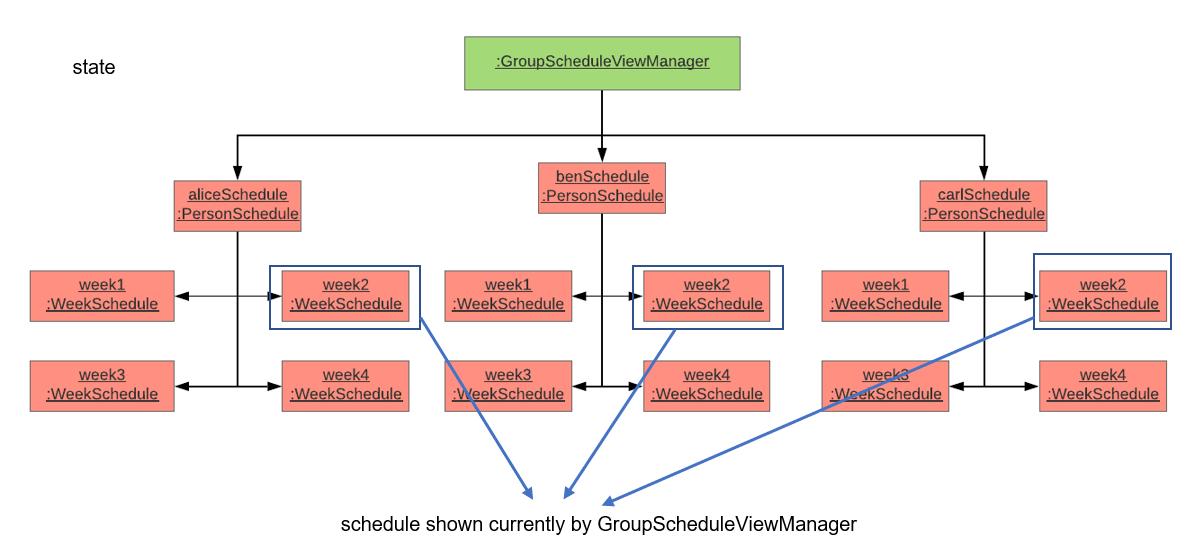
show command is executed.Step 2. Suppose the user thinks that arranging a group meeting on the first week is too rushed, so he executes the togglenext command to view the group’s schedule for the next week.
The state of ScheduleViewManager is then modified to show the second week of the group’s schedule as shown in the diagram below.
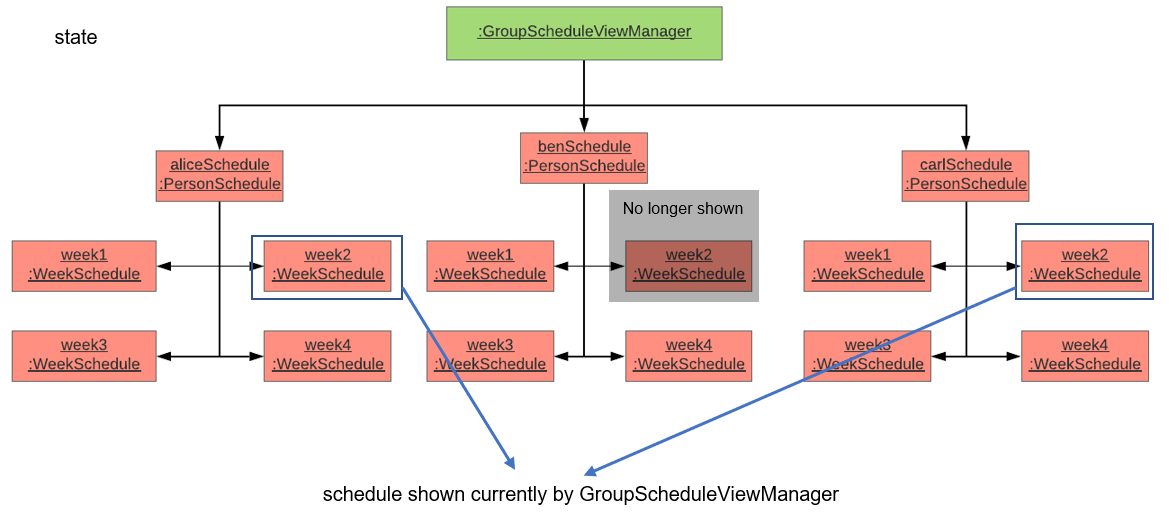
togglenext command is executed.Step 3. Suppose the user now wants to inspect some of his group members' schedules, and he executes the lookat command to inspect Alice’s and Carl’s schedules.
The state of ScheduleViewManager is once again modified to only show the specified group members' schedules in the object diagram below.
lookat command is executed.Now that we have the full picture of how the graphics are created and controlled, we are ready to show how the user obtain a visual representation of a person or group’s schedule using the show command.
The following sequence diagram shows the sequence of events that lead to changes in the UI when an example of the show command is executed for a group called CS2103.
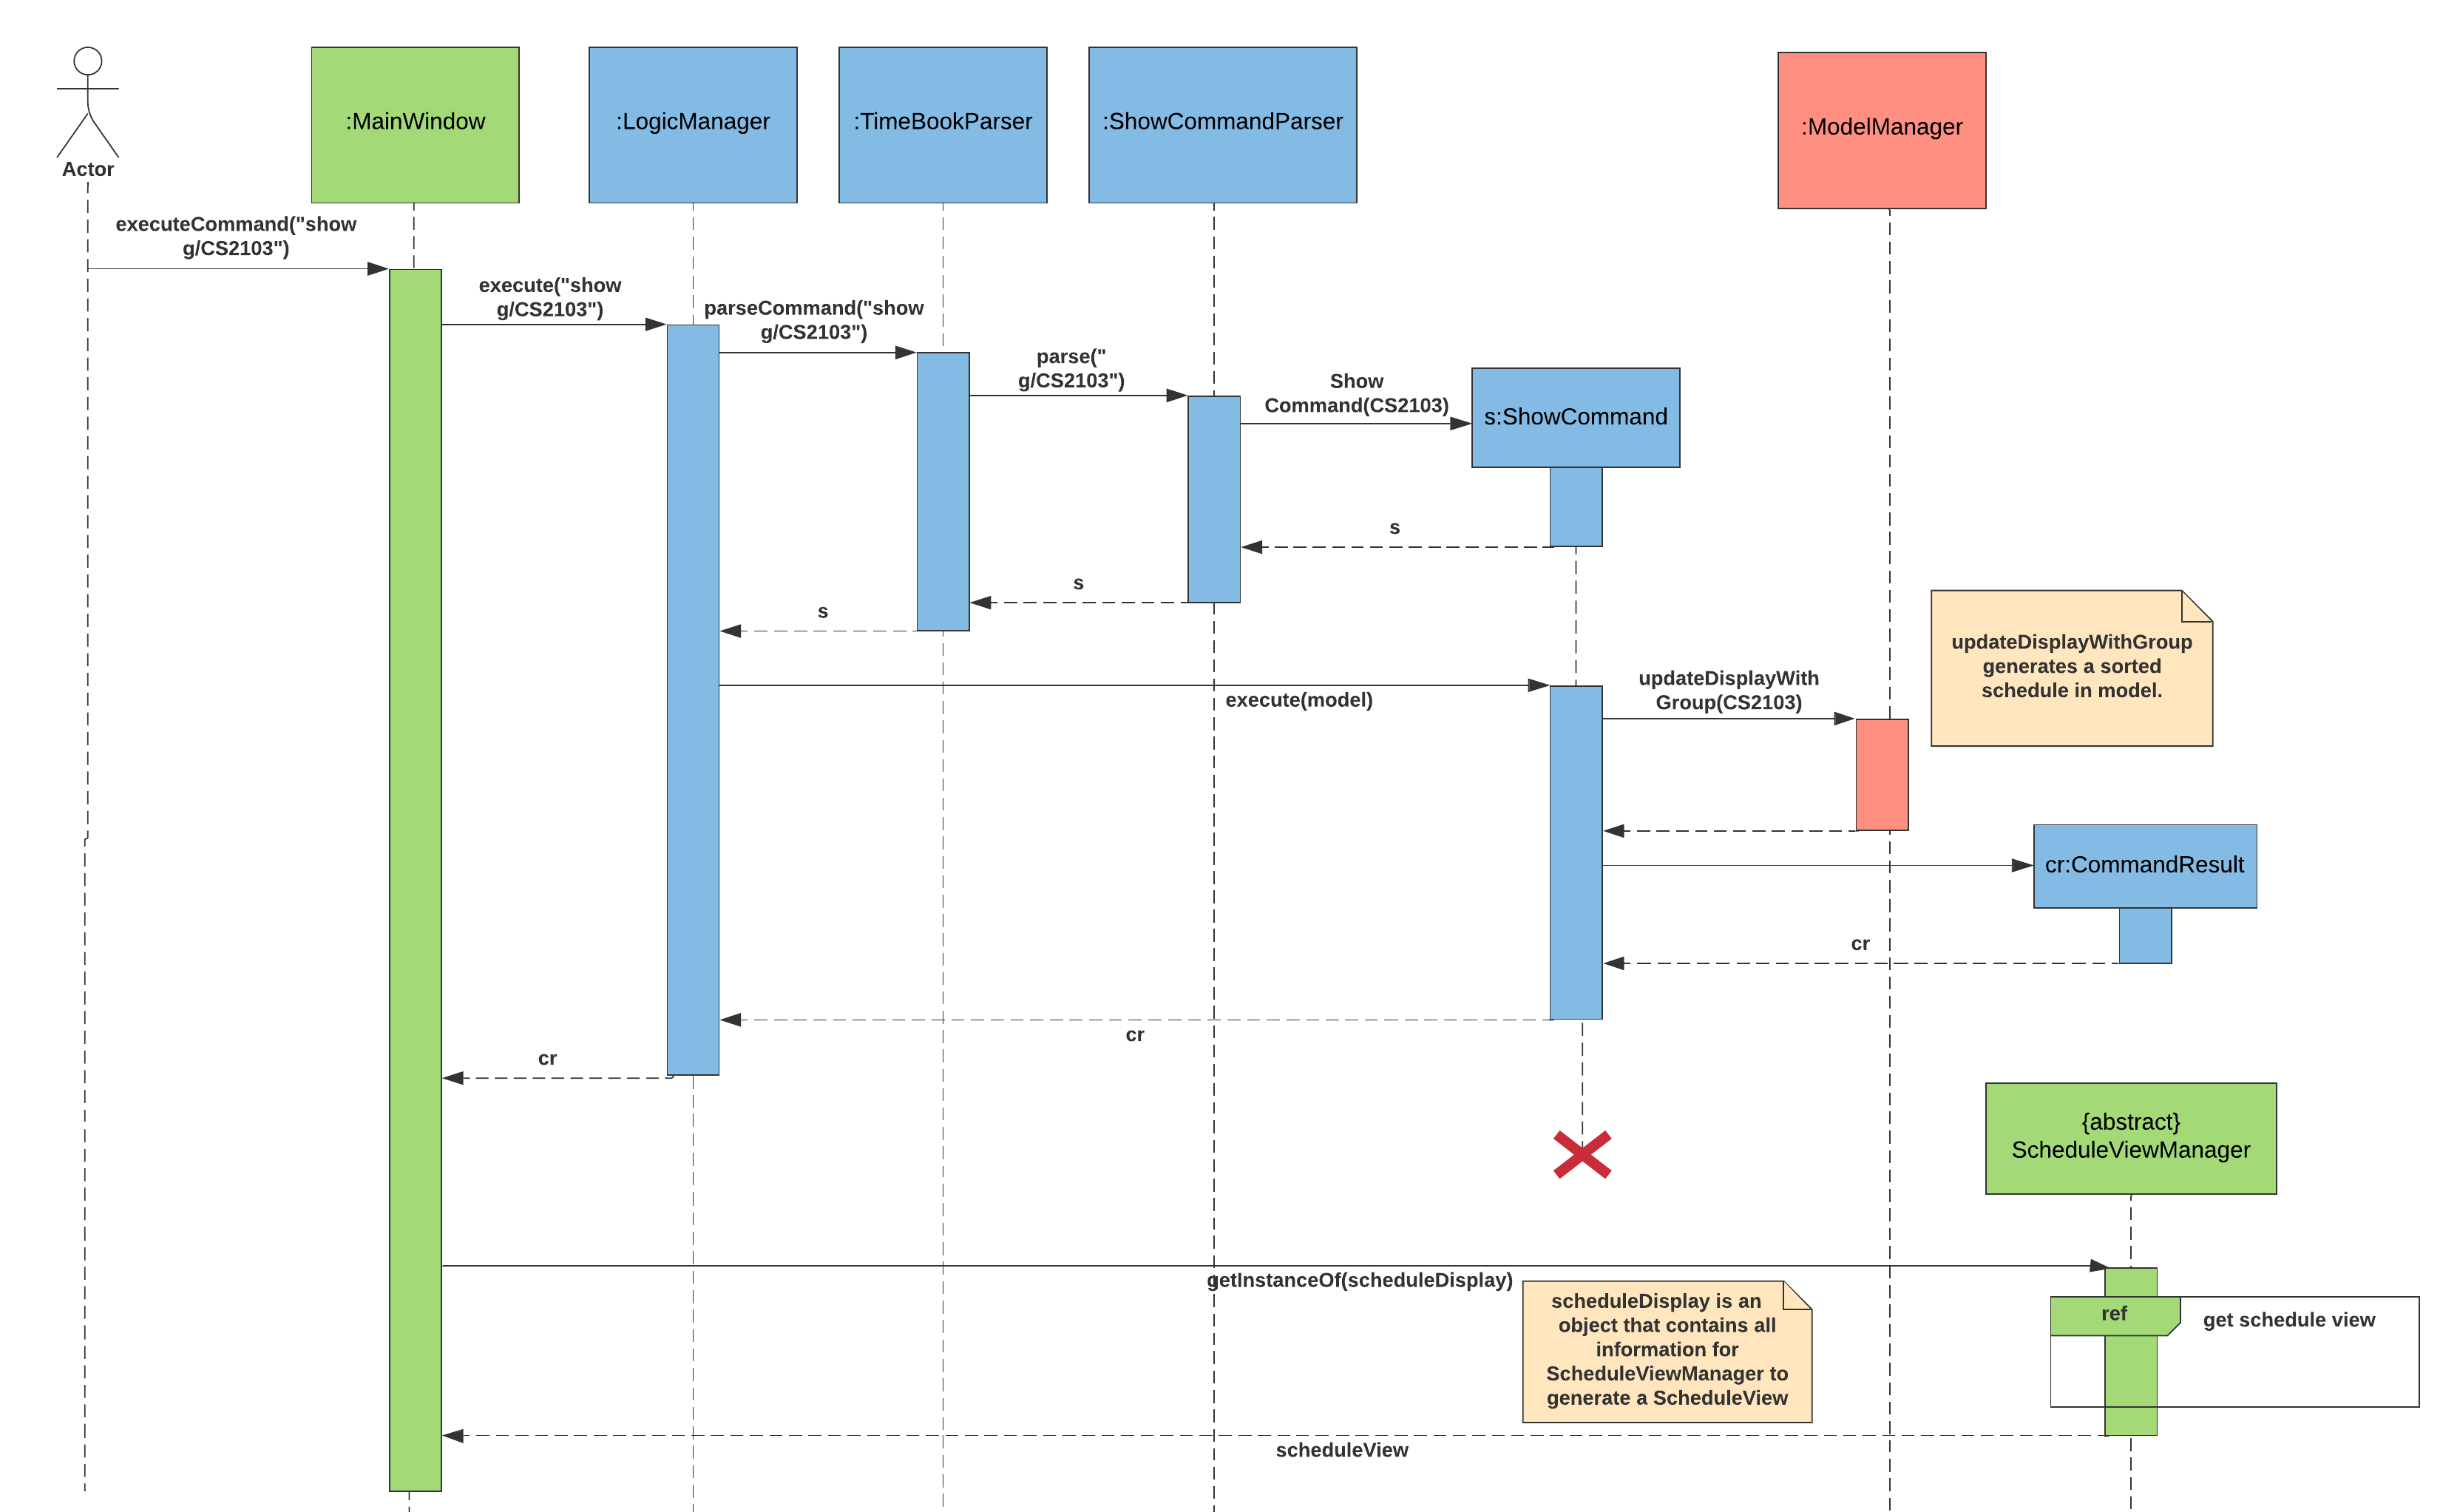
show command.In order to make the diagram look less messy, a reference diagram shown below is created to show what happens in the get schedule view frame.
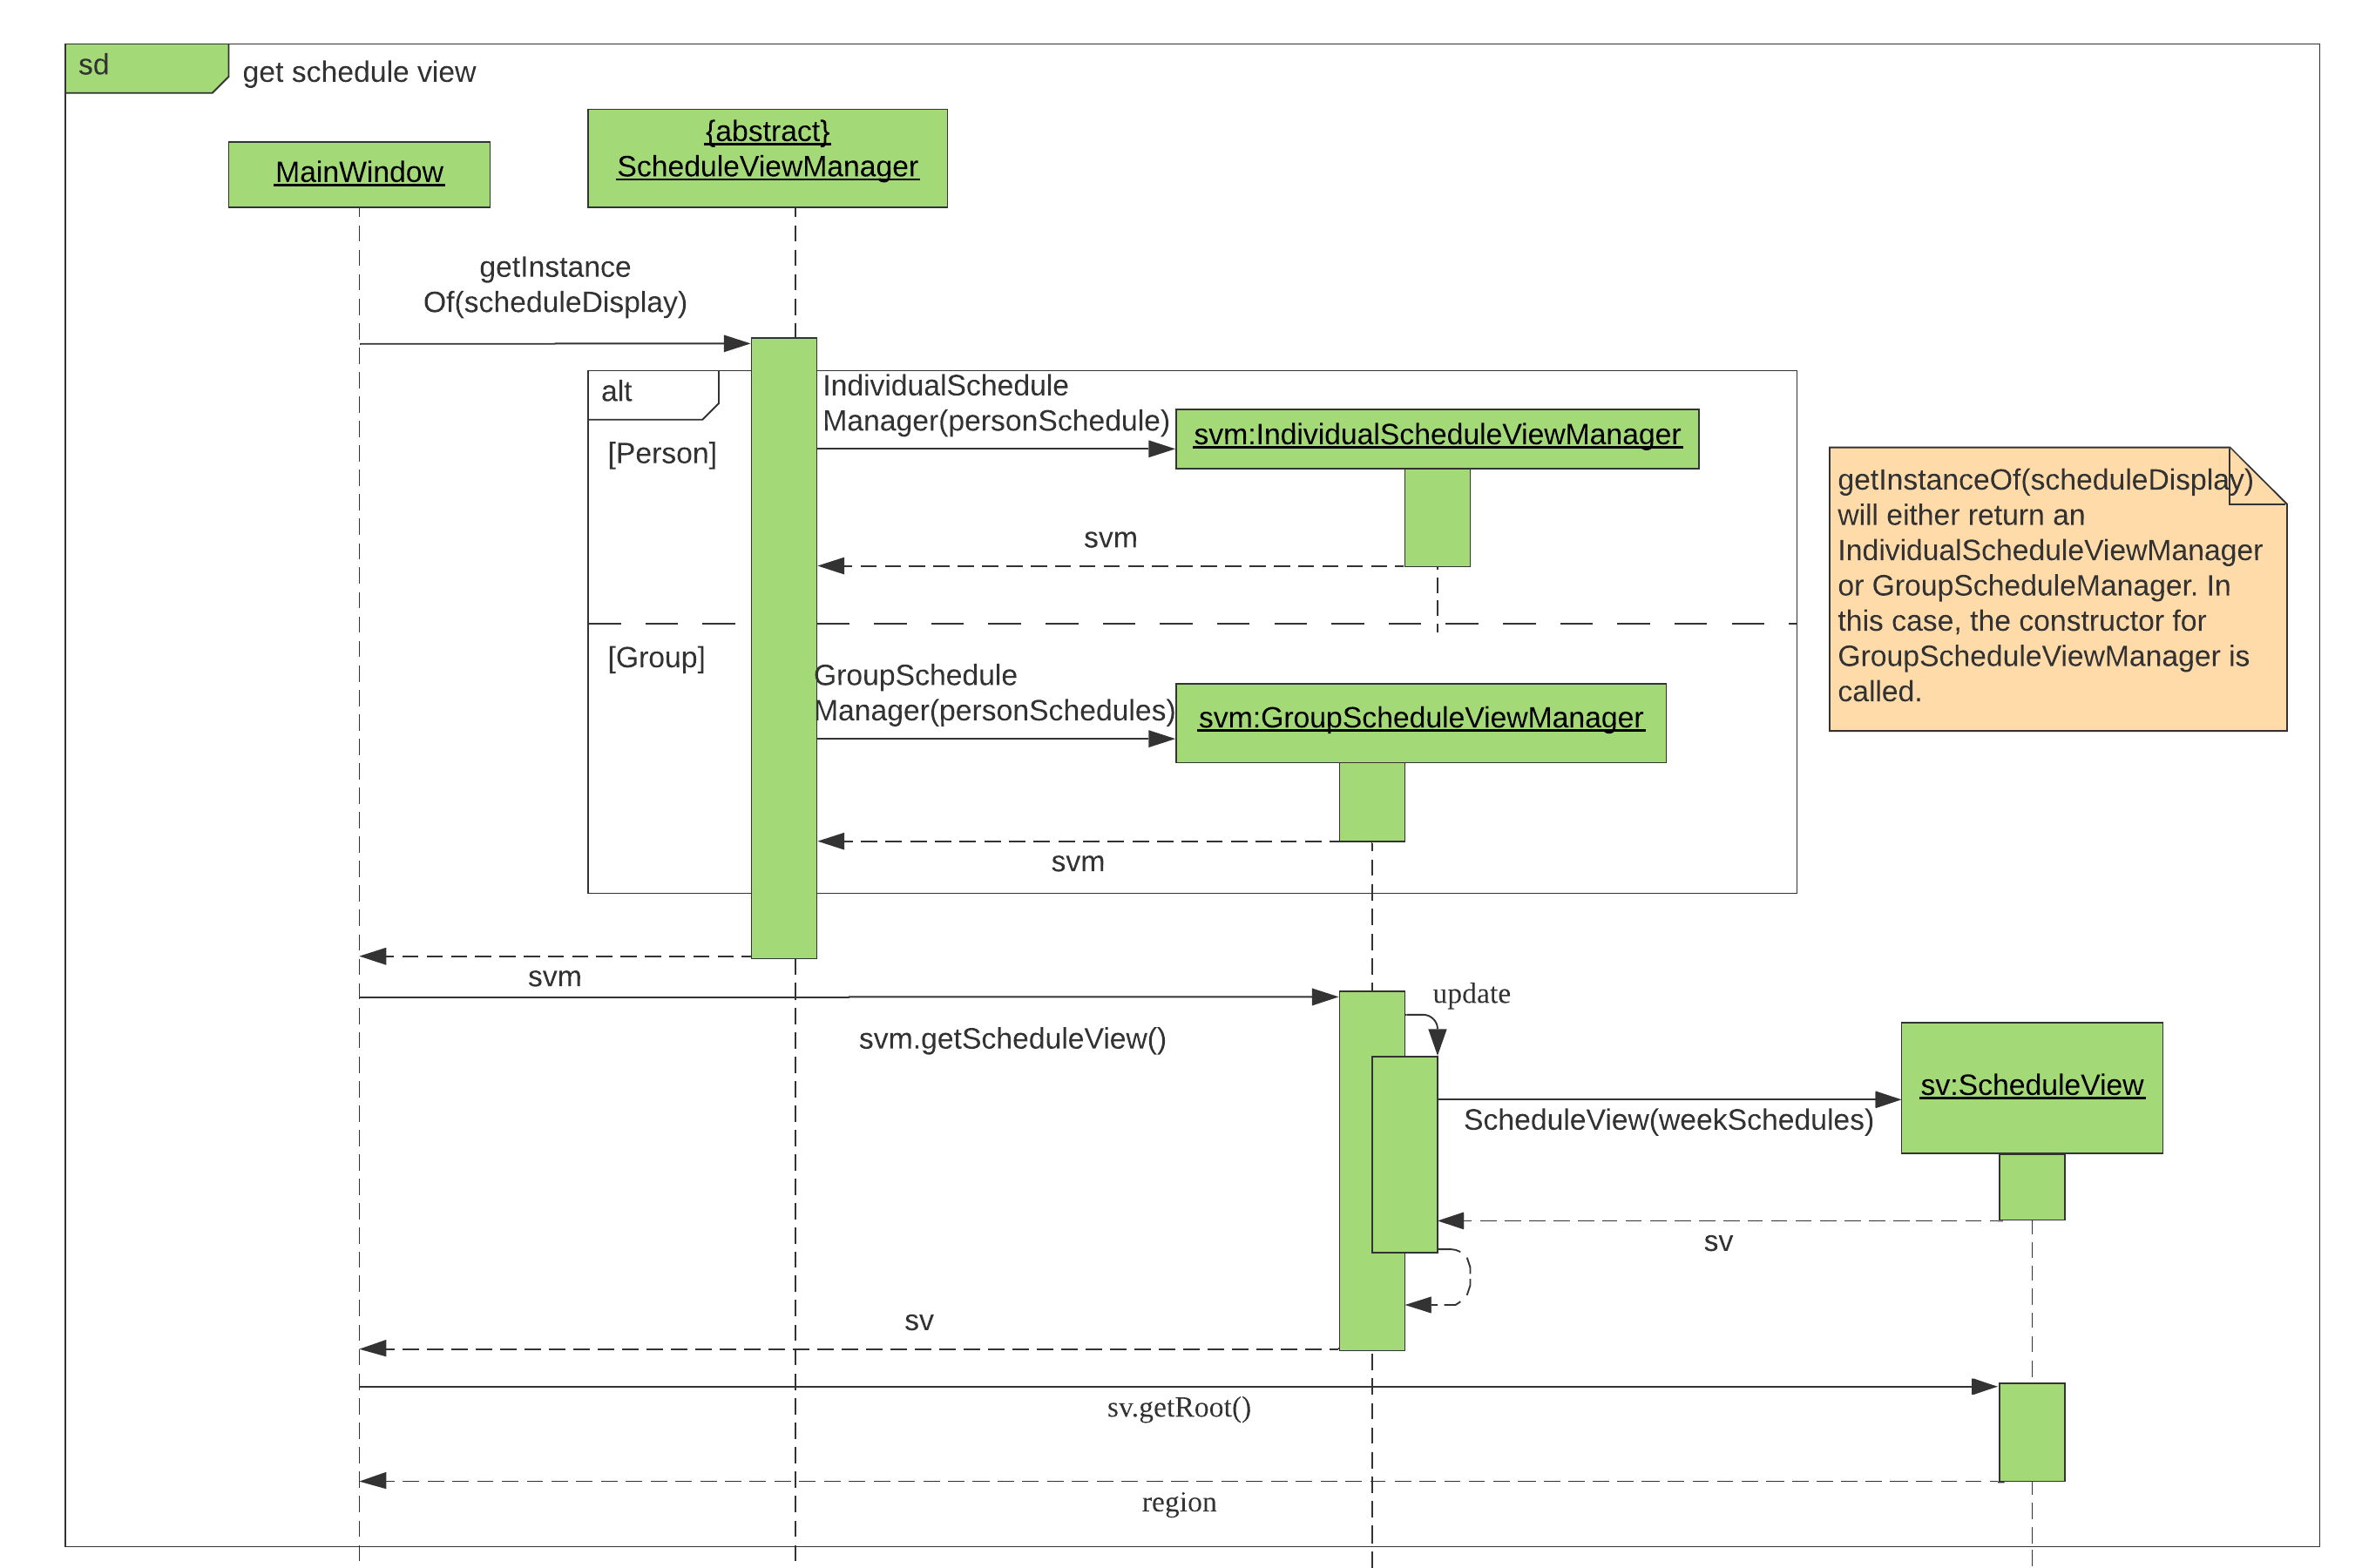
Details of how the graphics are created within the ScheduleView have been described above and thus, are omitted in the diagram.
3.5.1. Design Considerations
Aspect: |
Choice |
Pros |
Cons |
Amount of detail present in schedule view. |
1. Enable users to see schedules up to 1 week in advance. |
1. Easy to implement. 2. Less likely for bugs when invoking other commands such as select and popup. |
1. Users may experience difficulty to plan meetings 2 or more weeks in advance. |
2. Enable users to see schedules up to 4 weeks in advance. (Current choice) |
1. Most users should be able to plan most of their meetings. |
1. Slightly more challenging to implement. 2. Slower as each request will take 4 times as long. |
|
2. Enable users to see schedules up to an indefinite weeks in advance. |
1. Every users should be able to plan their meetings. |
1. Slow requests as every query will regenerate a new set of graphics. |
|
We chose to allow users to see schedules up to 4 weeks in advance mainly due to usability. We recognise that most group meetings do not happen within a short period of 1 week as it may seem rushed for everyone in a group. We also found that it is unnecessary to enable users to see their schedules after the 1 month mark since it is most likely to not have been updated yet. Thus, showing schedules for up to 4 weeks should be sufficient for our design. |
|||
Aspect: |
Choice |
Pros |
Cons |
Viewing some group member’s schedule in a group using the |
1. Filter, but do not recalculate the free time slot to the filtered group members from the command. (Current choice) |
1. Easier to implement.. 2. User can still keep track of the entire group’s schedule. |
1. Users may be misled to think that the |
2. filters, recalculate and display the common free time slot for the filtered members. |
1. There will not be any misleading empty blocks in a group’s schedule. |
1. Difficult to implement. 2. Each query will take a lot longer to process the locations data. |
|
We understand that users may want to inspect the schedules of some of his or her group members while still keeping track of the entire group’s common free time slots. This would be useful for users who want to organise partial group meetings with some of his or her group members before or after the official group meeting (where everyone attends). Furthermore, filtering a group member can easily be done by just creating a new group and adding group members to it. |
|||
3.6. Closest Common Location
Closest common location utilises Google Maps API to get the best center location to meet for a group project meeting. We define this location as Closest Common Location. Below is an example of this feature.
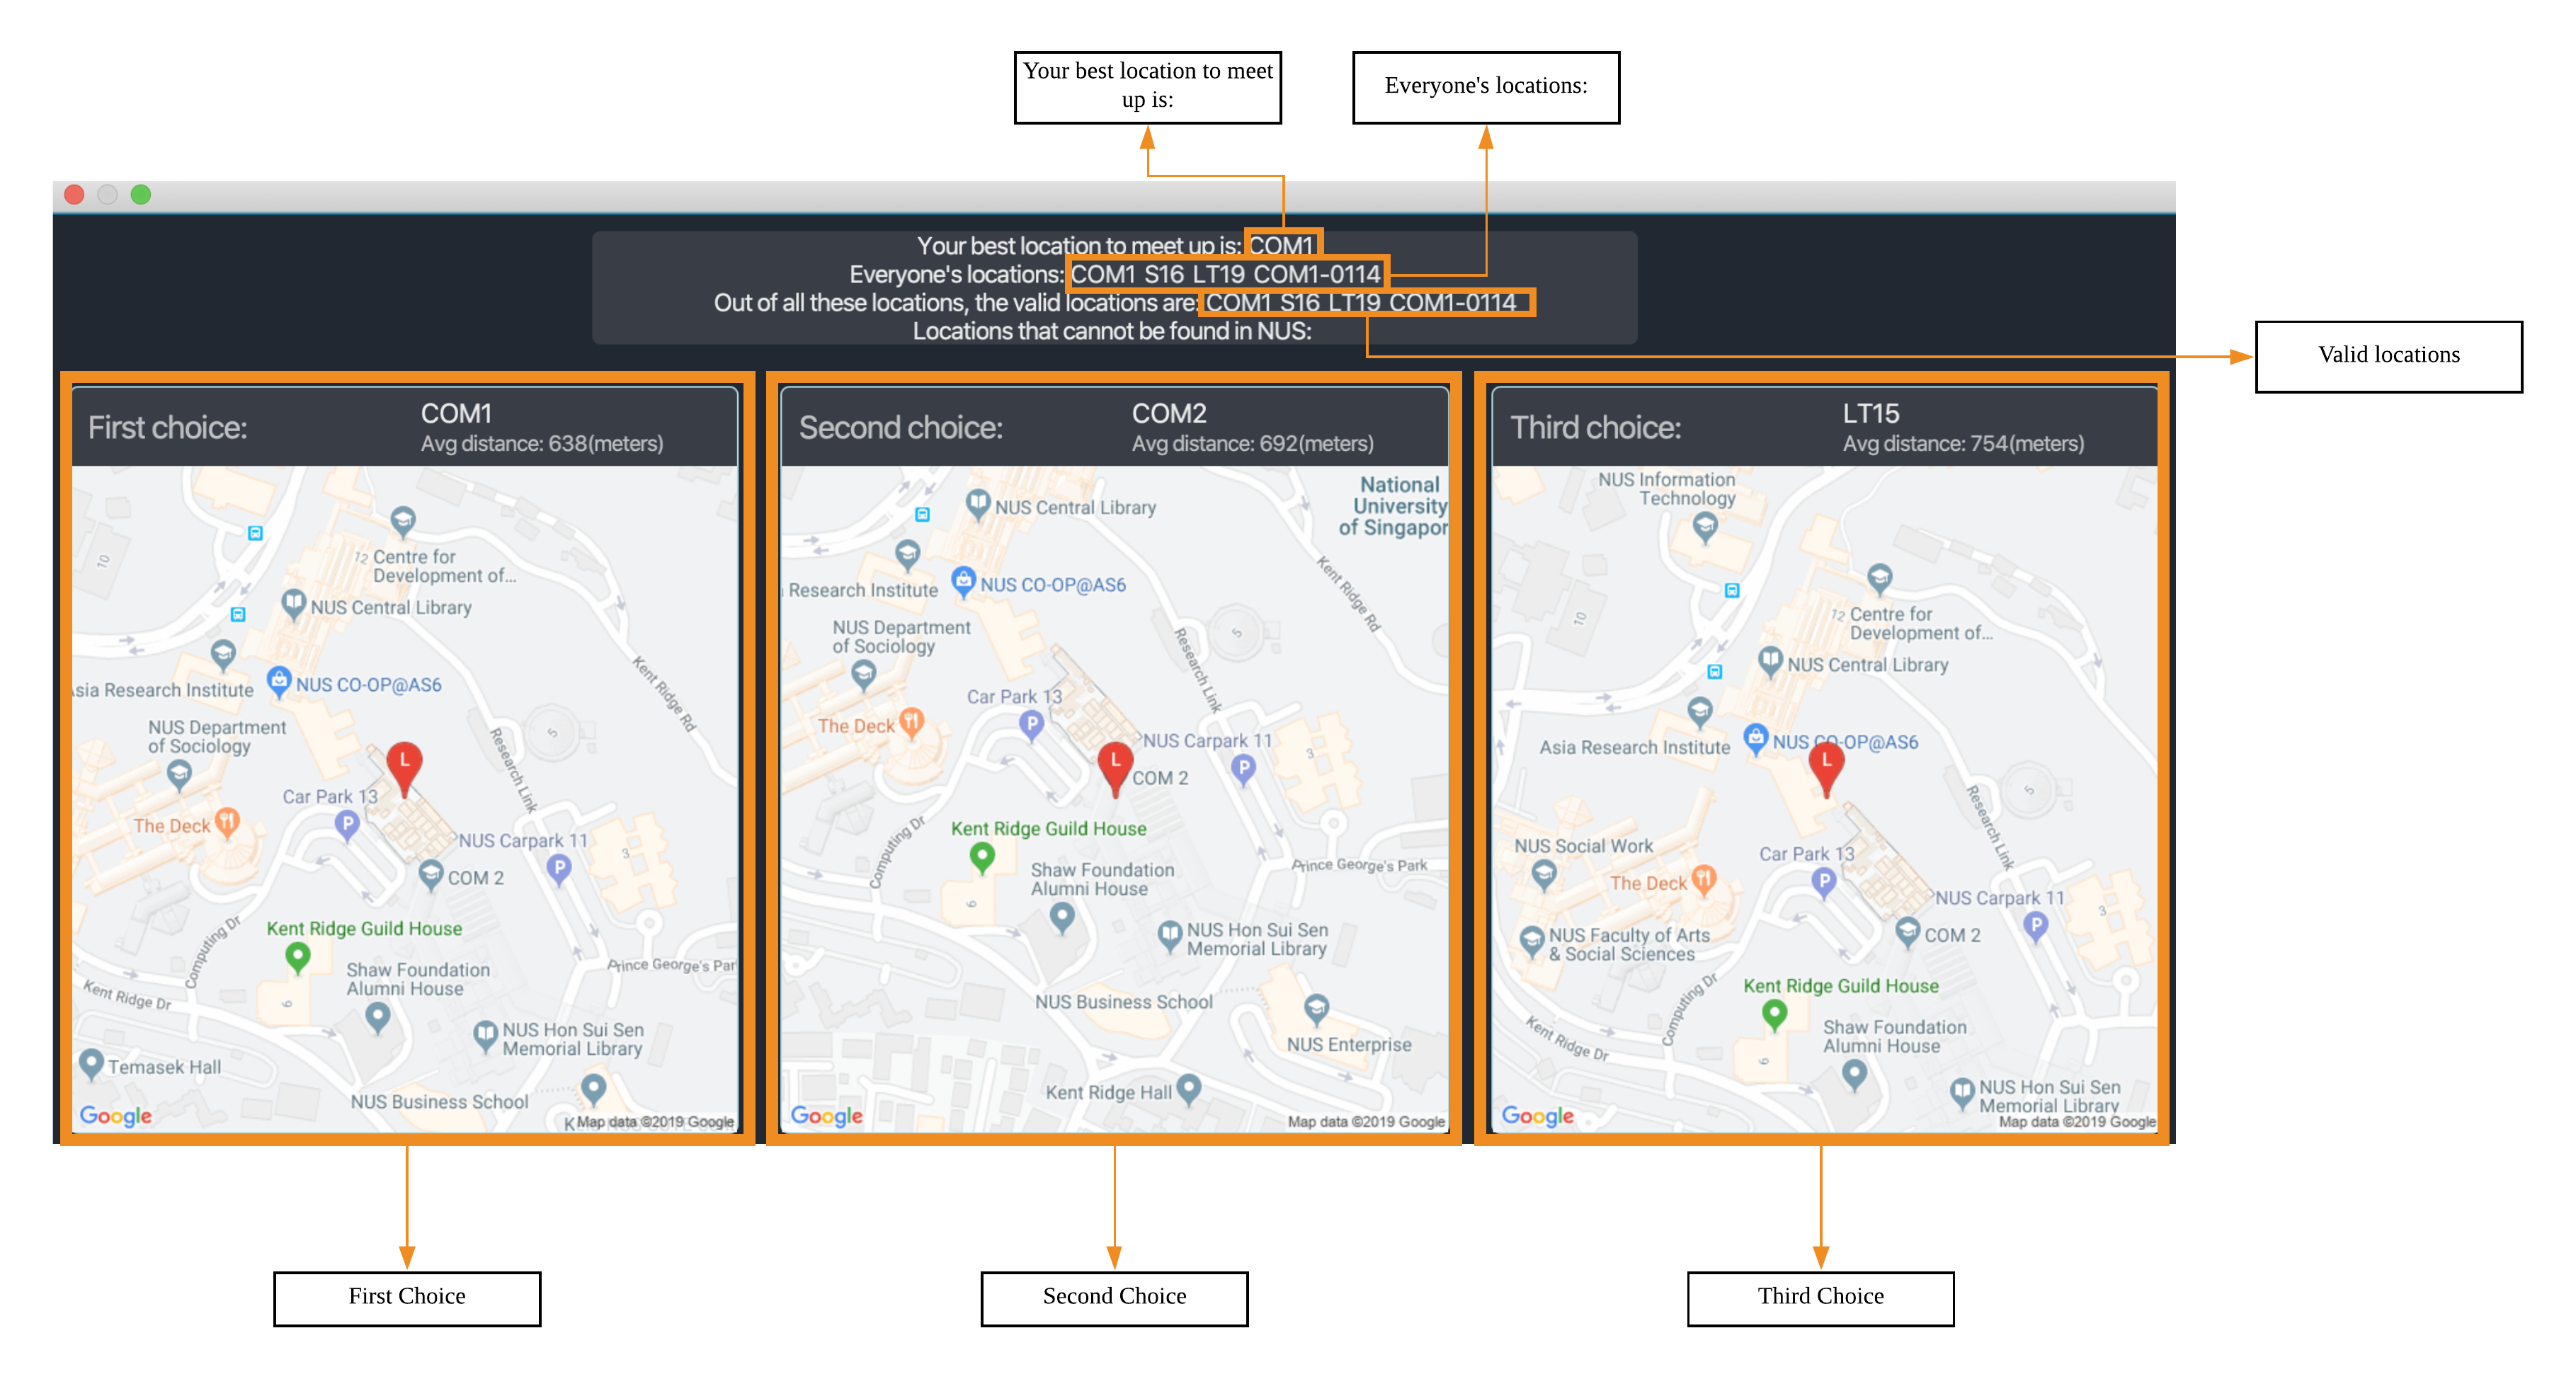
3.6.1. Definition
-
Due to connectivity constraints, we cannot support location outside of NUS. View User Guide for the full list of location we support.
-
The closest location is the location that has the least average travelling distance by car from the various sources.
-
All invalid locations are omitted and will not be considered in the computation of the closest common locations.
3.6.2. Algorithm
-
Create a complete graph where the vertices are the different locations in NUS and edges are the respective travelling distance by car from location
utov -
Represent this graph in a v x v matrix where
irepresent the source location andjrepresent destination location anddistanceMatrix[i][j]represents the time needed to travel fromitoj -
To get the closest common location of S1 … Sn:
-
Get the rows i = l1 … ln
-
Sum the values of the rows to a new row
totalDistance -
The smallest value in the row is the closest common location
-
Below is an example of how the algorithm is applied on arbitrary locations l1…ln with arbitrary travelling distance
to compute the closest common location for l2,ln-2 and ln1.

ln-2.3.6.3. Implementation
Consideration
-
Google Maps API charges USD$10-USD$20 per 1000 call.
-
Google Maps Distance Matrix Api has a limit of 100 elements for every API call.
-
Google Maps Api has bug
-
Inconsistency in identifying locations. Example
-
NUS_LT17is identified as the correct location andLT17is not. -
NUS_AS6is not identified as the correct location butAS6is identified as the correct location.
-
-
Certain locations are not supported by Google Maps
-
S4andS6are identifiable butS5is not.
-
-
Some locations are valid on Google Maps Places Api but not on Google Maps Distance Matrix Api.
-
-
Not all venues on NUSMods are identifiable on Google Maps API.
-
Some venues on NUSMods are in the same building(ie AS6-0213 and AS6-0214).
Implementation
The image below represents the Class Diagram for Closest Common Location component of TimeBook
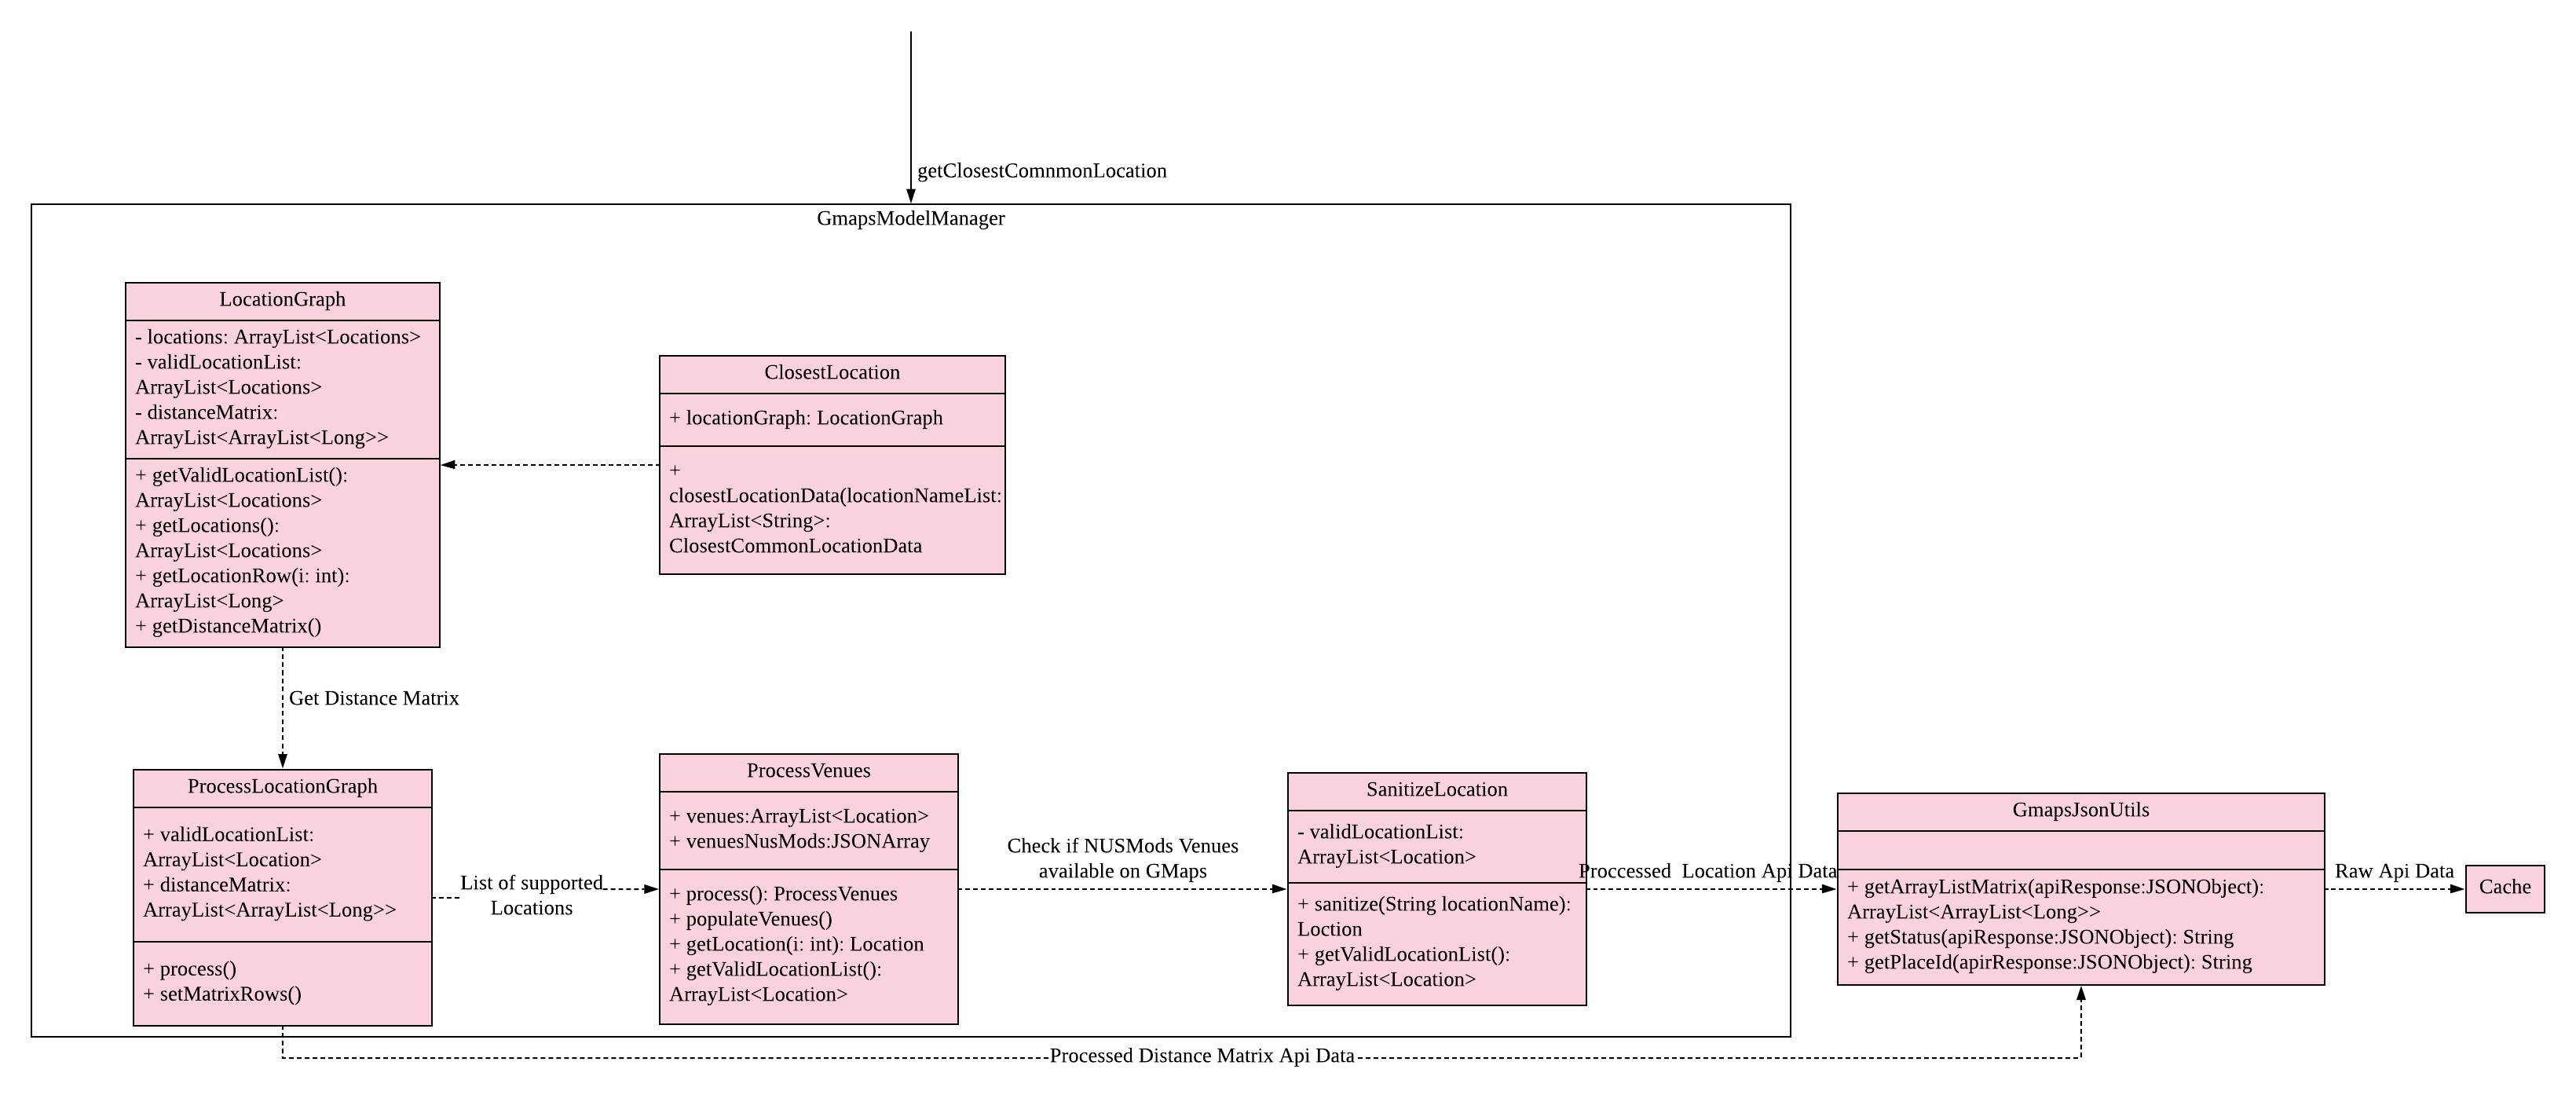
There are 3 main aspects to the implementation of this component.
-
External API
-
Creating the matrix
-
Getting the closest location
External API
To support the limited internet connection, we preprocess the relevant data and save it into the resources directory (See External APIs).
Constructing the graph matrix
Below is the sequence diagram for the creation of the matrix.
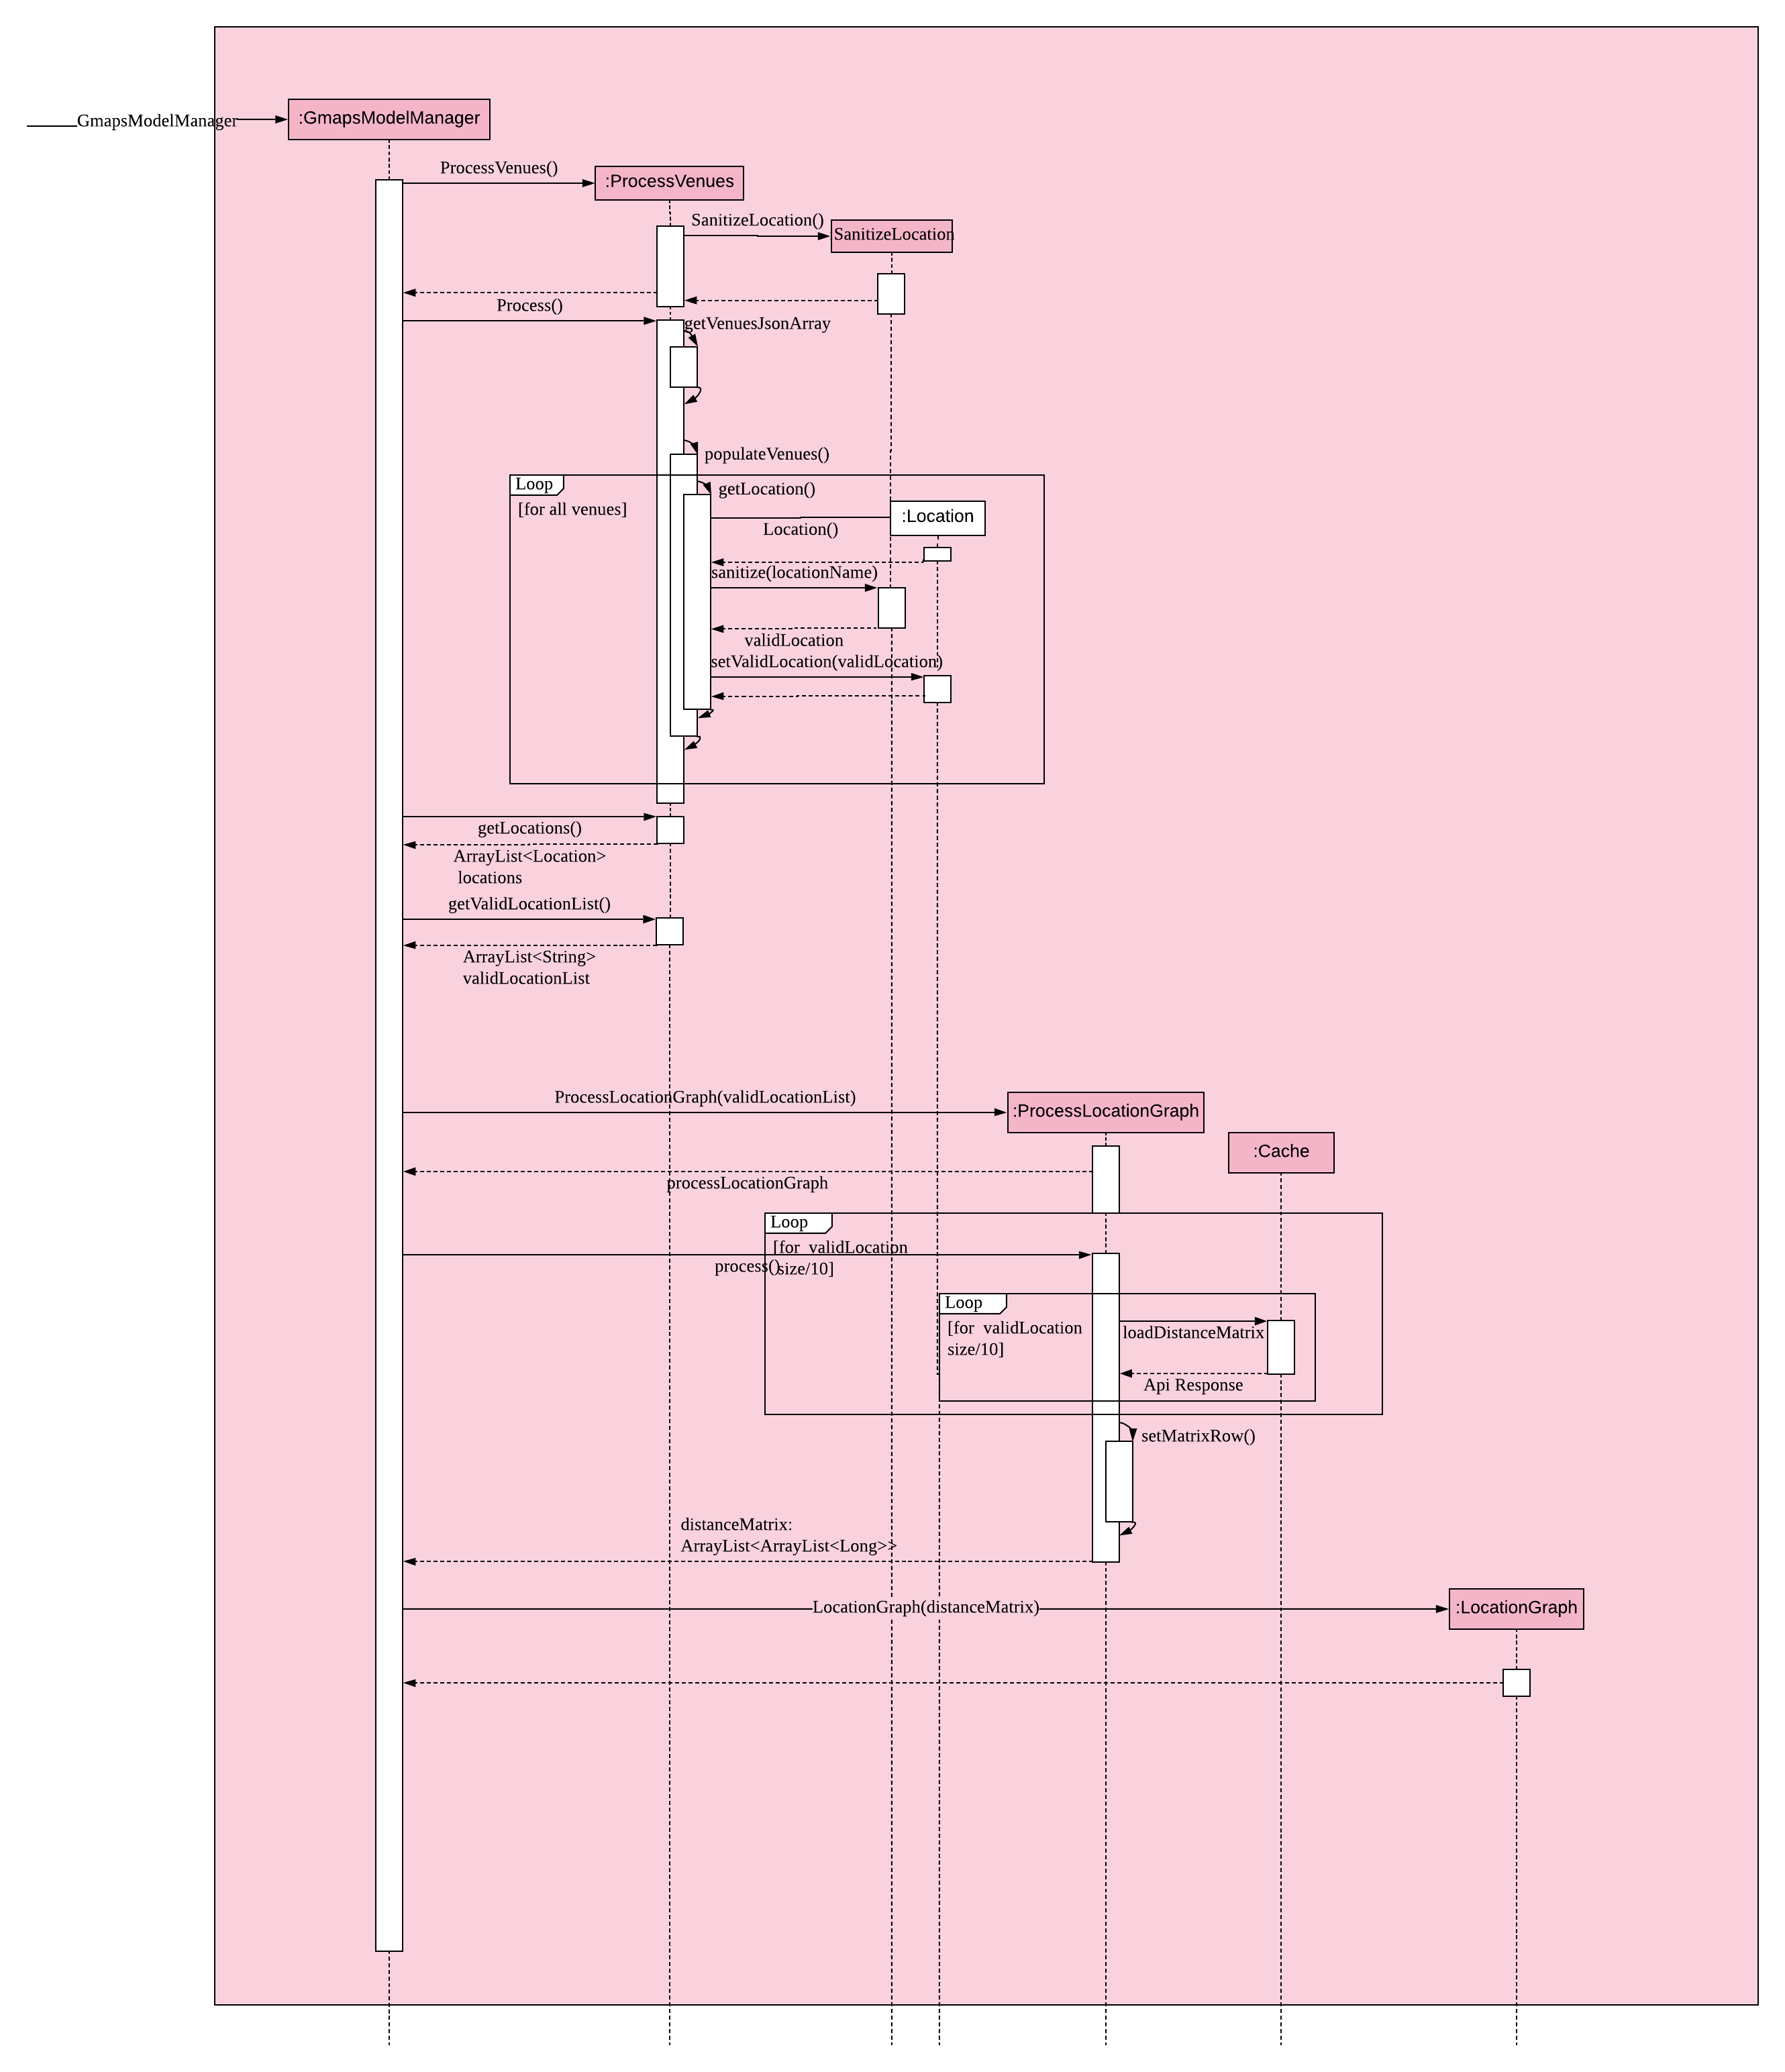
Brief overview The initialising of the matrix is broken into 2 steps. The first step is to get the list of locations in NUSMods and checking against Google Maps API if that location is identifiable by Google. The second step is to use the identifiable location to construct the matrix.
Steps
-
Check if the name of the location in NUSMods is identifiable on Google Maps.
ProcessVenues#processis the driver for this step.-
Call NUSMods API with
Cache#loadVenuesto get an array of Venues in NUS, -
Iterate through each venue and sanitize it to Google Maps Identifiable location.
-
Sanitizes the location name given by NUSMods by appending
NUS_to the front and removing any characters after-or/as the room in the building does not matter. This will help to reduce the cost of Google Maps API calls. -
UrlUtil#conditionalLocationNamemaps the location name that are not supported on Google Maps to a valid location name. -
Each venue in the array will have a
validLocationNameandplaceIdmapped to it in theLocationclass. This will help with the generation of Google Maps Distance Matrix API and retrieving of the location image from Google Maps Maps Static API
-
-
-
Construct matrix.
ProcessLocationGraph#processis the driver for this step.-
Get the list of valid location with the relevant data(
placeIdandvalidLocationName) -
Divide this list into blocks of 10 to keep under the 100 element limit of Google Maps.
-
Call Google Maps Distance Matrix Api for all the blocks in the list.
-
Combine the API response into a single 2-Dimensional array where
distanceMatrix: ArrayList<ArrayList<Long>>. -
Use the constructed 2-Dimensional to instantiate
LocationGraphwhich would be utilised to compute all the closest common location.
-
3.6.4. Getting closest location
ClosestLocation#closestLocationData executes algorithm above to compute the closest common location. Similar to how
JSON is used to transfer data in HTTP APIs, ClosestCommonLocationData is used to transfer the relevant data to the
UI to display the popup.
3.6.5. Design Considerations
Aspect: Location
Aspect: |
Choice |
Pros |
Cons |
How to process the location. |
1. Get the distance of the location directly from the NUSMods. |
1. Simplify the code base as we can directly call Google Maps API after calling NUSMods API. |
1. Bad time complexity as there would be quadratically more data to process. Prone to error as Google Maps might
identify |
2. Sanitize the Locations on NUSMods API according to their buildings(ie AS6-0114→AS6) (Current choice) |
1. Save time and space complexity as the number of venues will decrease by a factor of 10. |
1. Increase in complexity of the code base as an additional step of processing will be required. |
3.7. Add NUSMods To Schedule
3.7.1. Implementation
This feature allows users to add their NUSMods timetable (using the AddNusModsCommand or AddNusModCommand) to their TimeBook schedules.
The AddNusModsCommand can be executed by the user through the CLI with the following syntax addmods n/NAME link/NUSMODS_SHARE_LINK. The share link contains semester number, module codes, class types and class numbers, which are used for creating and adding events to the person’s schedule.
The AddNusModCommand can be executed by the user through the CLI with the following syntax addmod n/NAME m/MODULE_CODE cl/CLASS_TYPE_1:CLASS_NUMBER_1,CLASS_TYPE_2:CLASS_NUMBER_2,…. This allows the user to add individual modules but requires the user to manually specify the class type and class numbers.
Since the AddNusModsCommand is less complex than AddNusModsCommand as it only adds 1 module at a time and does not require URL validation and parsing, we will walk through the implementation of the latter instead. The following sequence diagram shows what happens when AddNusModsCommand is executed:
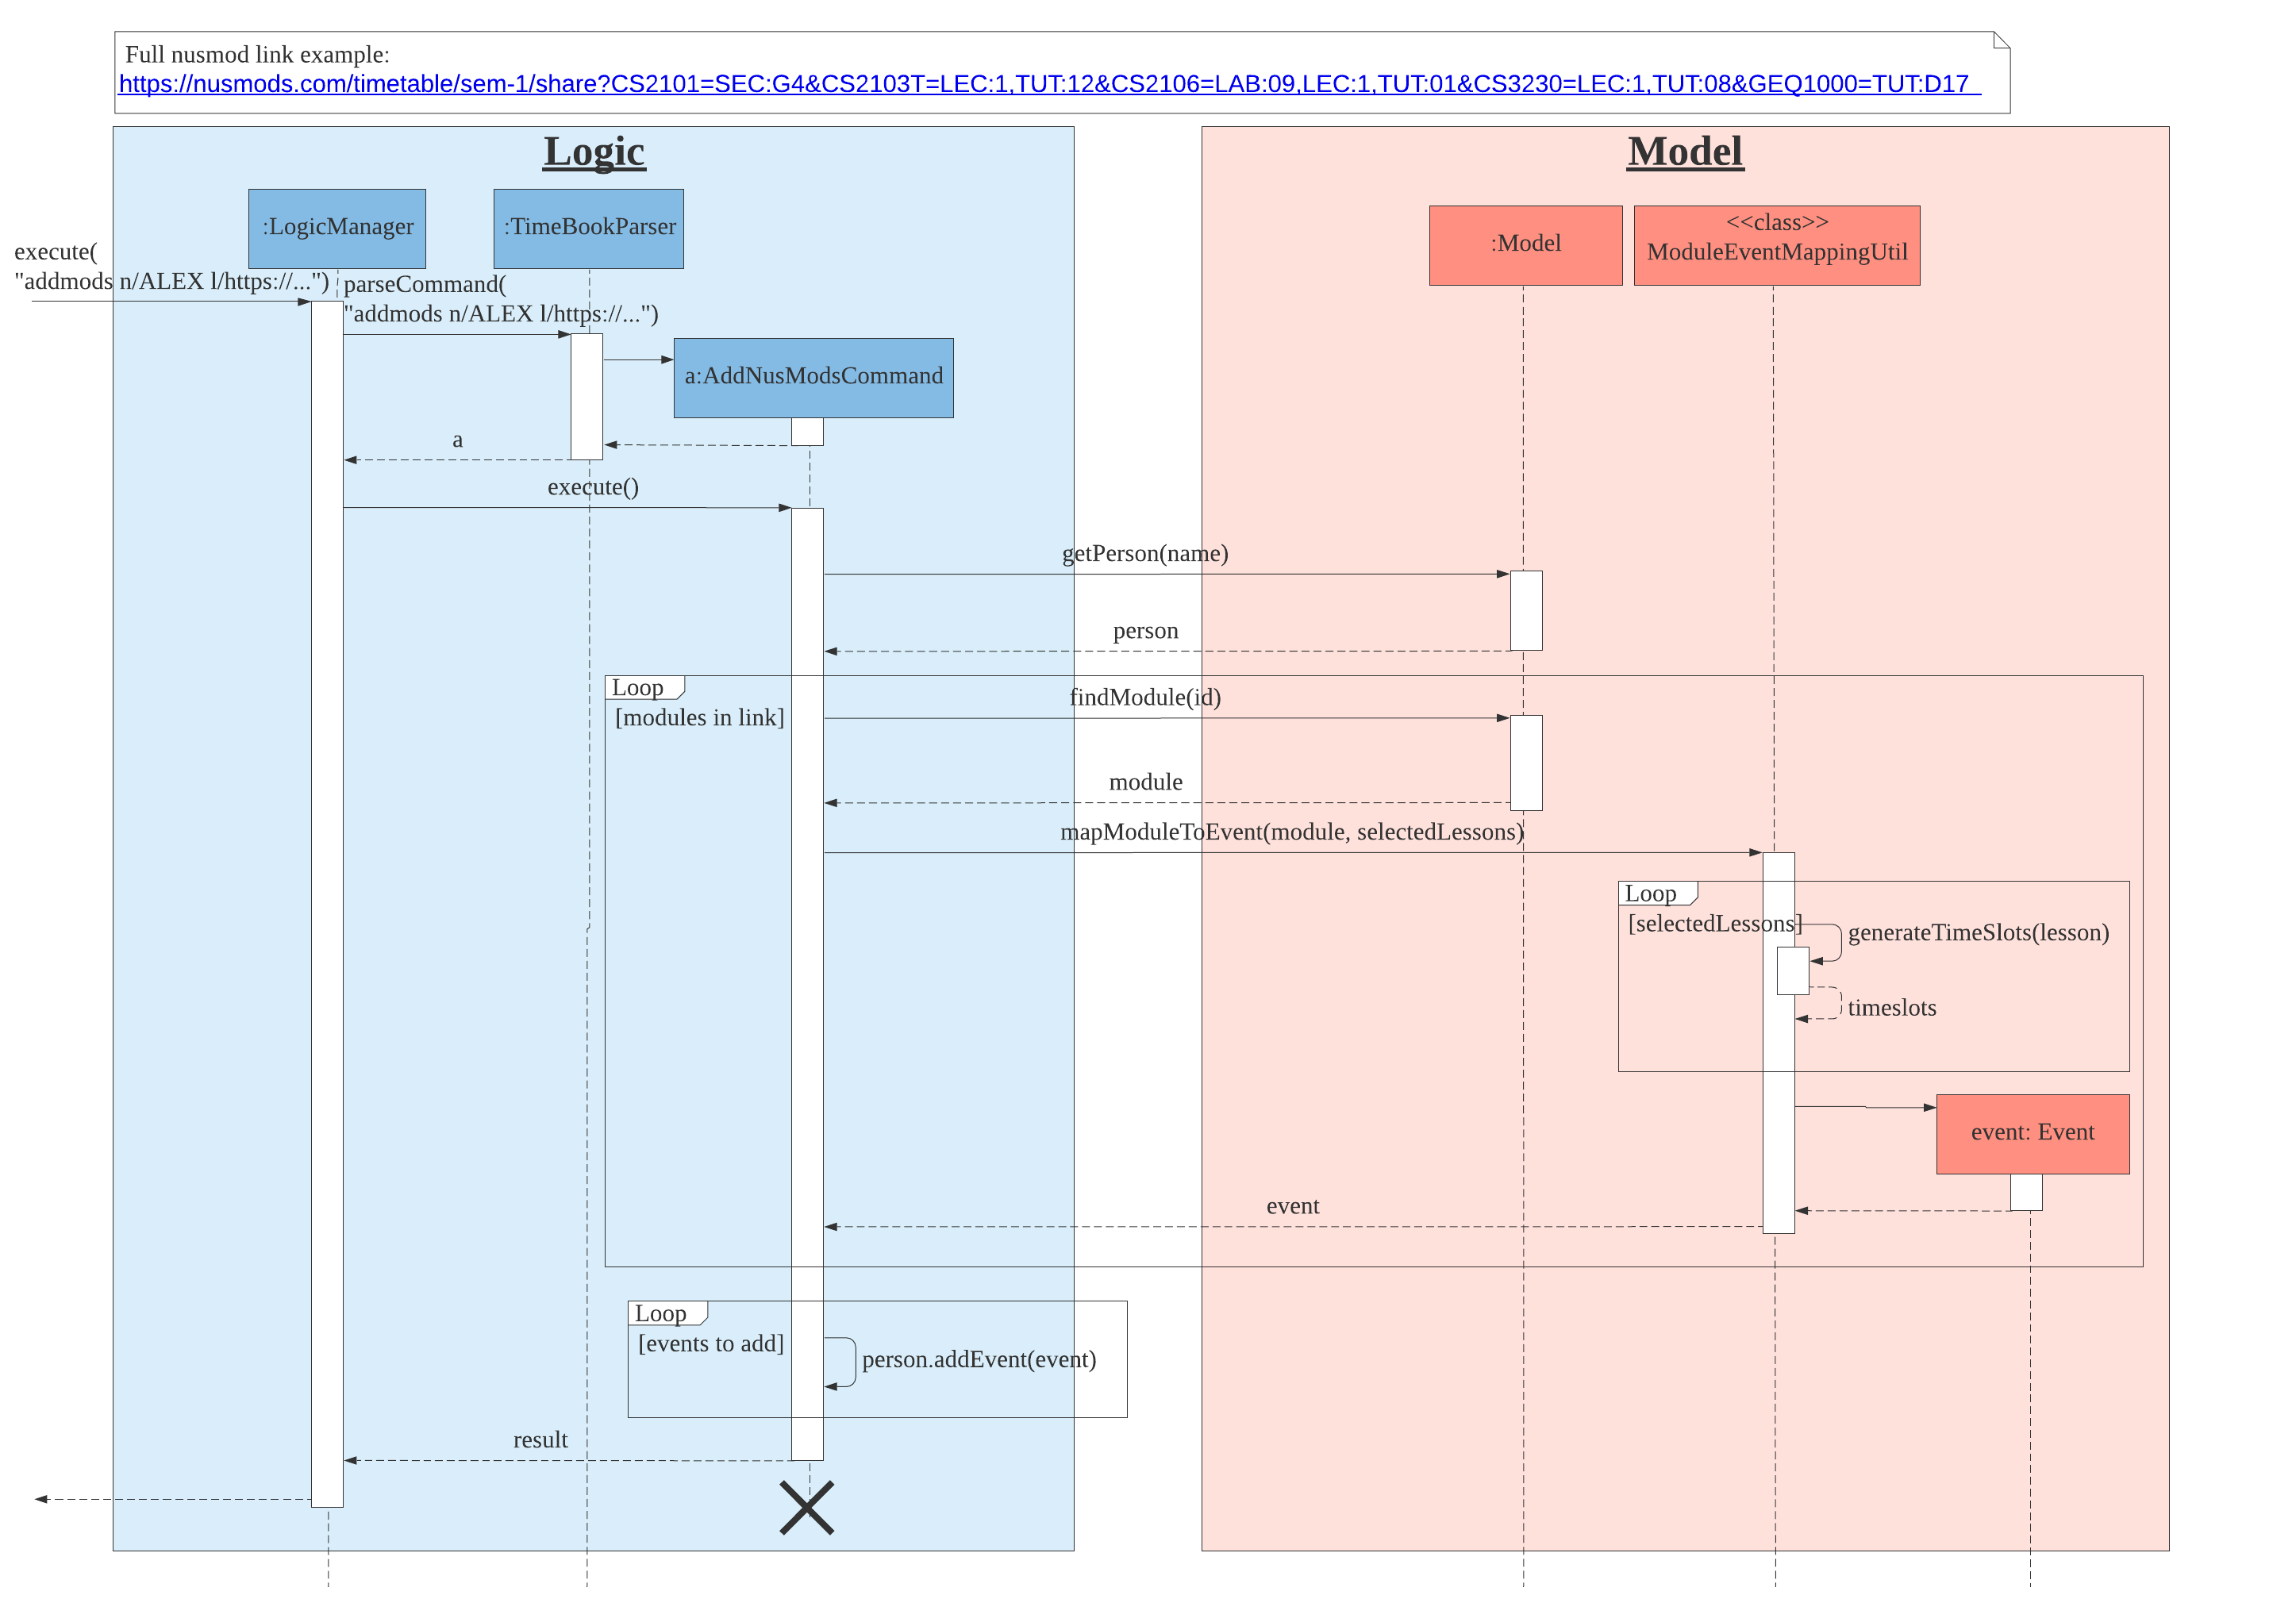
-
User enters
addmods n/NAME link/https//nusmods.com/…. The command string will be passed toLogicManagerwhich callsTimeBookParserfor parsing into anAddNusModsCommandobject. -
The
TimeBookParserdelegates the parsing toAddNusModsCommandParser. The name parameter will be parsed into aNameobject, while the link parameter will be passedNusModsShareLink#parseLink, which validates and parses the link to create anNusModsShareLinkobject containing theSemesterNo, each module’sModuleCode, and their corresponding lessons'LessonTypeandLessonNo. TheAddNusModsCommandParserthen creates anAddNusModsCommand, which takes in theNameandNusModsShareLinkobjects, and passes the command back toLogicManager. -
The
AddNusModsCommand#executeis then called by theLogicManager. In theAddNusModsCommand#executemethod,-
AddNusModsCommand#getPersonis called to get from the model thePersonwhose schedule will be added with the modules. -
AddNusModsCommand#mapModulesToEventsis then called to map each module to an event. EachModule-LessonType-LessonNoentry in theNusModsShareLinkis iterated through and the following is executed,-
Call
model#findModuleto get theModulewith the given module code. -
Pass the
Moduleand pairs ofLessonType-LessonNotoModuleEventMappingUtil#mapModuleToEventto generate anEventbased on the module and lesson type-number pair. OneModuleis mapped to oneEvent, and eachLessonin the module is used to generate multipleTimeslotsfor an event.
-
-
The created events will then be iterated through and executed with
person#addEventto add the events to the person’s schedule.
-
-
The command result is returned to
LogicManagerand feedback is displayed to user.
The following class diagram shows the Module class and its associated classes. The structure follows closely to the data retrieved from NUSMods API with some changes to suit the needs of our application.
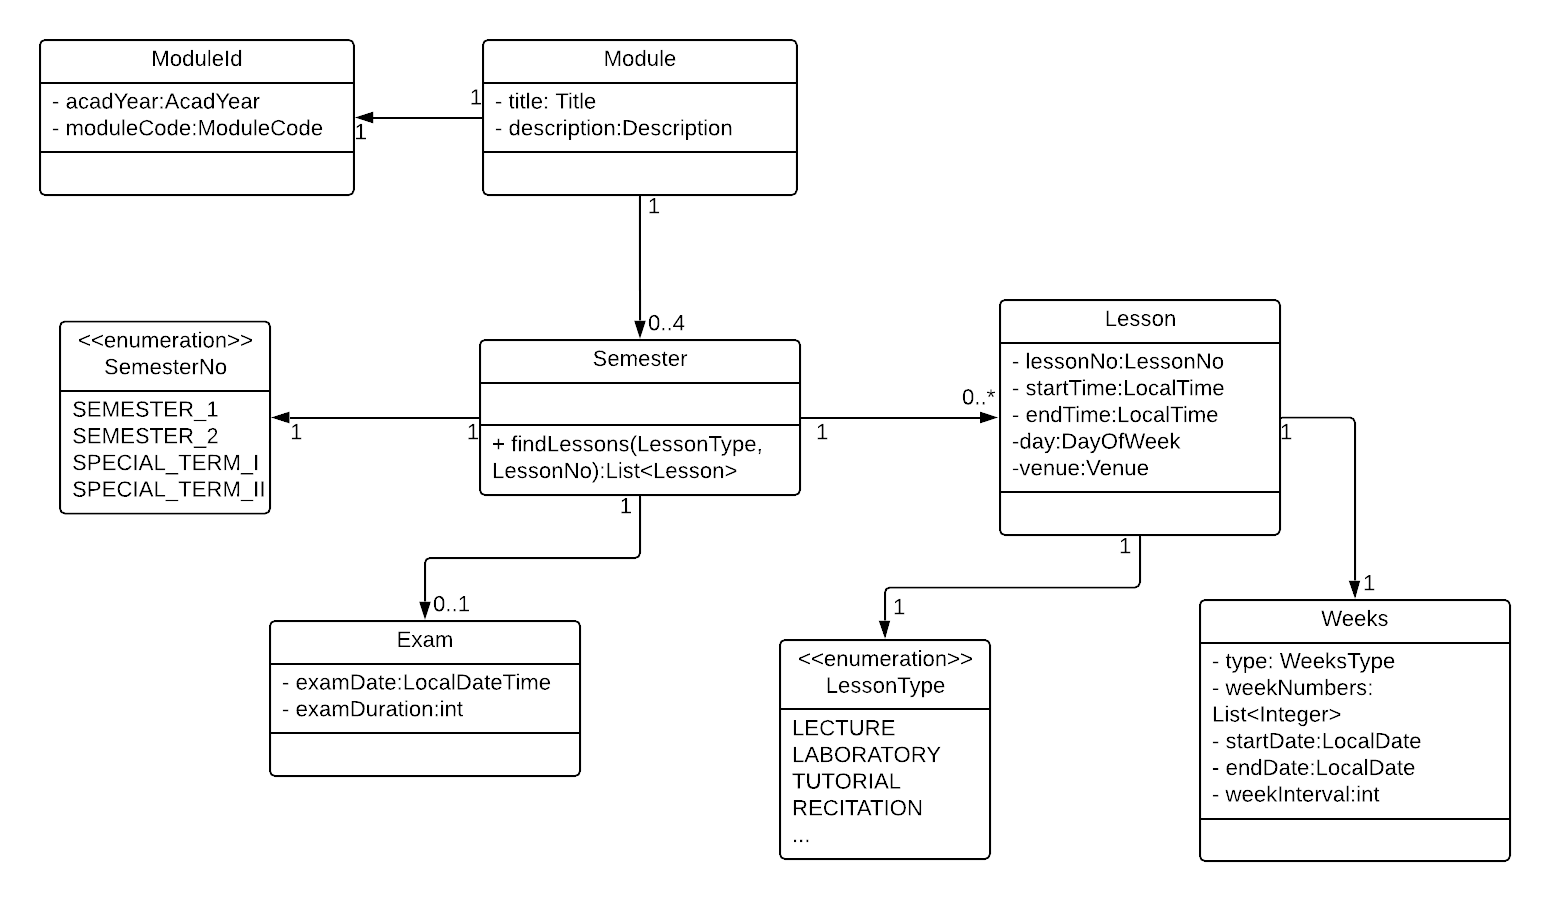
Module and associated classesThe following class diagram shows the Event class and its associated classes relevant in the context of this feature.
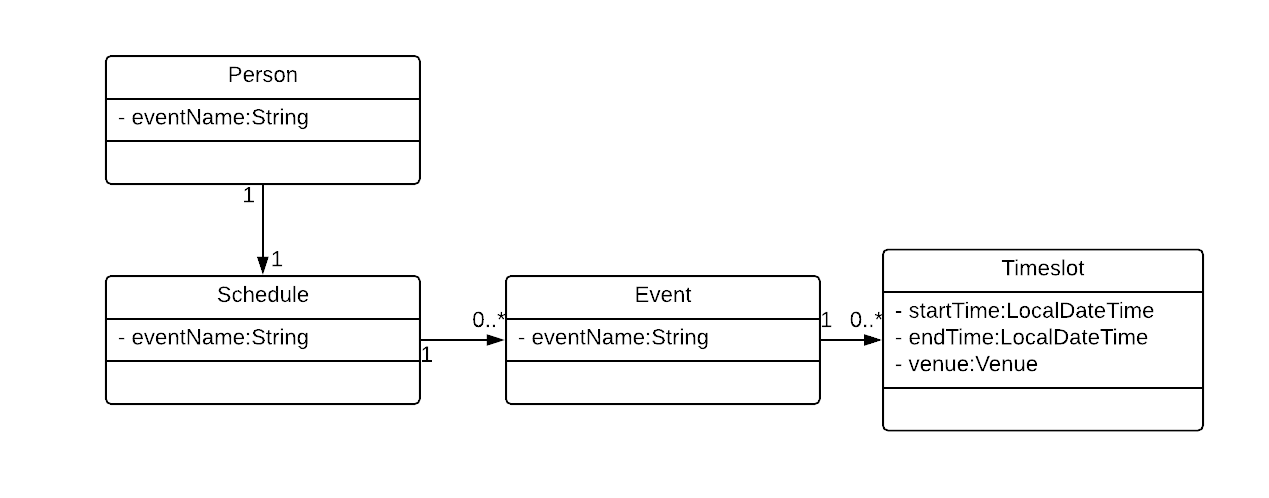
Event and associated classes3.7.2. Design Considerations
Aspect: |
Choice |
Pros |
Cons |
Ease of use |
1. Allow user to add modules individually |
Easier to implement. |
Tedious for user, as user has to specify the module code, lesson types and lesson numbers in the command. |
2. Allow user to add modules via NUSMods share link (current choice) |
User can easily get the NUSMods share link of his/her existing NUSMods timetable and copy/paste the link into the command. |
Require implementation of complex URL validation and parsing. |
|
3. Allow user to import the downloaded iCalendar file from NUSMods |
Opens up the possibility of importing generic iCalendar files. |
Harder to implement, need to deal with file IO and .ics file format parsing. Also, user is unlikely to get the iCalendar files of his/her group members (due to tediousness) |
|
We chose to implement choice 2 as it is the most user-friendly one. The bonus is that choice 1 has been implemented as well as it is easy to adapt what we have already implemented for choice 2 to make choice 1 work. |
|||
3.8. External APIs
The application requires data from the NUSMods API for the Add NUSMods To Schedule feature and data from the Google Maps API for the Closest Common Location feature. The following subsections describe the implementation of the Api component:
3.8.1. APIs
We have implemented an Api component to contain the logic of interfacing with external APIs, the architecture diagram of this component can be seen in Design → Api component.
The websocket.NusModsApi class contains methods for querying different endpoints of the NUSMods API and parsing the query results into JSONObject or JSONArray objects.
The websocket.GmapsApi class contains methods for querying different endpoints of the Google Maps API and parsing the query results into JSONObject or JSONArray objects.
The websocket.Cache class handles the saving and loading of cached API results in the resources folder.
The websocket.util folder contains various utility classes for querying external APIs.
3.8.2. Caching API Results
To support limited connectivity in our application, the results of all API queries are preprocessed and saved into the resources directory. This is managed by the Cache class. The following activity diagram shows how the caching feature works when external data is required for the execution of a certain command:
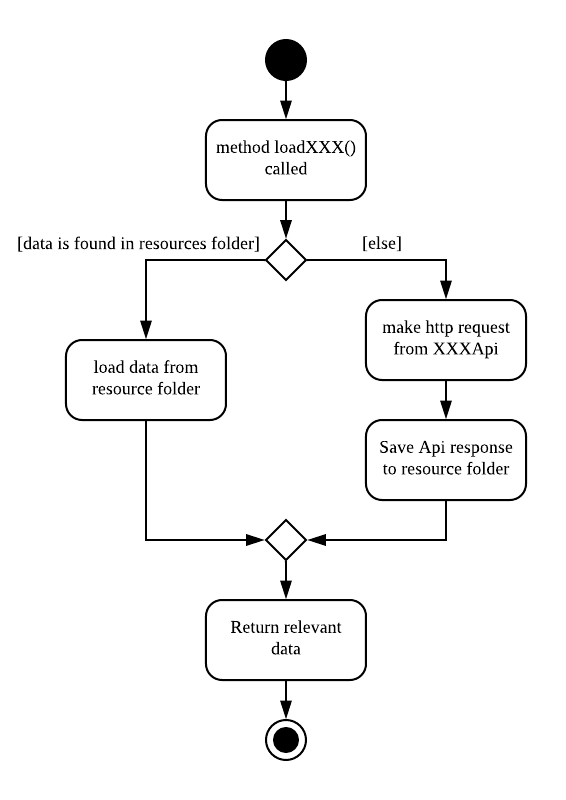
loadXXX methods3.8.3. Preprocessing NUSMods API
We preprocess the data collected from NUSMods API so that we can cache the data for offline usage and perform some early computation steps (e.g. validation, parsing) to reduce the computation cost during actual use in the application.
Notably, the key information that we require for each NUS module is the timetable information. However, there is no available API endpoint which provides the timetable information of all modules at once. Rather, there is only an endpoint which provides the timetable information of one module per query. Thus, we developed a small program in logic.internal.nusmods.ImportMods, which is executed prior to the main application itself, to query the timetable info for every module and save the data in the resources folder.
3.8.4. Preprocessing Google Maps API
All preprocessing of raw API data for Google Maps are done in the GmapsJsonUtils class.
3.8.5. Design Considerations
Aspect: |
Choice |
Pros |
Cons |
Limited Connectivity Support |
1. Preprocessing API results and storing it in resources folder. |
Can achieve complete offline support, also avoids the issue of providing API keys in production (current choice). |
Have to run the preprocessing programs in |
2. Caching Query Results |
Achieves limited connectivity support (call once and save result, then use saved result for future calls). Also, needs less work to support future data/API changes. |
Not so useful in cases where a large number of queries is required to be preprocessed first in order to handle a single user command, e.g. finding common location requires building a |
|
3. Direct API queries |
Easy to implement, minimal work to support future data/API changes. |
No limited connectivity support. |
|
The choice of implementation was progressive - it was initially choice 3 for prototyping, then enhanced to choice 2, and finally adapted to choice 1. Choice 1 suits our needs the best as it can achieve complete offline support and avoid handling API keys in production. Additionally, the cons of choice 1 is manageable. However, a mix of choice 1 and 2 will be required moving forward if we intend to support non-NUS locations or multiple academic semesters. |
|||
4. Documentation
Refer to the guide here.
5. Testing
Refer to the guide here.
6. Dev Ops
Refer to the guide here.
Appendix A: Product Scope
Target user profile:
-
has a need to coordinate meetings with many groups/projects
-
prefer desktop apps over other types
-
can type fast
-
prefers typing over mouse input
-
is reasonably comfortable using CLI apps
Value proposition: find a common time and venue amongst group members to schedule meetings faster
Appendix B: User Stories
Priorities: High (must have) - * * *, Medium (nice to have) - * *, Low (unlikely to have) - *
| Priority | As a … | I want to … | So that I can… |
|---|---|---|---|
|
new user |
see usage instructions |
refer to instructions when I forget how to use the App |
|
user |
add a new person |
|
|
user |
delete a person |
remove contacts that I no longer need |
|
user |
find a person by name |
locate details of persons without having to go through the entire list |
|
user |
add a new group |
create a group for scheduling meetings |
|
user |
add person to group |
|
|
user |
delete a group |
remove groups that I no longer need |
|
user |
find a group by name |
locate details of groups without having to go through the entire list |
|
user |
import my current schedule |
do not have to manually add my calendar events |
|
user |
import my friends' schedule easily |
do not have to manually add their calendar events |
|
user |
view my schedule |
see what’s on my schedule |
|
user |
find a common free time between multiple schedules |
schedule a meeting between multiple people quickly |
|
user |
schedule meetings with different intervals (multiple times a week, every week, biweekly) |
arrange more regular meetings |
|
user |
import my current schedule |
do not have to manually add my calendar events |
|
user |
add ad-hoc events |
can de-conflict |
|
user |
export/share scheduled meetings |
share it with other members of the group/project |
|
user |
savable data |
share it with other members of the group/project |
|
user |
know the best meeting location |
arrange the meeting at a convenient place for all members |
|
user |
know which bus to take |
get to the meeting location |
|
experienced user |
only use the keyboard |
get things done faster |
|
user |
tab complete |
type my commands faster |
|
forgetful user |
have guidance when typing |
complete my commands easily |
|
inexperienced user |
group people’s timetables |
complete my commands easily |
|
user |
generate email invite |
notify other members of the group/project about the scheduled meeting |
|
user |
have a change log |
view past changes |
Appendix C: Use Cases
(For all use cases below, the System is TimeBook and the Actor is the user, unless specified otherwise)
Use case: Delete person
MSS
-
User requests to list persons
-
TimeBook shows a list of persons
-
User requests to delete a specific person in the list
-
TimeBook deletes the person
Use case ends.
Extensions
-
2a. The list is empty.
Use case ends.
-
3a. The given index is invalid.
-
3a1. TimeBook shows an error message.
Use case resumes at step 2.
-
Use case: Schedule a meeting
Preconditions: meeting group is created.
MSS
-
User requests to arrange a meeting for a group
-
TimeBook searches for common free timeslots between all group members' schedules
-
User chooses a free timeslot to schedule a meeting
-
TimeBook adds the scheduled meeting to all members' schedules
Extensions
Appendix D: Non Functional Requirements
-
Should work on any mainstream OS as long as it has Java
11or above installed. -
Should be able to hold up to 1000 persons without a noticeable sluggishness in performance for typical usage.
-
A user with above average typing speed for regular English text (i.e. not code, not system admin commands) should be able to accomplish most of the tasks faster using commands than using the mouse.
-
The application should be user-friendly to novices who have not used a command line interface before.
-
The application should primarily cater to NUS students who already uses NUSMods to find free time.
-
The UI design of the application should be intuitive to users to navigate.
-
The application size should not be too big.
-
The application should save data real time and not require users to invoke save manually.
-
Our code should allow other developers to add new features in the application easily.
Appendix F: Instructions for Manual Testing
Given below are instructions to test the app manually.
| These instructions only provide a starting point for testers to work on; testers are expected to do more exploratory testing. |
F.1. Launch and Shutdown
-
Initial launch
-
Download the jar file and copy into an empty folder
-
Double-click the jar file
Expected: Shows the GUI with a set of sample contacts. The window size may not be optimum.
-
-
Saving window preferences
-
Resize the window to an optimum size. Move the window to a different location. Close the window.
-
Re-launch the app by double-clicking the jar file.
Expected: The most recent window size and location is retained.
-
F.2. Deleting a person
-
Deleting a person while all persons are listed
-
Prerequisites: Populate TimeBook with person
addperson. -
Test case:
deleteperson n/NAME(Where NAME is the name of the person you added)
Expected: The person name will be removed from the list on the left of GUI and the feedback box will showDelete person success: NAME deleted
-
F.3. Getting closest common location
-
Get closest common location
-
Prerequisites: Populate TimeBook with your group and group members with
addtogroupandaddperson. Subsequently, Show group scheduleshow g/GROUP_NAME. Expected: Show a group schedule with common free time. -
Test case:
selectfreetime i/x
Expected: A popup with the closest location will appear. -
Other incorrect select free time commands to try:
selectfreetime i/0.1,selectfreetime i/x(where x is the free time slot id on the display)
-
-
Invalid
ID.-
Prerequisites: Show group schedule
show g/GROUP_NAMEExpected: Show a group schedule with common free time. -
Test case:
selectfreetime i/0
Expected: Invalid time slot ID: 0. Please enter a valid id as shown in the GUI. -
Other incorrect select free time commands to try:
selectfreetime i/0.1,selectfreetime i/x(where x is larger than the id on the display)
-
F.4. Graphic for schedules in TimeBook
-
Adding events to the schedules TimeBook can be tested with a given list of events.
-
Each event should fit into the time table cell properly without overlapping with one another.
-
Events that overlap in time slots should not be allowed to be added into TimeBook.
-
-
Resizing the window should not distort the schedule graphics displayed.
-
Ensure that the first column of the schedule graphic is always today’s date.
F.5. Adding NUSMods timetable to a person’s schedule
-
Adding via NUSMods link to a new person with an empty schedule.
-
Prerequisites: A new person John is added with the
addperson n/Johncommand. -
Test case 1:
addmods link/https://nusmods.com/timetable/sem-1/share?CS2101=&CS2103T=LEC:G05&CS3230=LEC:1,TUT:08&CS3243=TUT:07,LEC:1&GEQ1000=TUT:D17
Expected: John’s schedule is successfully updated with the all the lesson times and exam times for the module classes specified in the link. -
Test case 2: Enter
addmods link/https://nusmods.com/timetable/sem-1/share?CS2101=&CS2103T=LEC:G05&CS3230=LEC:1,TUT:08&CS3243=TUT:07,LEC:1&GEQ1000=TUT:D17twice consecutively.
Expected: No lessons are added to John’s schedule. Error message shows up due to a clash in timings between events in current schedule and the modules you are adding. -
Other incorrect addmods commands to try:
addmods,addmods n/John link/random_string,addmods n/John link/https//randomurl.com,addmods n/John link/https://nusmods.com/timetable/sem-1/share?INVALIDMODULE=LEC:G05,addmods n/John link/https://nusmods.com/timetable/sem-1/share?CS2103T=INVALIDCLASSTYPE:G05,addmods n/John link/https://nusmods.com/timetable/sem-1/share?CS2103T=LEC:INVALIDCLASSNUMBER
No lessons are added to John’s schedule. Error details are shown in the feedback display.
-
F.6. Adding an NUS module’s lessons to a person’s schedule
-
Adding CS2100 lecture 1, lab 15 and tutorial 08 to a new person with an empty schedule.
-
Prerequisites: A new person John is added with the
addperson n/Johncommand. -
Test case 1:
addmod n/John m/CS2100 cl/TUT:08,LAB:15,LEC:1
Expected: John’s schedule is successfully updated with CS2100 lecture 1, lab 15, tutorial 08 and exam timeslots. -
Test case 2: Execute
addmod n/John m/CS2100 cl/TUT:08,LAB:15,LEC:1twice.
Expected: No lessons will be added to John’s schedule. Error message shows up due to a clash in timings between events in current schedule and the module you are adding. -
Other incorrect addmod commands to try:
addmod,addmod n/John m/random_string,addmod n/John m/CCS2100 cl/random_string.
-