By: Team TimeBook Since: Aug 2019 Licence: MIT
Our team is still working on the User Guide. Keep a look out for more cool and exciting features coming soon!
- 1. Introduction
- 2. Understanding this guide
- 3. Quick Start
- 4. Inexperienced CLI user
- 5. GUI Components
- 6. Commands
- 7. FAQ
- 8. Command Summary
- 9. Supported Locations
1. Introduction
Thank you for checking out TimeBook! TimeBook is a desktop application that is morphed from AddressBook Level 3 (AB3). TimeBook is a scheduling application that aims to help busy NUS undergraduates keep track of the schedules of you and your friends. It also can find the common free time and venues among you and your friends. TimeBook will have the following features:
-
A graphical user interface (GUI) but most of the interactions with the application would happen using command line interface (CLI).
-
Allows users to add the schedules of his or her friends and organise them into groups.
-
Deconflict different schedules of different people and different groups to find the common free time among them.
-
Integration with NUSmods API to allow users to enter their NUSmods timetable link to add it to their schedule.
-
Integration with Google Maps API to allow the application to evaluate the best venue for the group to meet up during the free time in their schedules.
2. Understanding this guide
2.1. Basic Information
This guide explains how you can use TimeBook to the fullest extent to assist you to plan for your group’s meeting.
You can find the steps needed to start scheduling group activities with your friends or loved ones in the quick start section and general lifecycle usage of our application. If you happen to stumble upon some difficulties, our Frequently Asked Questions (FAQ) is here to address that. If you are an experienced Command Line Interface (CLI) user, you can hop right into using the application by looking at our Command Summary. Otherwise, take a look at the Inexperienced CLI User section to obtain more information on how to use our application.
We have used the following symbols to help you better understand our application usage. (For now we have not picked our symbols yet.)
| Symbol | What it means |
|---|---|
|
Important information that you may want to note. |
|
Shortcuts or hacks that would improve your experience using this application. |
|
Warning! Be careful if you encounter this symbol. |
3. Quick Start
![]() Make sure that your screen resolution height is at least 720 pixels before you continue this section!
Make sure that your screen resolution height is at least 720 pixels before you continue this section!
-
Ensure you have Java
11or above installed in your Computer. -
Download the latest
timebook.jarhere. -
Copy the file to the folder you want to use as the home folder for your TimeBook.
-
Double-click the file to start the app.
The GUI should appear in a few seconds.

-
Type the command in the command box and press Enter to execute it.
e.g. typinghelpand pressing Enter will open the help window. -
Some example commands you can try:
-
list: lists all information in TimeBook. -
addpersonn/John Doe p/98765432 em/johnd@example.com a/John street, block 123, #01-01: adds a contact namedJohn Doeto the TimeBook. -
deletepersonn/John Doe: deletes the person namedJohn Doefrom the TimeBook. -
addgroupg/CS2103: adds a new group calledCS2103to the TimeBook. -
addtogroupn/John Doeg/CS2103: Adds a personJohn Doeinto the groupCS2103. -
exit: exits the appWhen you first start using TimeBook, a default profile will be created for you! This default profile will have a default name:
User
To personalize TimeBook and make it yours, renameUserby entering the commandedituser n/Your Name Here. If you’d like to fill in more details, you can do so using theeditusercommand.
-
-
Refer to Section 6, “Commands” for details of each command.
4. Inexperienced CLI user
Unlike most applications, where you use your mouse to interact with the application such as scrolling and clicking, our application mostly use the Command Line Interface. Most of the time, you would be interacting with the application through typing commands in the command box of the application.
You can play around with the commands in Command Summary to get yourself warmed up.
5. GUI Components
In this section, you will learn more about the different components of our application. Here is an overview of all of the components in our application:
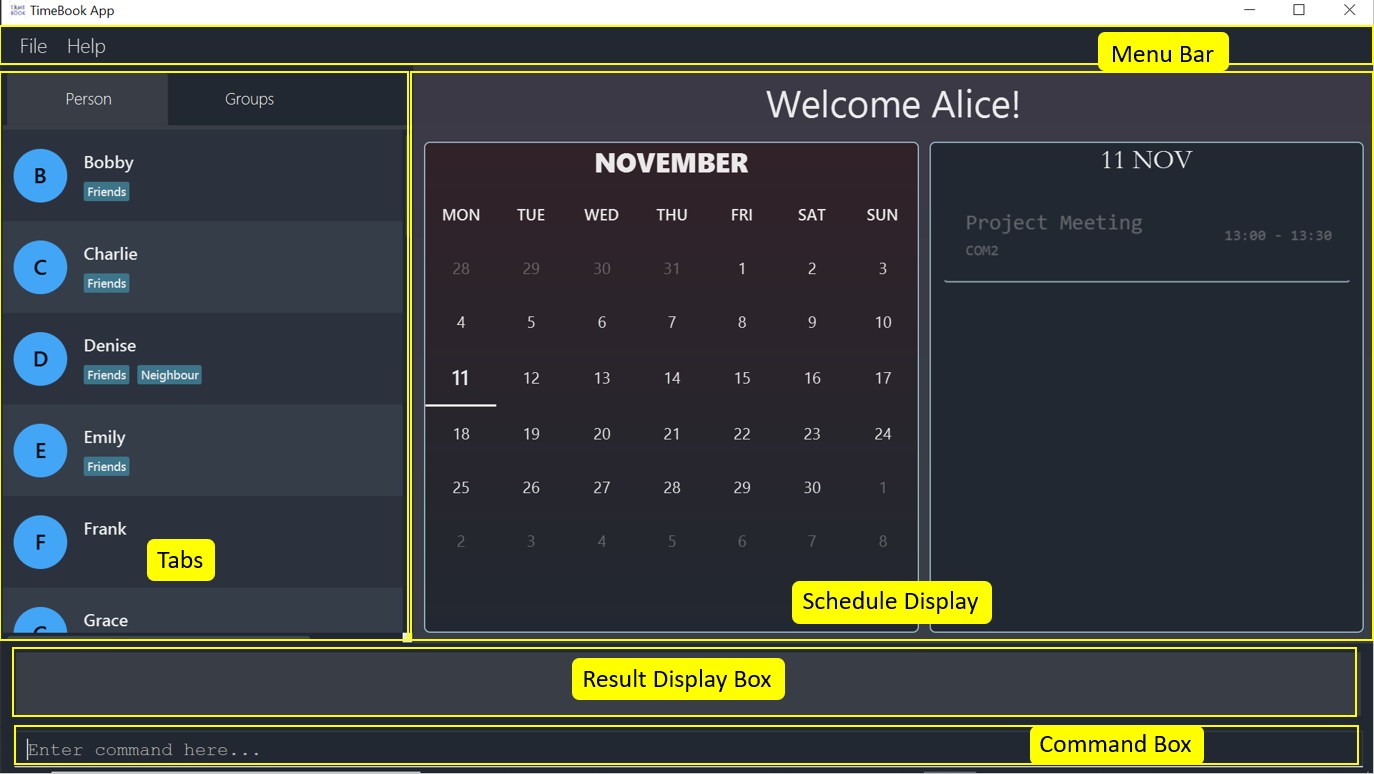

5.2. Schedule Display
The schedule display is the main component that you will be looking at to look schedules of yours or others!
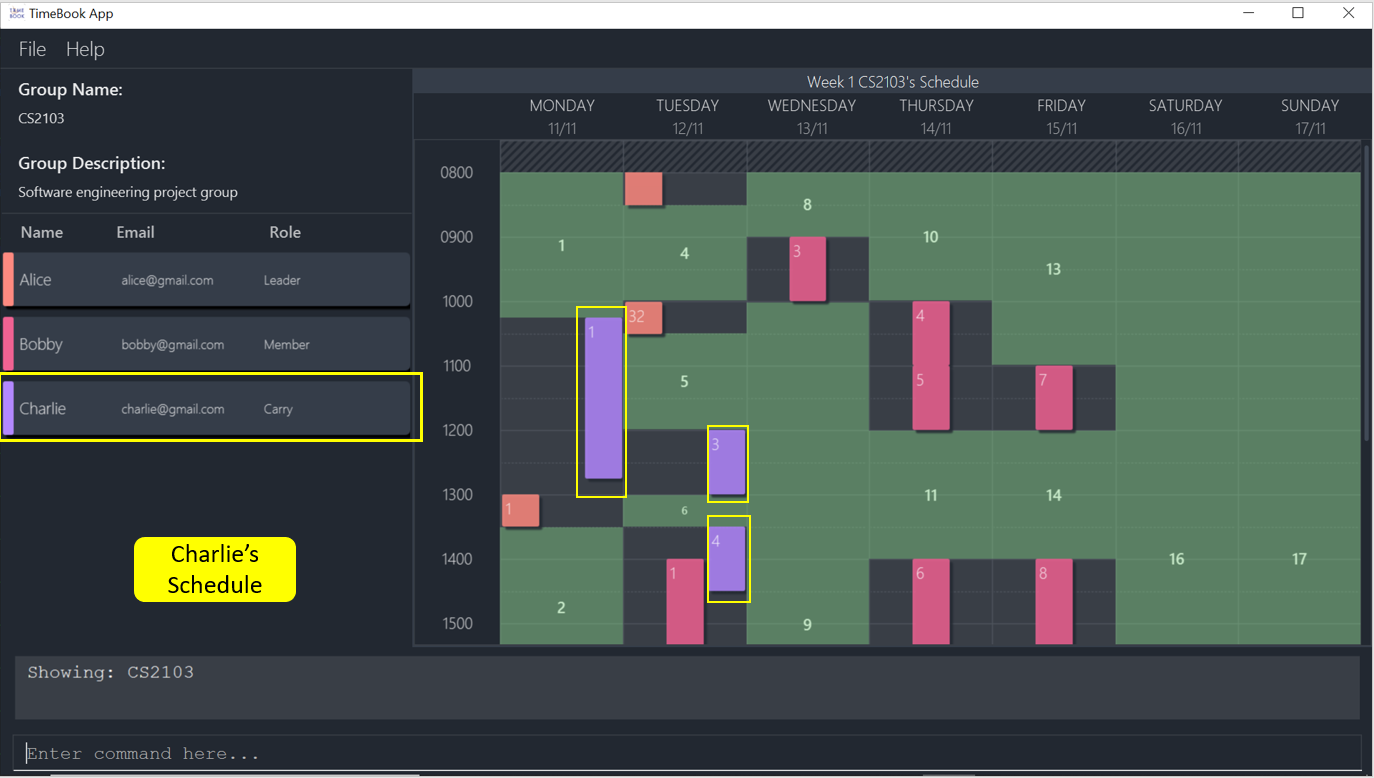
5.2.1. How to read the schedule view
Unsure of how to read the combined schedules of your friends in TimeBook? Here is a simple example to guide you!
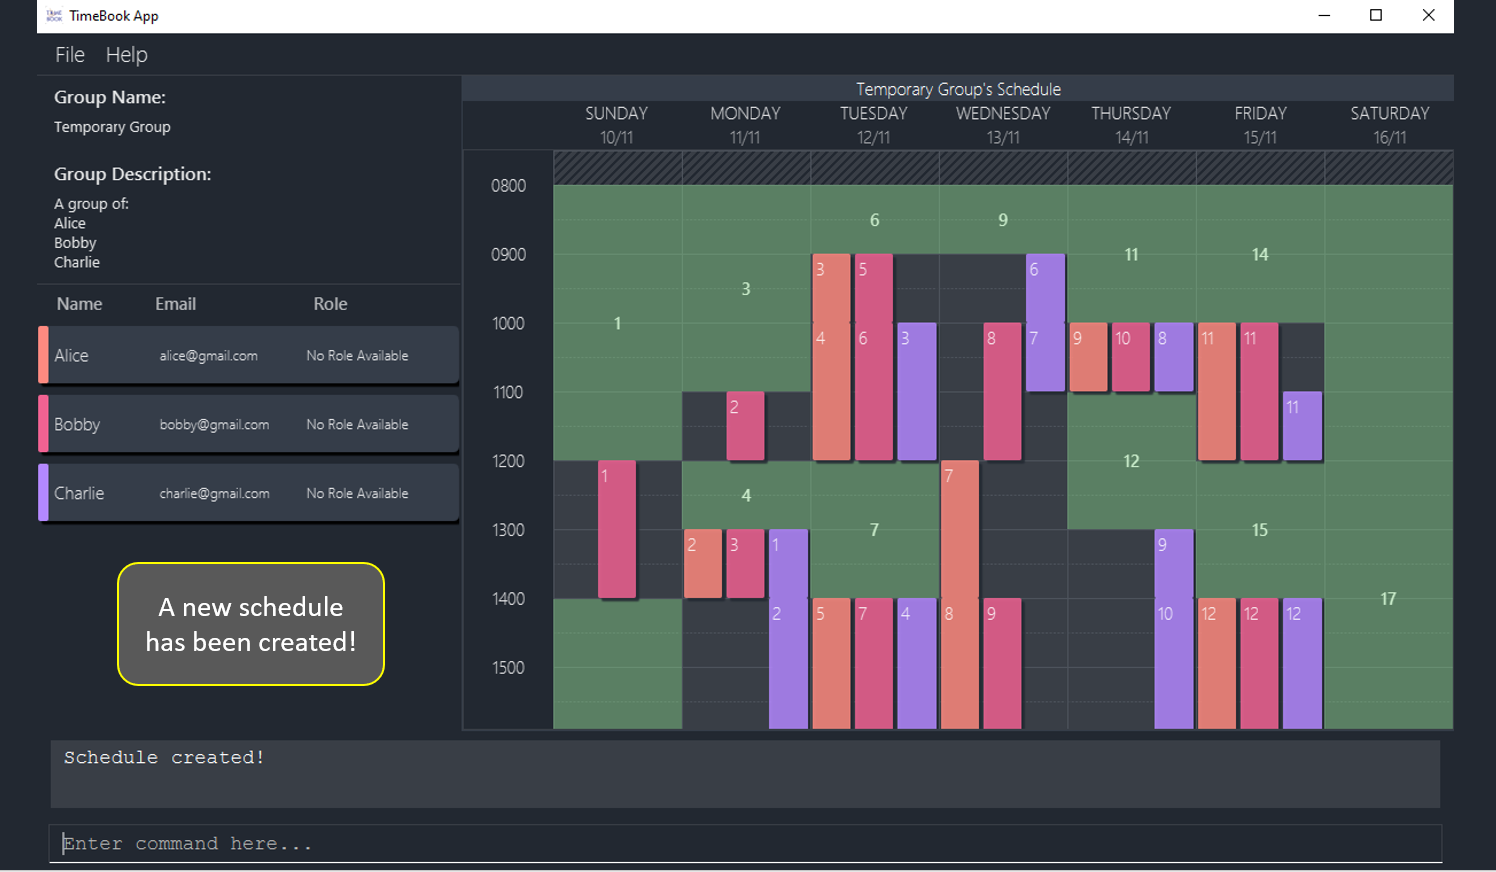
TimeBook ensures that the leftmost column will always start from today’s date. Each unnumbered coloured block belongs to someone’s schedule in the group. For example, the image below highlights all of Charlie’s schedule.
Take note of the numbered green boxes you see below!
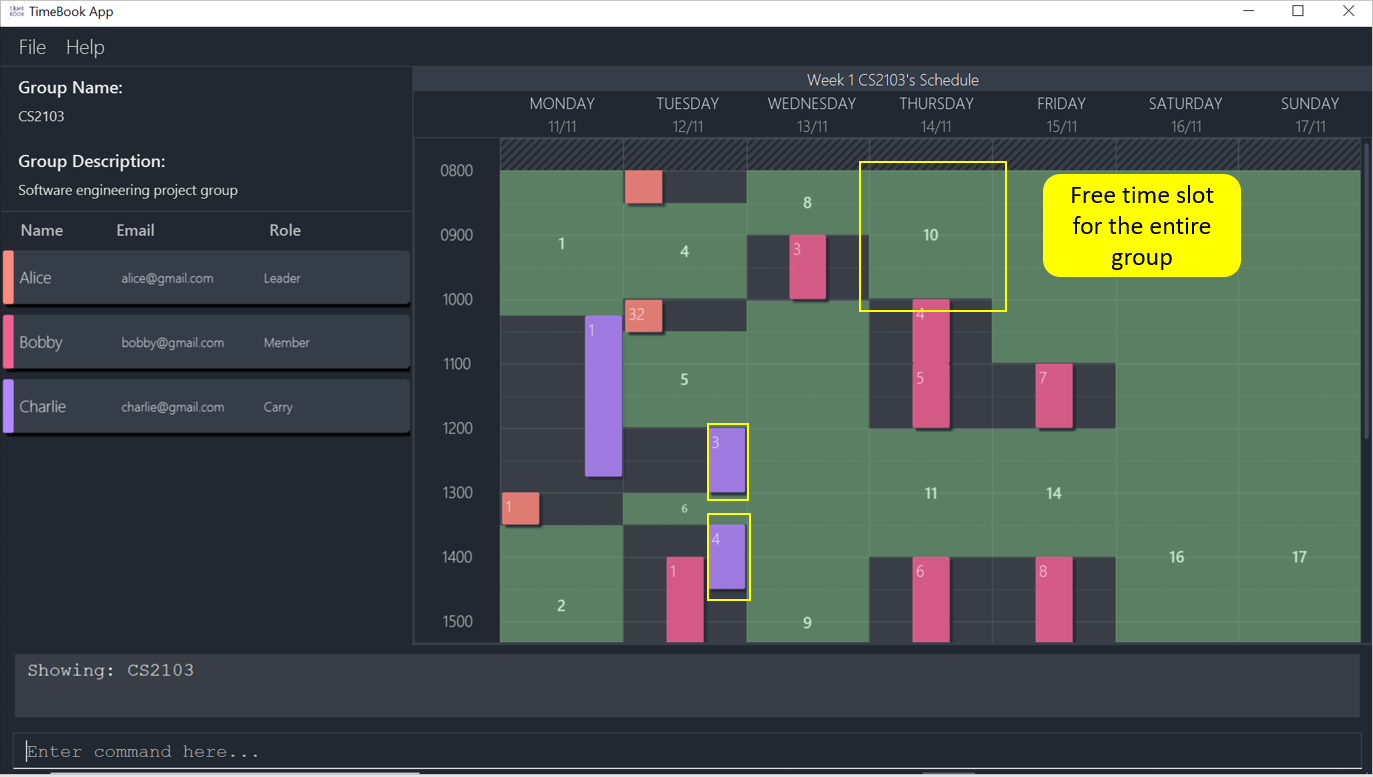
These are the common free time slot that you and your entire group members share! You can use these numbered green boxes to arrange your meetings or share it with your group members to pick.
![]() Note that the labels for each of the coloured block will become hidden if each block becomes too small!
To get more information about the coloured block, you can just hover your mouse over it!
Note that the labels for each of the coloured block will become hidden if each block becomes too small!
To get more information about the coloured block, you can just hover your mouse over it!
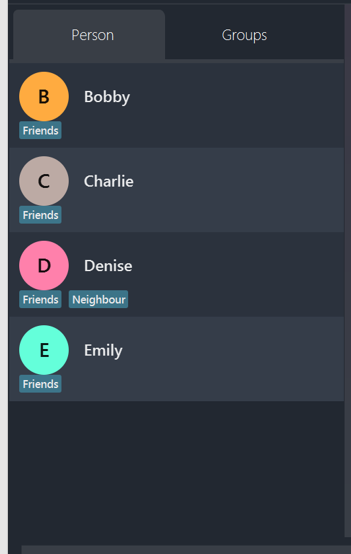
5.3. Tabs
Tabs will contain your contacts and your groups. You can use it to see all your existing contacts and groups!
5.4. Result Display Box
This box shows you whether your command executed is successful or unsuccessful. If you encounter an error message here, look at our Frequently Asked Questions section to see what is the cause of error.


5.6. Suggestions Autocomplete
TimeBook comes with a helpful feature that provides suggested commands or relevant values so you can spend less time typing commands and more time on your group meetings.
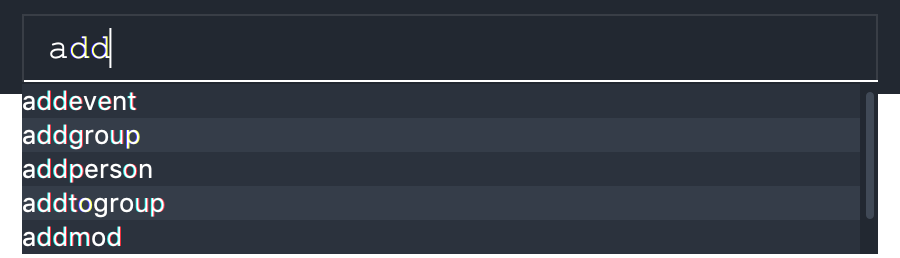
When you type a command, TimeBook will show a dropdown with similarly matching commands.
For example, you type in the command add.
TimeBook will then suggest commands such as addevent, addgroup, addperson like so:
If you meant to type the addevent command, you can immediately select it by pressing the Tab key.
Otherwise, you can pick other options by using the Up or Down arrow keys and then hit the Tab key to confirm your selection.
For now, try selecting the addtogroup command using the Down and Tab keys.
TimeBook will complete the command like this:

![]() You can type an abbreviated version of any command as long as the letters are in order!
For example, instead of typing
You can type an abbreviated version of any command as long as the letters are in order!
For example, instead of typing addtogroup, try atg.
Remember how TimeBook can also suggest relevant values?
Let’s try that by specifying a person’s name using the n/ parameter like so:
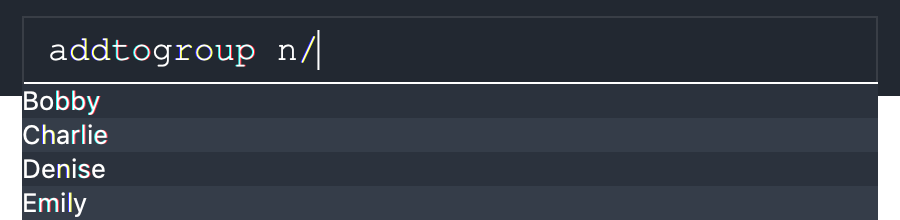
Again, TimeBook provides useful suggestions, in this case, the names of the people we’ve previously added. Now, try using the Tab key to immediately fill in "Bobby".

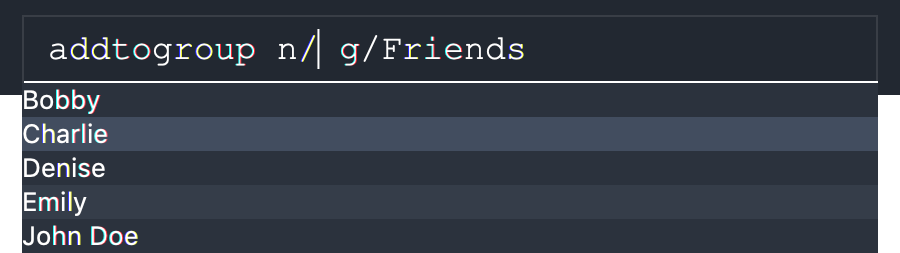
Now, let’s complete the addtogroup command.
Let’s add Bobby to the Friends group by typing g/ and using the suggestions to help us pick the Friends group.

|
–Tab–> |

|
Let’s say we change our mind and don’t want to add Bobby to the Friends group. No problem, just remove Bobby’s name and pick someone else using the familiar Up, Down and Tab keys. TimeBook is smart enough to only fill in the name parameter and won’t mess up the rest of your command.
|
–Tab–> |

|
Congratulations! You’ve now mastered the suggestions feature using just three simple keys, the Up and Down arrow keys to navigate between suggestions and the Tab key to select it.
The following sections will explain all the commands we have in TimeBook and what they do.
6. Commands
Command Format
-
Words in
UPPER_CASEare the parameters to be supplied by you e.g. inaddperson n/NAME,NAMEis a parameter which can be used asaddperson n/John Doe. -
Items in square brackets are optional e.g
n/NAME [t/TAG]can be used asn/John Doe t/friendor asn/John Doe. -
Items with
… after them can be used multiple times including zero times e.g.[t/TAG]…can be used ast/friend,t/friend t/familyetc. -
Parameters can be in any order e.g. if the command specifies
n/NAME p/PHONE_NUMBER,p/PHONE_NUMBER n/NAMEis also acceptable.
6.1. Navigation
6.1.1. Home: home
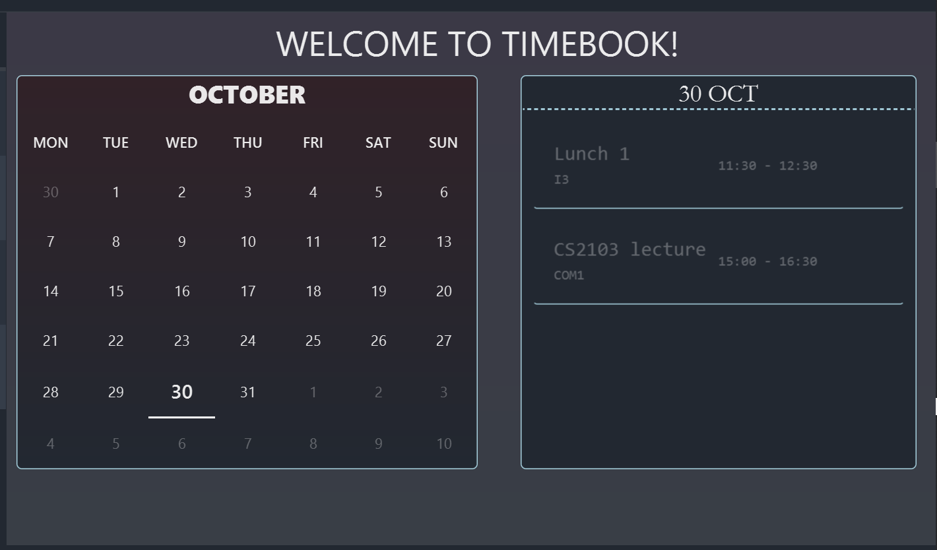
You can return back to the home page to see your upcoming schedule for today.
Format: home
6.1.2. Switch tabs: switch-tab
You can switch the tab of Person and Group using this command.
Format: switch-tab
6.1.3. Viewing help: help
Format: help
6.2. Person Management
6.2.1. Editing your details: edituser
|
When you first start using TimeBook, a default profile will be created for you!
This default profile will have a default name: To personalize TimeBook and make it yours, use the |
Lets start off by editing our profile by using the command
edituser!
Format: edituser [n/NAME] [p/PHONE] [em/EMAIL] [a/ADDRESS] [r/REMARK] [tag/TAG]…
Suppose our name is Alice, we can edit our profile like this!
Example:
-
edituser n/Alice p/91239123 a/Kent Ridge Drive em/alice@gmail.com r/Student
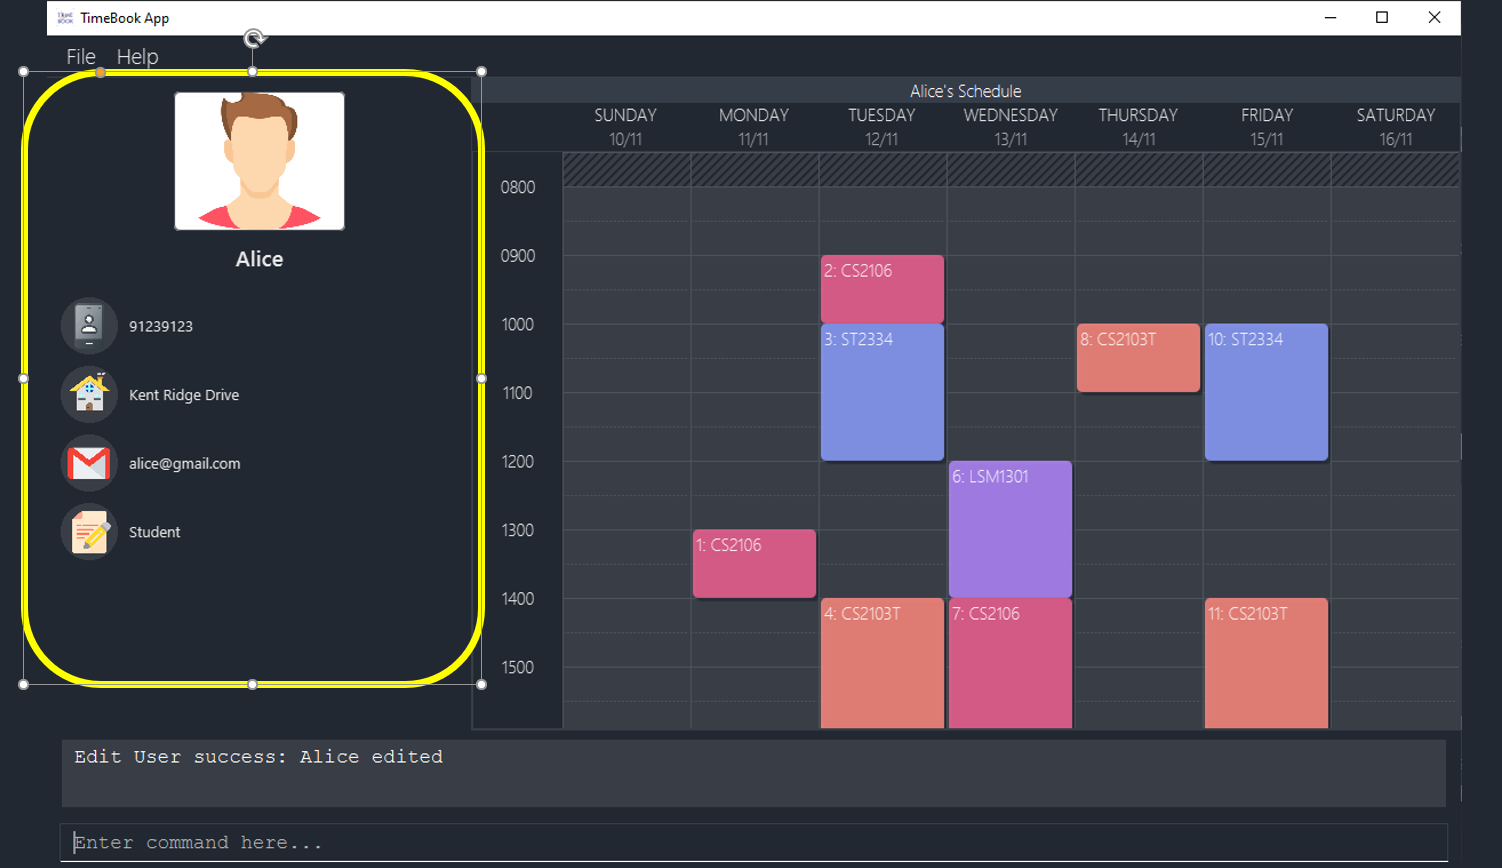
After editing our profile, this is what we should see!
6.2.2. Adding a person: addperson
The first thing to do in TimeBook is to add people that you know! It could be friends, family and even your colleagues!
To add a new person into TimeBook, simply use the command addperson and specify his or her name!
You can also optionally specify his or her phone number, email address, home address, a remark and tags.
Format: addperson n/NAME [p/PHONE] [em/EMAIL] [a/ADDRESS] [r/REMARK] [tag/TAG]…
Suppose we met our new friend Fred and want to add him into TimeBook, simply use this command!
Example:
-
addperson n/Fred p/91234567 em/fred@example.com a/kent ridge drive r/friend tag/Friends tag/Colleague

After adding Fred into the TimeBook, his name will appear on the list of people on tabs in the side panel!
6.2.3. Editing a person: editperson
Accidentally added the wrong info of a person into TimeBook? No worries, you can simple edit an existing person with our
editpersoncommand!
To edit an existing person, simply use the editperson command
and specify the name of the person you wish to edit with the ed/ prefix!
Then, simply edit each of the fields of a person with their corresponding prefixes!
Format: editperson ed/PERSON_NAME [n/NAME] [p/PHONE] [em/EMAIL] [a/ADDRESS] [r/REMARK] [tag/TAG]…
Suppose we added Fred’s name wrongly, and he wants to be called Freddie.
Additionally, he has also changed his phone number, and he wants to be your best friend!
To update his particulars, simply execute this command!
Example:
-
editperson ed/Fred n/Freddie p/85868784 r/best friend tag/bestfriend
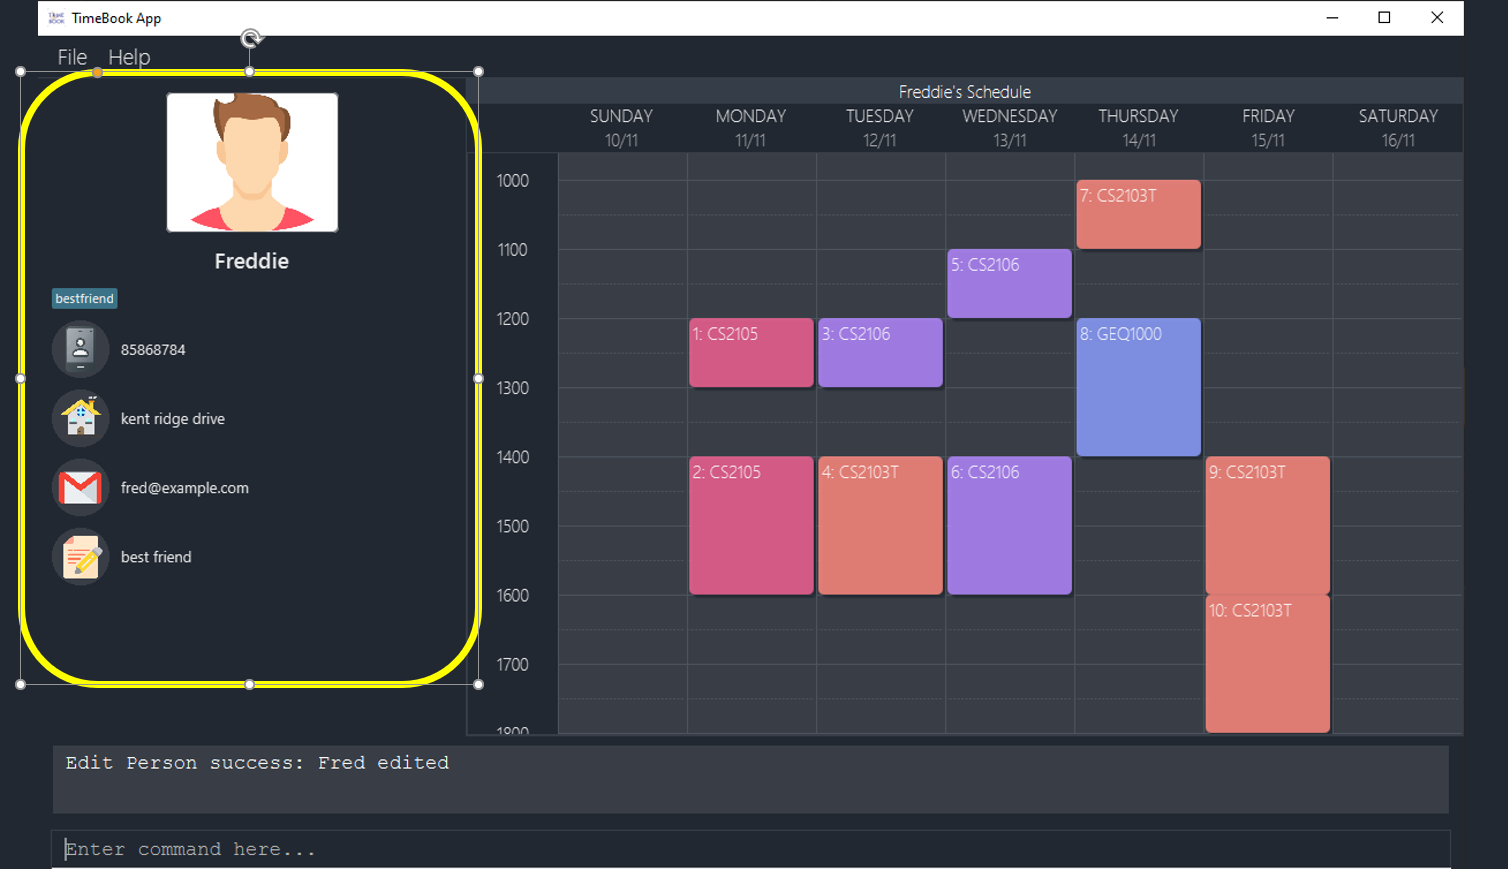
After editing a person, this is what you will see! Freddie’s details has been updated accordingly!
6.2.4. Deleting a person: deleteperson
Want to delete a person from TimeBook? That’s easy! Simply use our
deletepersoncommand!
To delete a person from TimeBook, simply use the deleteperson command
and specify the name of the person you wish to delete!
Format: deleteperson n/NAME
Suppose our business with Freddie is over, we can simply delete him from TimeBook!
Examples:
-
deleteperson n/Freddie
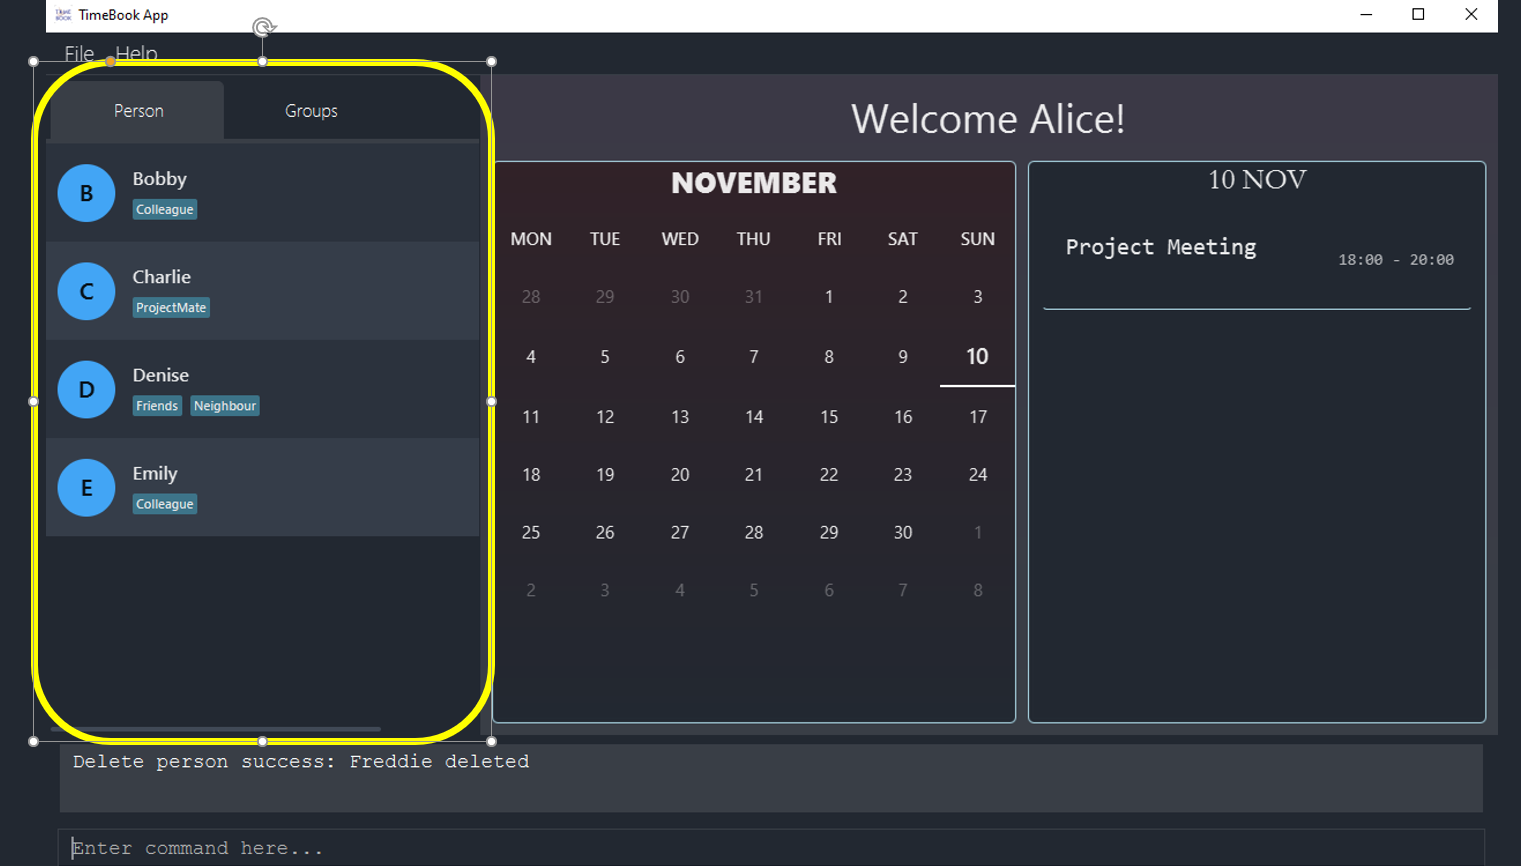
As you can see, after deleting Freddie, he is removed from our persons tab!
6.2.5. Show person: show
Want to arrange a private meeting with someone in TimeBook?
You can see the schedule of this person up to 4 weeks in advance using the show command.
Format: show n/NAME
Example:
-
Type
show n/Bobbyin the command line as shown below: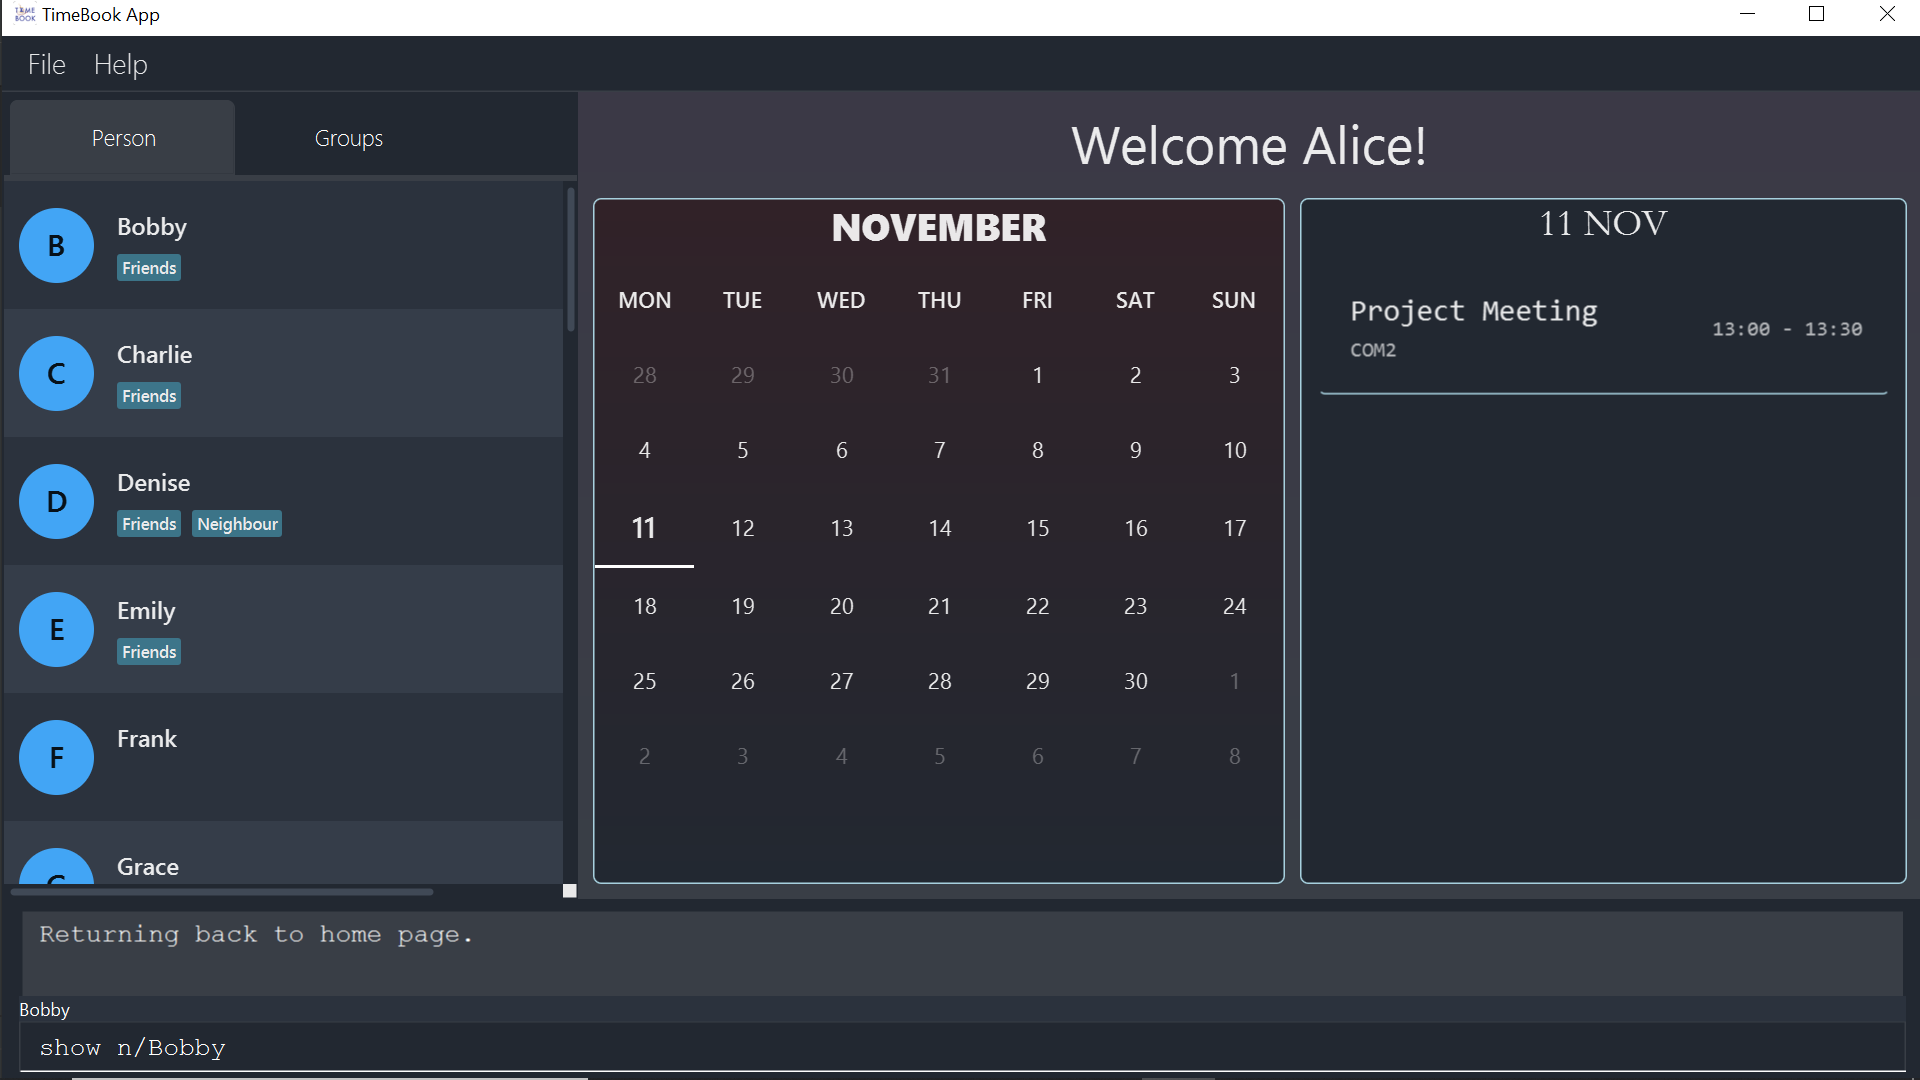 Figure 1. Command box
 -
Hit the Enter key and you should see details of the person! You should see a window similar to the one below.
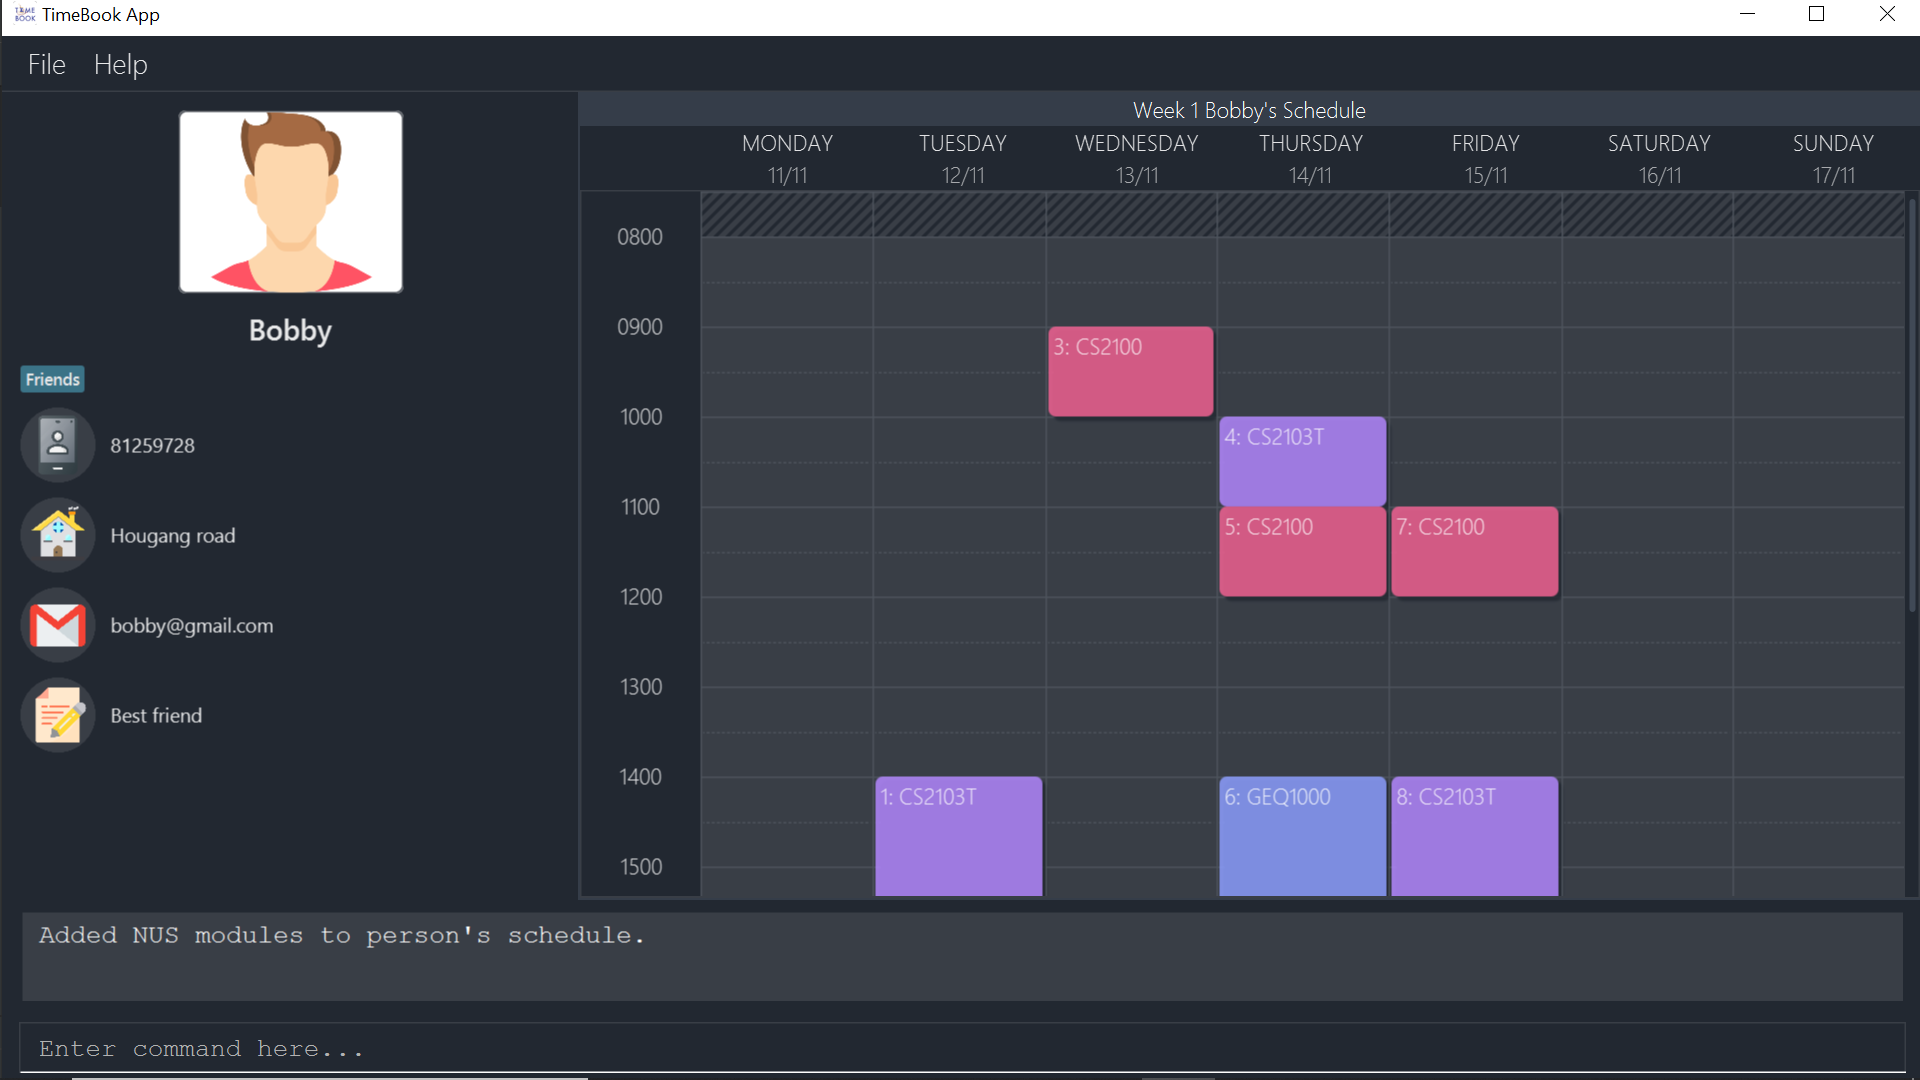 Figure 2. Result after executing the
showcommand for Bobby
![]() You can use the command
You can use the command scroll to help you scroll the schedule view without touching your mouse!
![]() You can use the command
You can use the command togglenext see the schedule for next week! You may see this schedule up to 4 weeks in advance.
After you’ve reached the fourth week’s schedule, the next togglenext command will start back on the first week’s schedule.
![]() Unfortunately, TimeBook does not let you see a schedule that has already passed.
Unfortunately, TimeBook does not let you see a schedule that has already passed.
6.3. Schedule Management
6.3.1. Add Module to Schedule: addmod
Want to add an NUS module to you or your friend’s schedule on TimeBook? You can do so with the addmod command! If you already have your timetable on NUSMods, check out the addmods command!
Format: addmod [n/NAME] m/MODULE_CODE cl/CLASS_1_TYPE:CLASS_1_NUMBER,…
-
Currently supports academic year 2019/2020 and semester 1 only.
-
If the NAME is not provided, then the modules will be added to the default user, which is you!
-
 : Just like adding a normal event via
 addevent, the module will only be added if the specified classes does not clash with any events in the person’s schedule.
Examples:
-
addmod m/CS2103T cl/LEC:G01
This adds CS2103T lecture G01 to your schedule. -
addmod n/John m/CS3230 cl/LEC:1,TUT:08
This adds CS3230 lecture 1 and tutorial 08 to John’s schedule. -
addmod n/John m/CS2100 cl/LEC:1,TUT:01,LAB:08
This adds CS2100 lecture 1, tutorial 01 and lab 08 to John’s schedule.
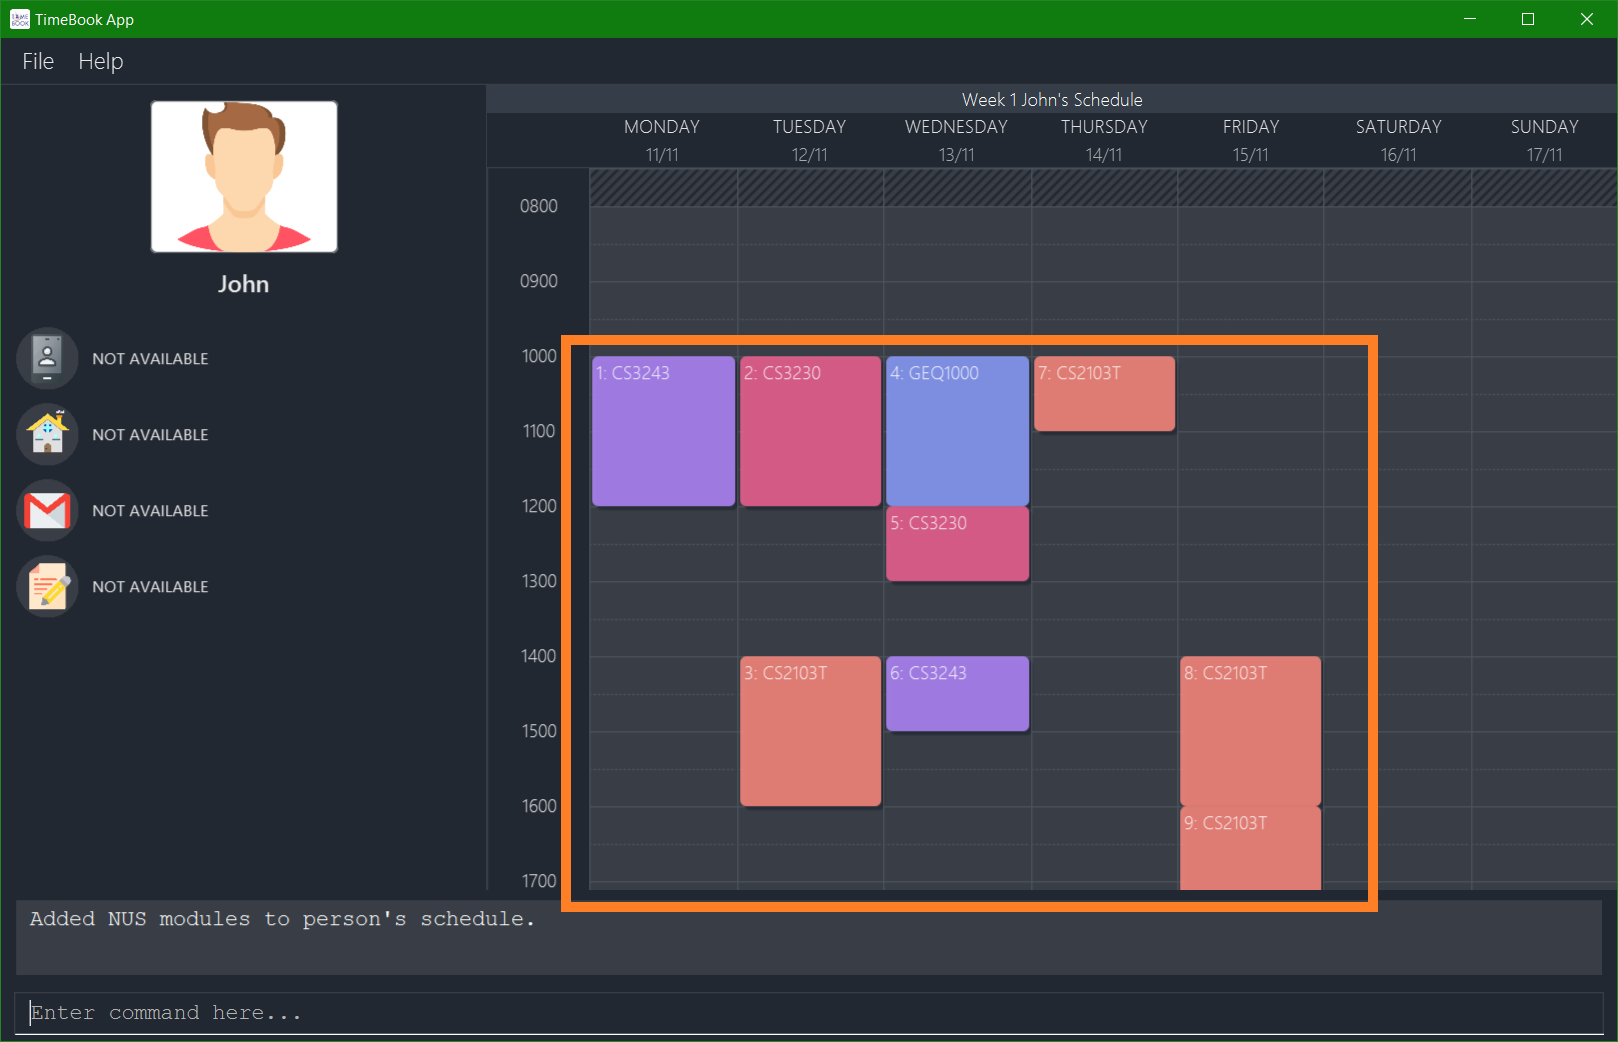
How do I add an NUS module to my schedule?
-
Suppose you want to add CS3230 lecture 1 and tutorial 08 to your schedule. You can add the classes to your schedule easily by first typing
addmod m/CS3230 cl/LEC:1,TUT:08into the command box, then pressing Enter to execute it!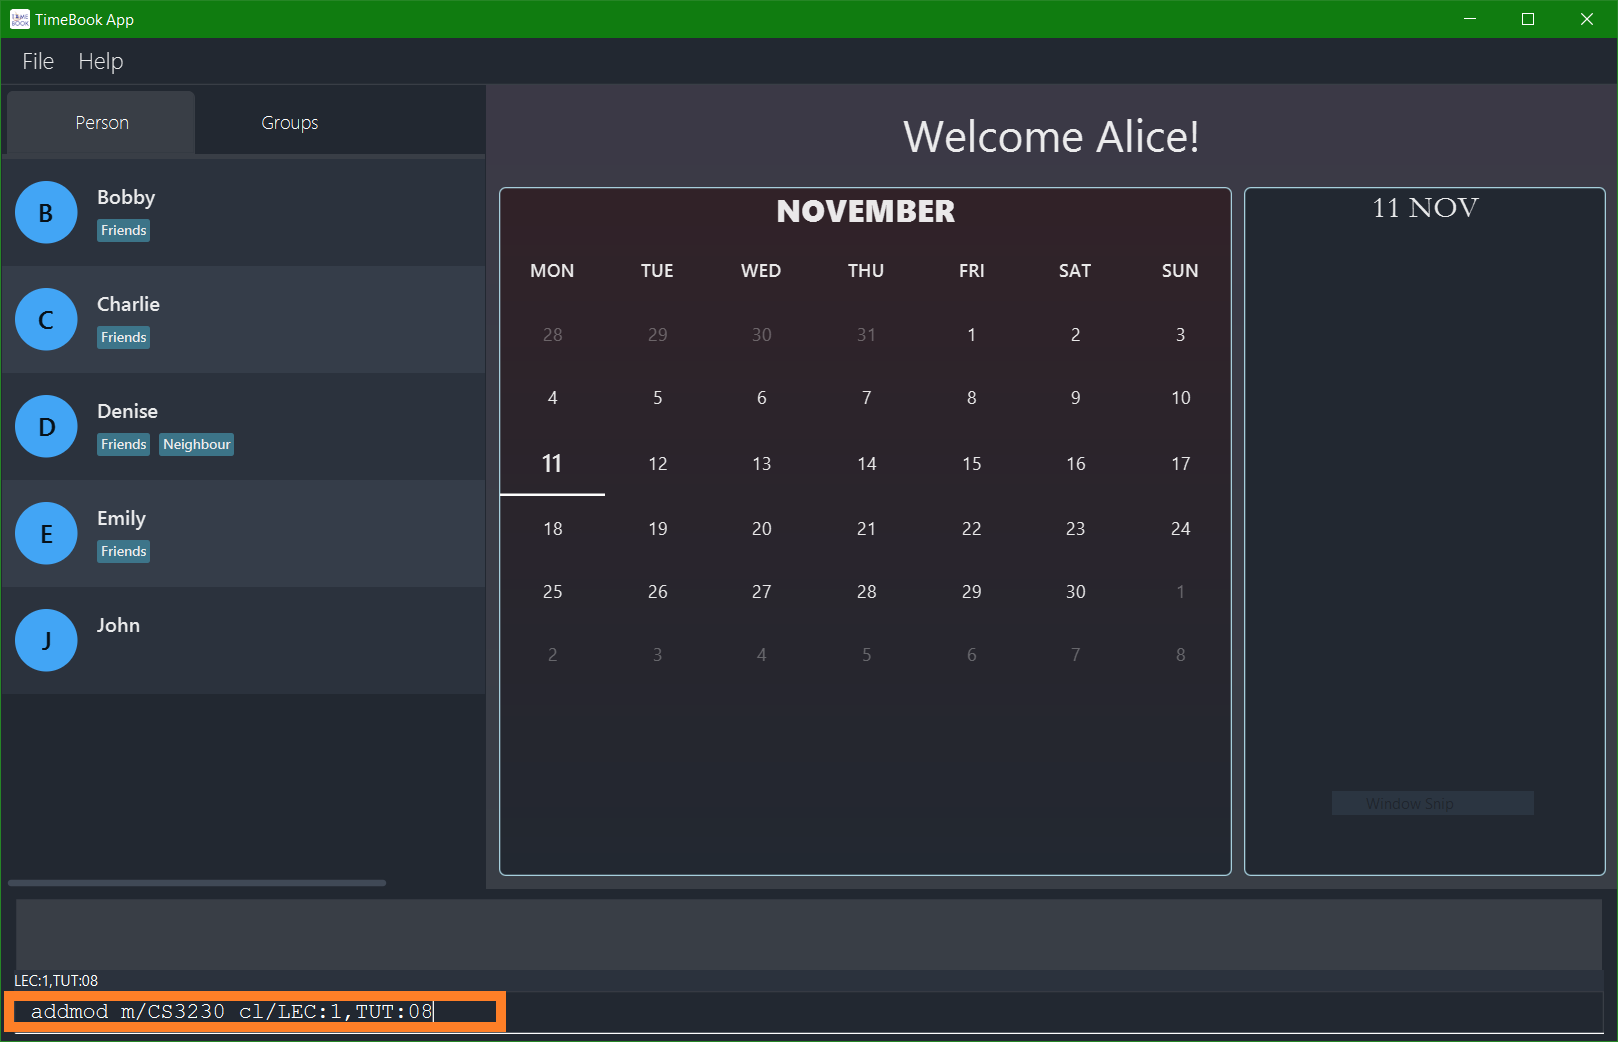
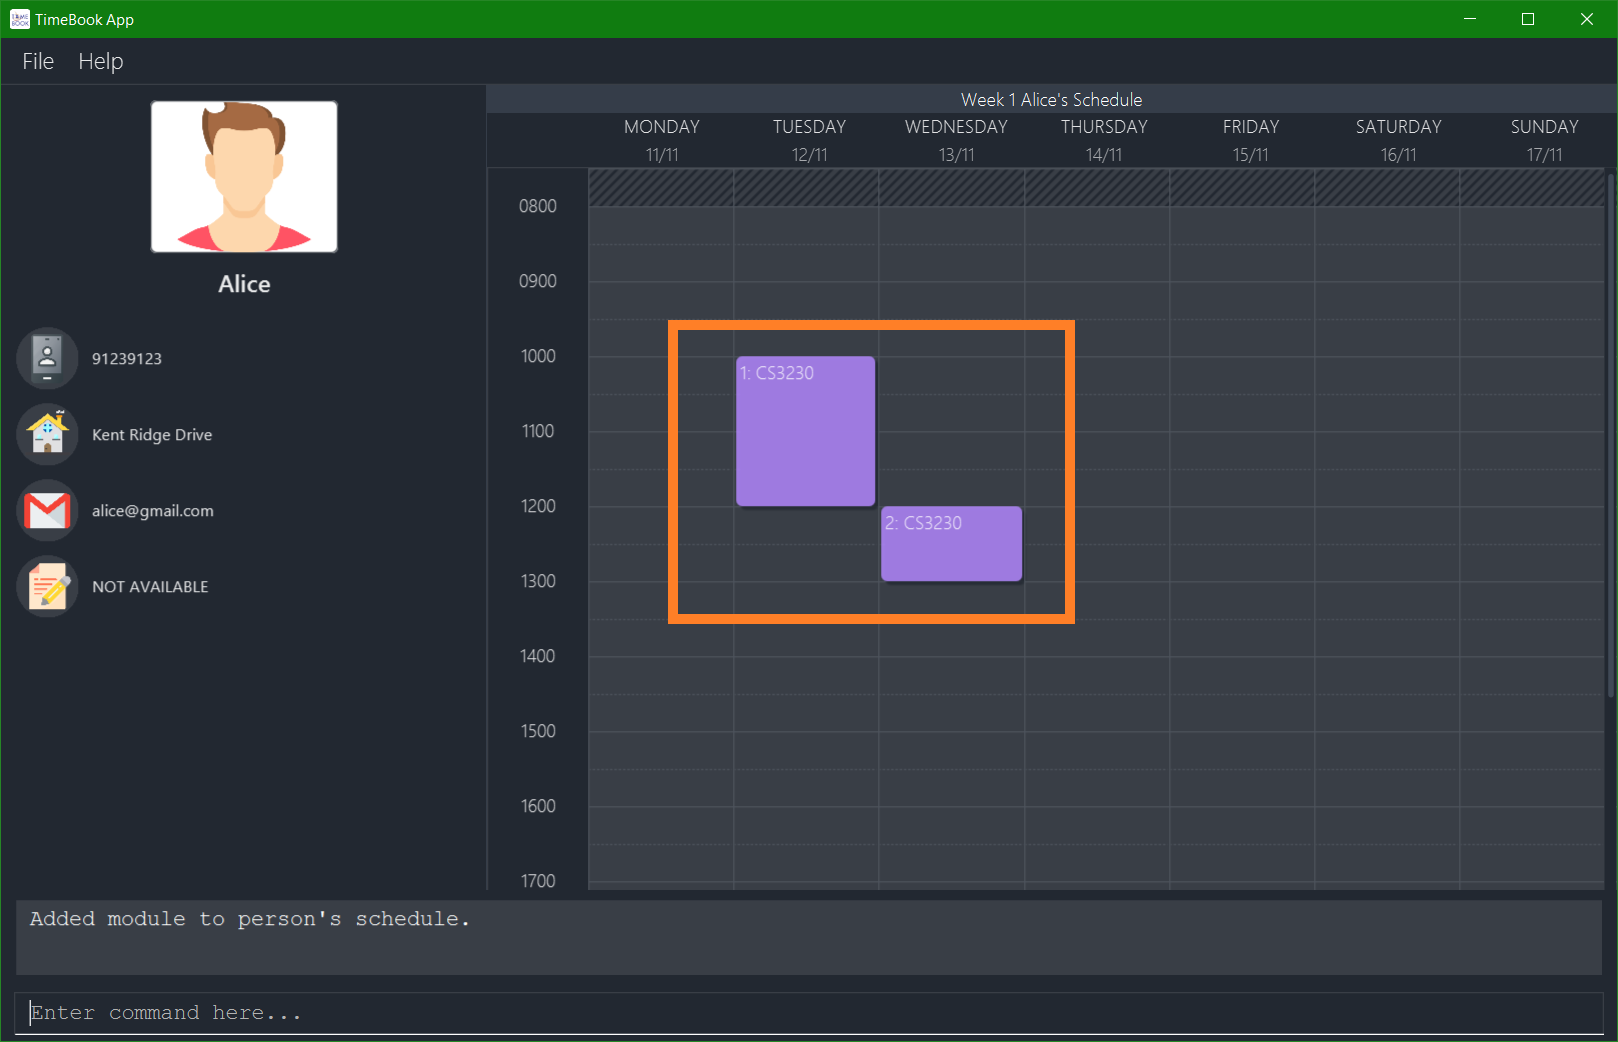
-
If you manage to successfully add the module and its classes into the person’s schedule, you will see the person’s schedule appearing with the newly added timeslots:
6.3.2. Add Modules via NUSMods Link: addmods
Already have your modules timetable on NUSMods?
Great, you can easily add your modules timetable into TimeBook with the addmods command!
Format: addmods [n/NAME] link/NUSMODS_SHARE_LINK
-
Reads the specified
NUSMODS_SHARE_LINKto get the modules and classes, then adds the classes into the person’s schedule. -
If the NAME is not provided, then the modules will be added to the default user, which is you!
-
Currently supports academic year 2019/2020 and semester 1 only.
-
: Just like adding a normal event via
addevent, the module will only be added if the specified classes does not clash with any events in the person’s schedule.
Examples:
-
addmods link/https://nusmods.com/timetable/sem-1/share?CS2101=&CS2103T=LEC:G05&CS3230=LEC:1,TUT:08&CS3243=TUT:07,LEC:1&GEQ1000=TUT:D17
This will add the modules in the NUSMods link to your schedule. -
addmods n/John link/https://nusmods.com/timetable/sem-1/share?CS2101=&CS2103T=LEC:G05&CS3230=LEC:1,TUT:08&CS3243=TUT:07,LEC:1&GEQ1000=TUT:D17
This will add the modules in the NUSMods link to John’s schedule. -
addmods n/Bob link/https://nusmods.com/timetable/sem-1/share?CS2101=&CS2103T=LEC:G05&CS3230=LEC:1,TUT:08&CS3243=TUT:07,LEC:1&GEQ1000=TUT:D17
This will add the modules in the NUSMods link to Bob’s schedule.
How do I add my team member John’s NUSMods timetable to TimeBook?
-
Well that is simple, add John’s NUSMods timetable by first typing
addmods n/John link/into the command box, then copy and paste his NUSMods link. Finally, press Enter to execute it.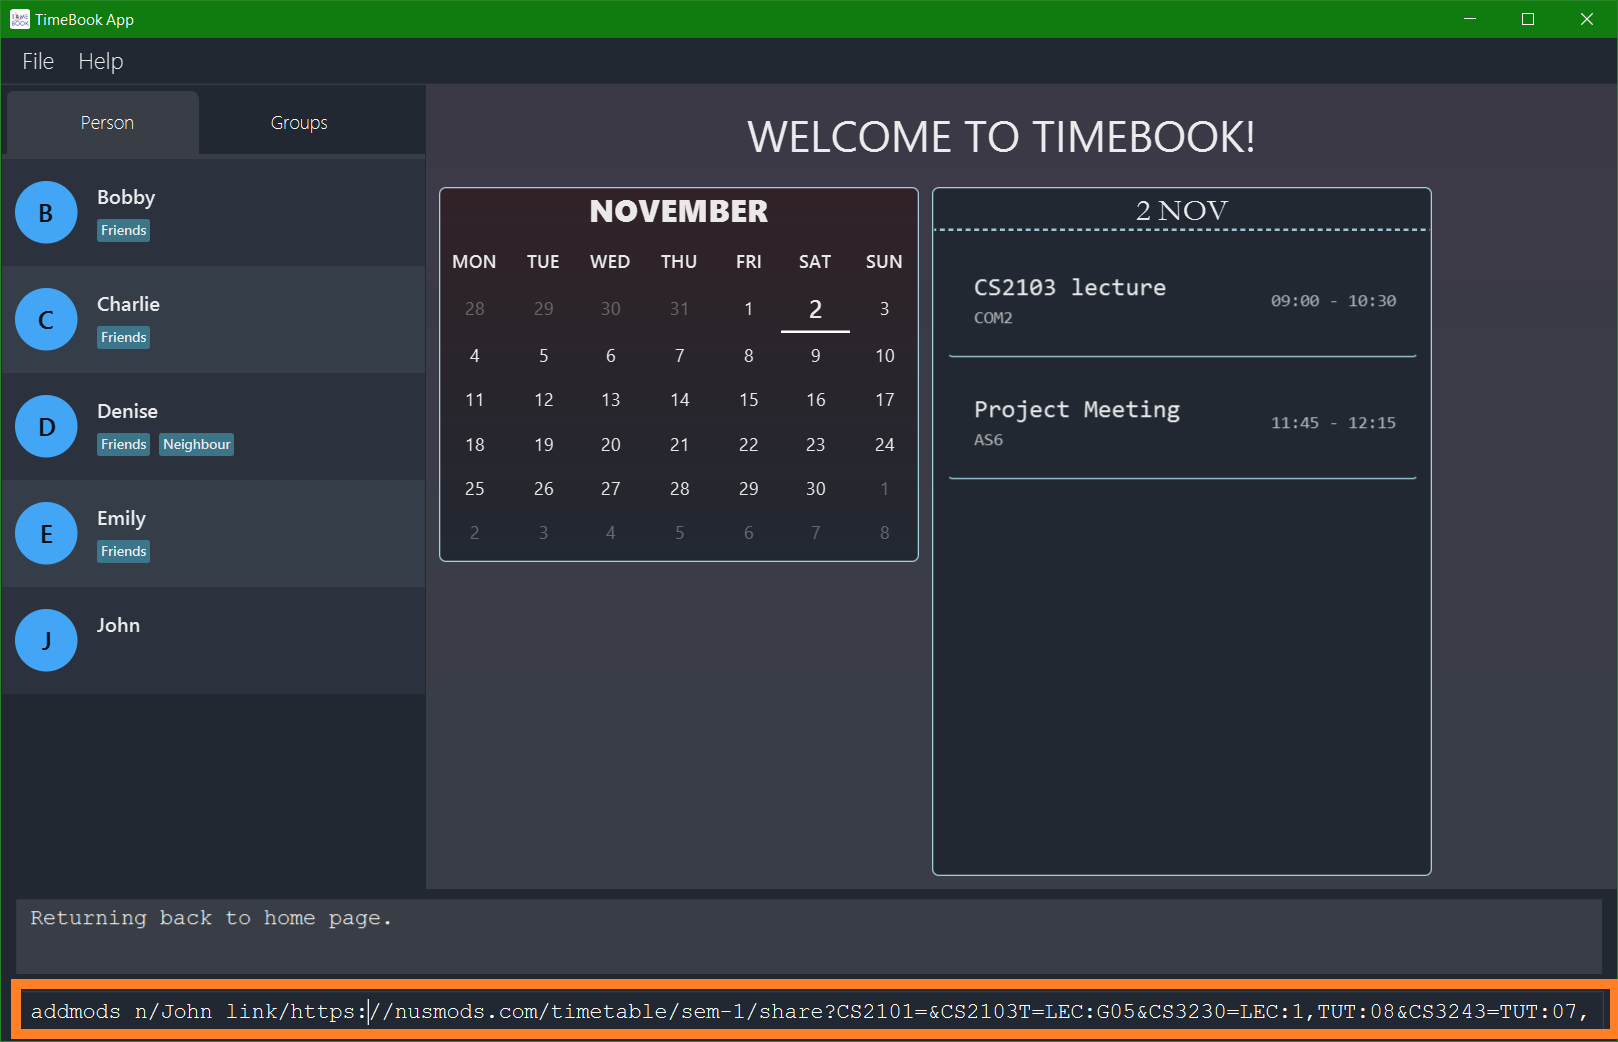
-
If the command succeeds, you will see John’s schedule update with the newly added timeslots from his NUSMods timetable:
6.3.3. Add Event to Schedule: addevent
Have an event outside of your NUSmods timetable? Simply add them in using the
addeventcommand!
To add an event into TimeBook, simply specify the name of that event, and the time slots of that event!
Format:
-
addevent [n/NAME] e/EVENT_NAME t/DATETIME…
Suppose Bobby has to meet his project mates to work on his project, let’s try adding that event into our TimeBook!
Example:
-
addevent n/Bobby e/Project Meeting t/10112019-1200-1400-COM1 t/13112019-1000-1200-AS6
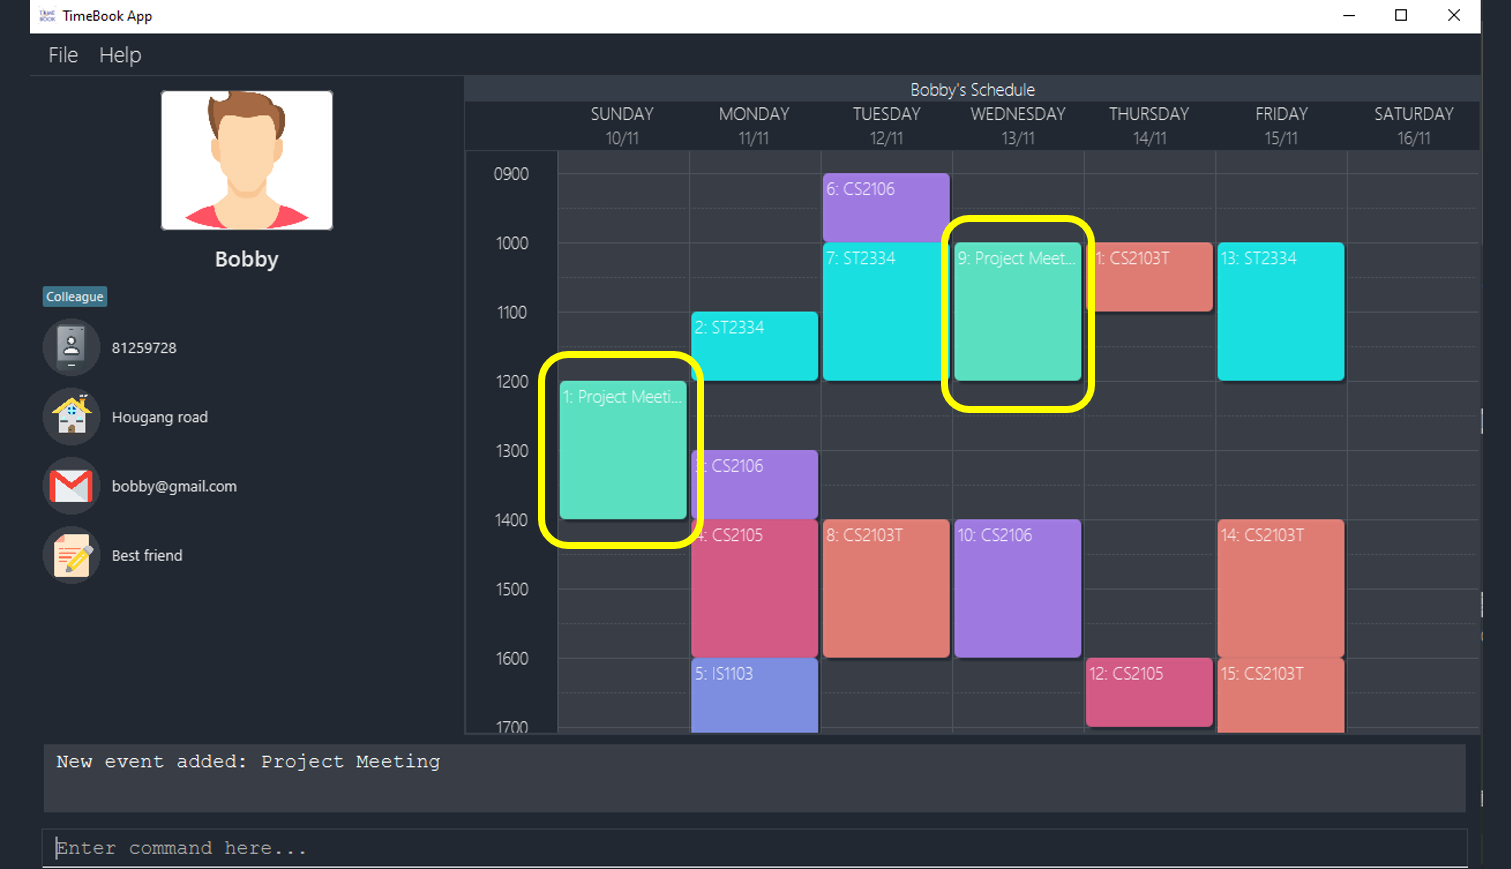
After adding the event into our TimeBook, Bobby’s schedule is automatically updated!
6.3.4. Delete an Event from a Schedule: deleteevent
What should I do if an event is cancelled? Simply delete it from TimeBook with our
deleteventcommand!
To delete an event, simply execute the deleteevent command and specify the event to delete and the person
to delete it from!
Format:
-
deleteevent [n/NAME] e/EVENT_NAME
-
The
n/(optional) prefix specifies the name of the person whom we want to delete an event from. -
If the
n/prefix is not specified, TimeBook will try to delete the event from your schedule! -
 You can delete a module by specifying the module code!
A module’s event name is its module code!
You can delete a module by specifying the module code!
A module’s event name is its module code!
Suppose Bobby wants to drop CS2105 from his timetable as he finds it too hard to cope with so many modules. We can simply delete it!
Example:
-
deleteevent n/Bobby e/CS2105
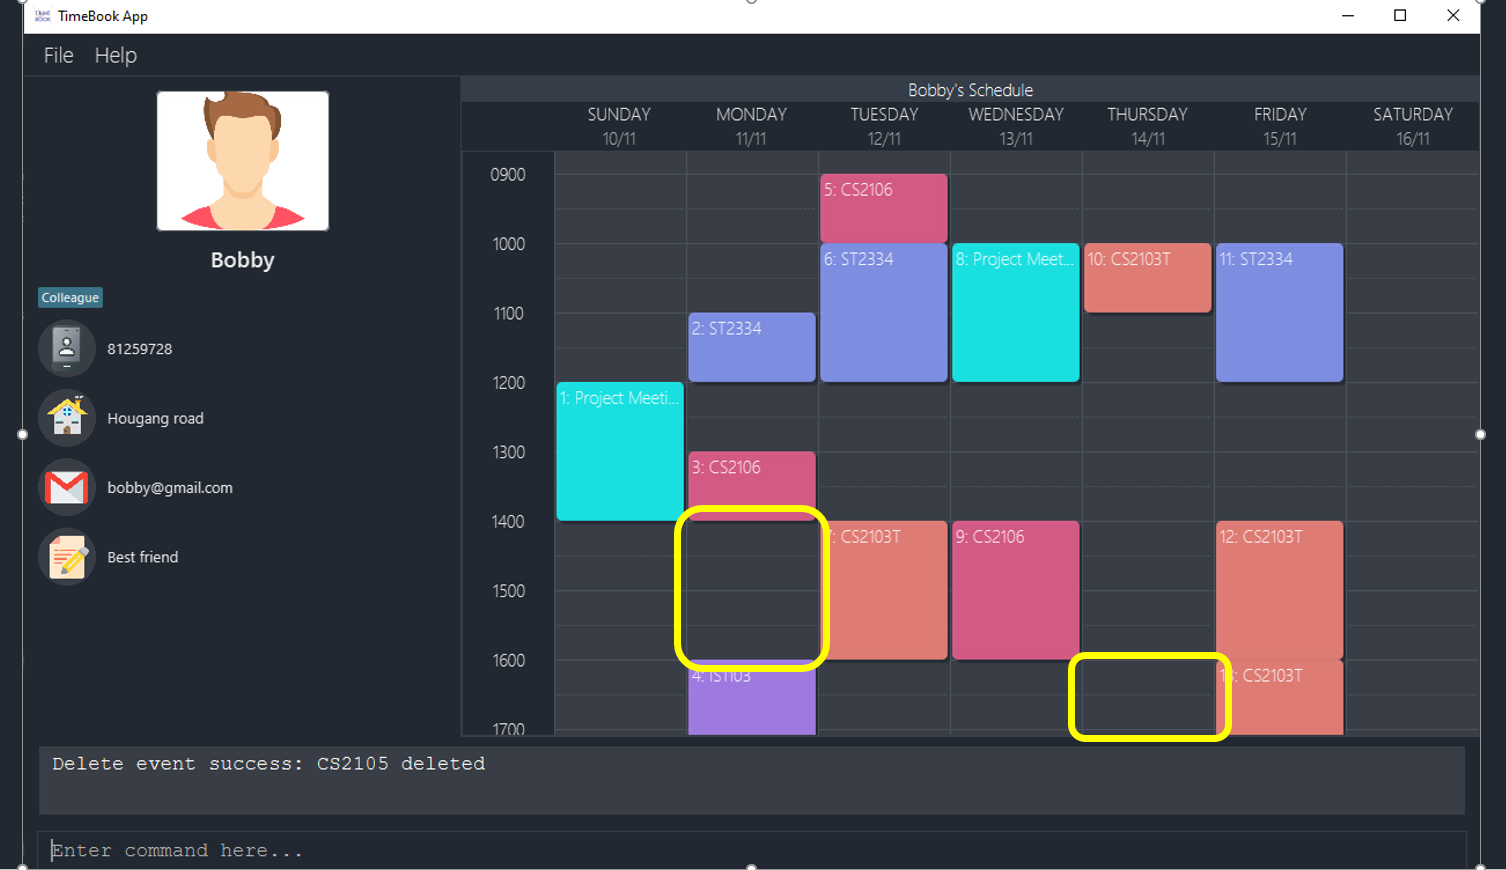
After deleting that event from TimeBook, Bobby’s schedule is automatically updated!
6.3.5. Generate a Schedule: schedule
Want to see a schedule between you and your friends? Simple use the
schedulecommand!
To generate a schedule for you and your friends, simply execute the schedule command and
specify who to add to this schedule!
Format:
-
schedule n/NAME…
Lets try and generate a schedule between you, Bobby and Charlie! Execute the following command!
Example:
-
schedule n/Bobby n/Charlie
When executing the command, TimeBook will calculate the free time slots among the schedule members!
6.4. Group Management
6.4.1. Adding a group: addgroup
In TimeBook, we allow you to organise your contacts too! This can be done through making groups! This can be done using our
addgroupcommand!
To add a new group into TimeBook, simply execute the addgroup command
and specify the name of the group you want to make!
Format:
-
addgroup g/GROUP_NAME [d/GROUP_DESCRIPTION] [role/USER_ROLE]
-
 Whenever a new group is created, you are automatically added into that group!
 -
The
g/prefix specifies the name of the group you want to create.-
A group name must be alphanumeric
-
-
The
d/prefix (optional) gives a description to the group-
A group description must be alphanumeric
-
-
The
role/prefix (optional) specifies the role you play in that group-
A role must be alphanumeric
-
Suppose you want to create a new group for your CS2103 project, and you are appointed as the leader for this group!
Let’s try to add a new group with the following command!
Example:
-
addgroup g/CS2103 d/A CS2103 project group role/Leader
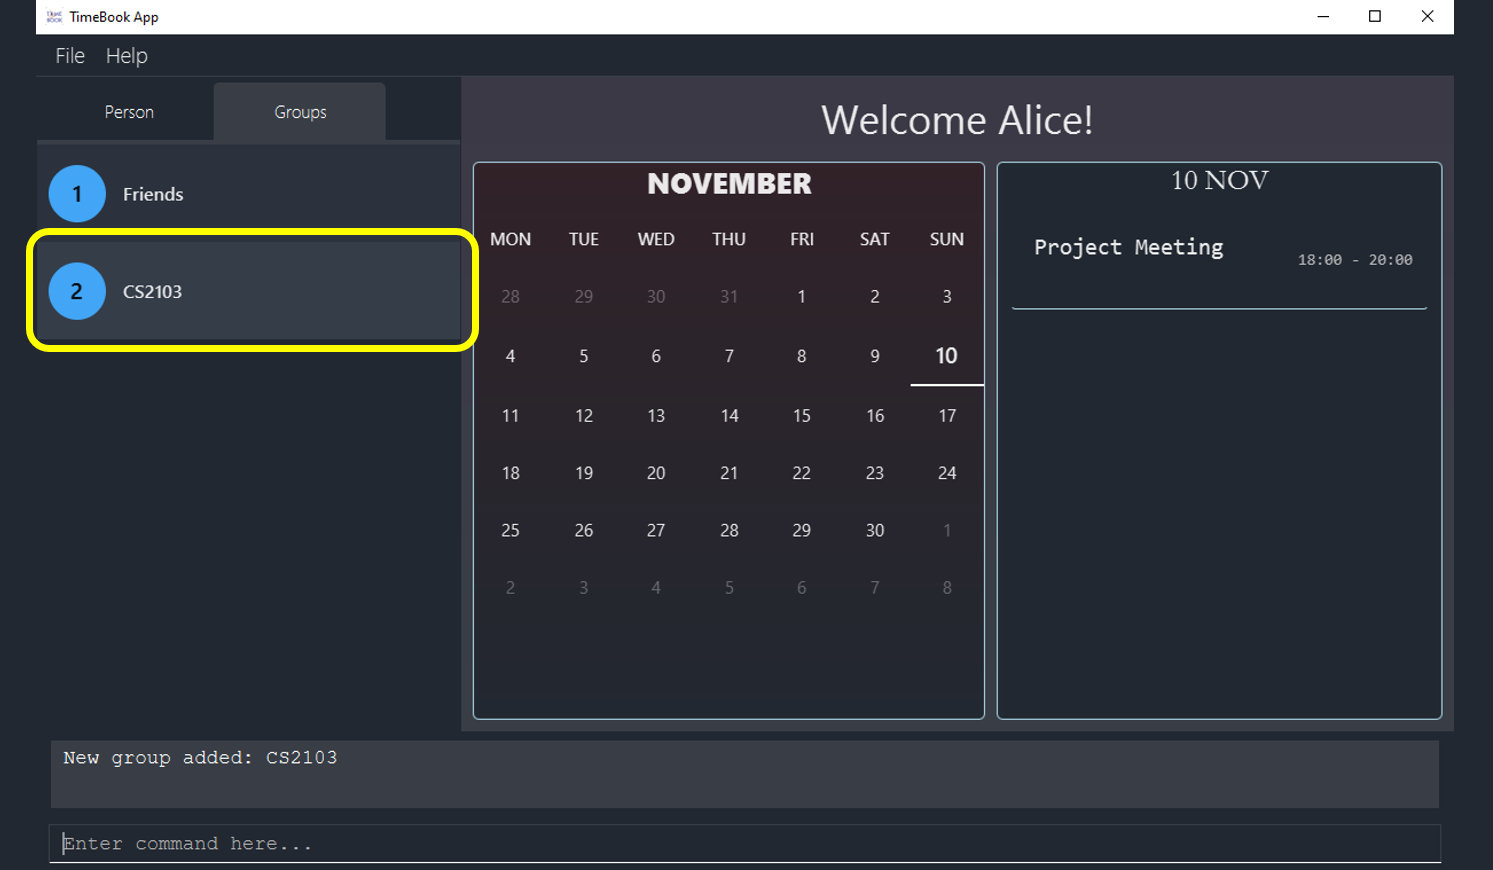
When a new group is added, it is automatically added into the list of groups!
6.4.2. Editing a group: editgroup
The details for your group has changed? Edit it with our
editgroupcommand!
To edit an existing group, simply use the editgroup command
and specify the name of the group you wish to edit with the ed/ prefix!
Format: editgroup ed/GROUP [g/GROUP_NAME] [d/GROUP_DESCRIPTION] [role/USER_ROLE]
Suppose we entered the details for our group wrongly, no worries we can edit them!
Example:
-
editgroup ed/CS2103 g/CS3203 d/A CS3203 project group role/Member
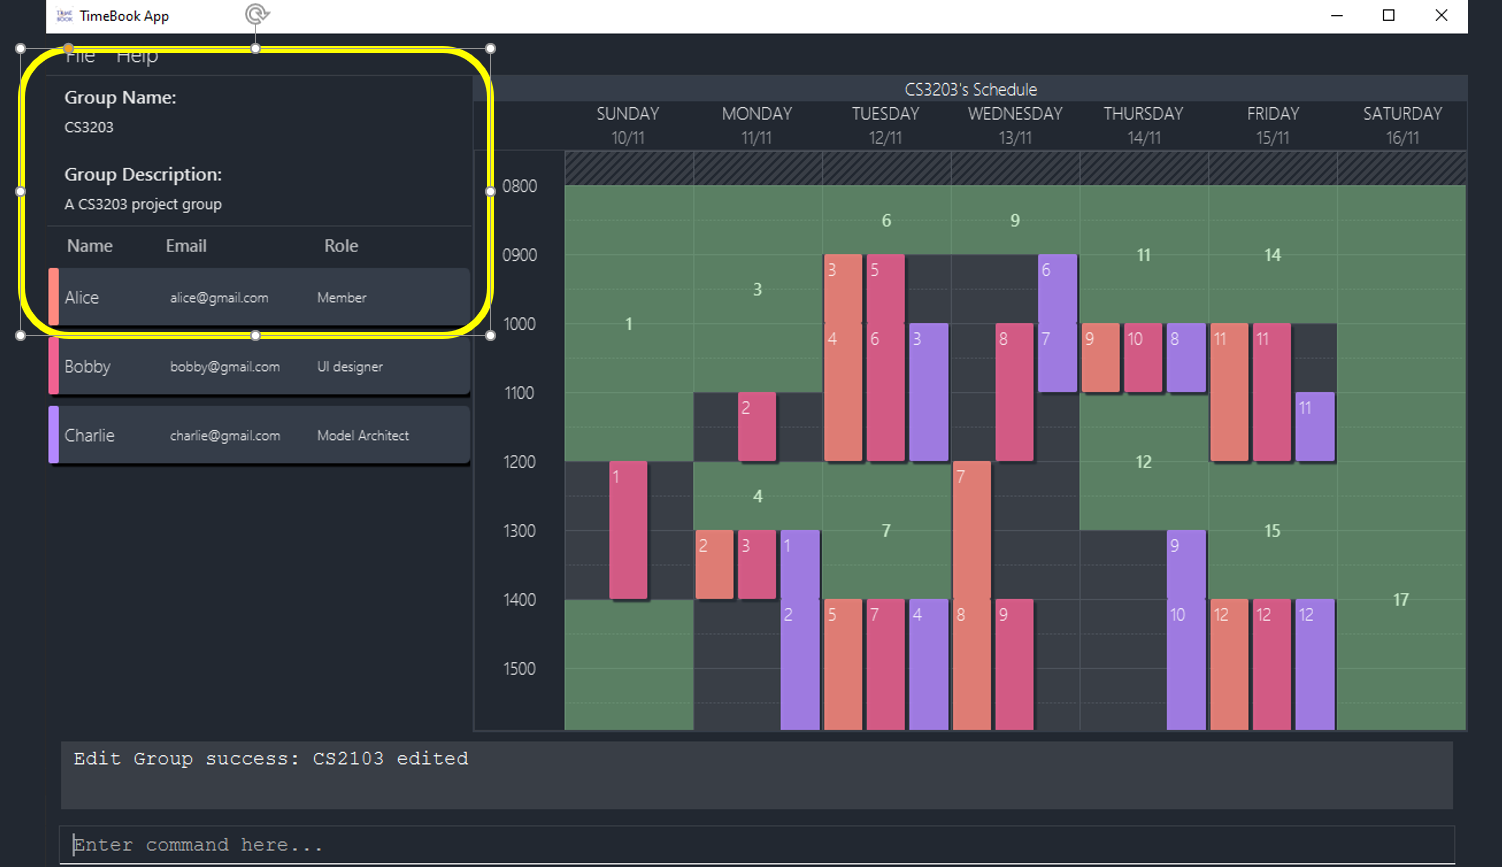
When a group is edited, it is automatically updated as shown above!
6.4.3. Add Person to Group: addtogroup
After you have created your group, you can add people into the group with our
addtogroupcommand!
To add a person into a group, simply execute the addtogroup command,
and specify the person’s name and the group’s name!
Format: addtogroup n/PERSON_NAME g/GROUP_NAME [role/ROLE]
Let’s add a new person Denise into our CS3203 project group!
Example:
-
addtogroup n/Denise g/CS3203 role/Manager

When a new person is added into the group, it automatically updates the group’s schedule as well!
6.4.4. Delete a Person from Group: deletefromgroup
What if I want to remove a person from my group? You can! With our
deletefromgroupcommand!
To delete a person from a group, simply execute the deletefromgroup command,
and specify the person’s name and the group’s name and the person will be removed from the group!
Format:
-
deletefromgroup n/NAME g/GROUP_NAME
-
The
n/prefix specifies the name of theperson -
The
g/prefix specifies the name of thegroup -
This person must be in the group
-
deleting a person from group does not delete your contacts!
Your contacts still exists in your persons tab!
Let’s remove Charlie from our group! We can simply execute the following command!
Example:
-
deletefromgroup n/Charlie g/CS3203

When a person is removed from the group, the group’s schedule will automatically be updated as well!
6.4.5. Deleting a group: deletegroup
The project is over, and there is no need for this group anymore? Delete it!
To delete a group, simply execute the deletegroup command and
specify the group’s name!
Format:
-
deletegroup g/GROUP_NAME
-
The
g/prefix specifies the name of thegroup -
deleting a group does not delete your contacts!
Your contacts still exists in your persons tab!
Let’s delete CS3203 group from our TimeBook! Simply use this command!
Example:
-
deletegroup g/CS3203
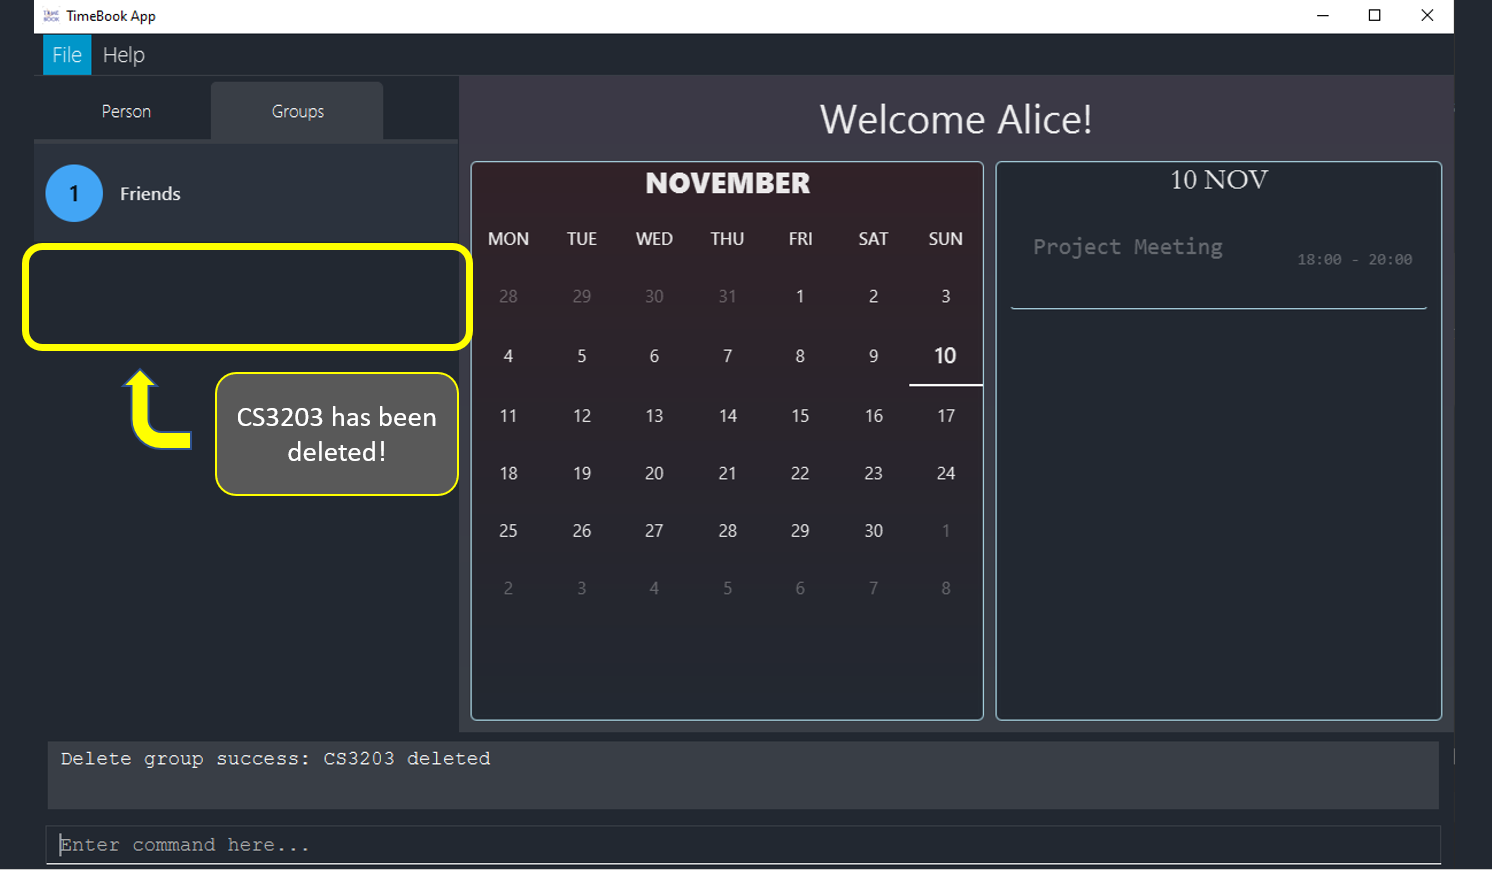
Deleteing a group will automatically update your groups tab!
6.4.6. Show group: show
Want to see your group’s schedules to plan for your next group meeting? The show command is what you need to see
the schedules of your group members! You can view a group’s schedule up to 4 weeks in advance.
Format: show g/GROUP_NAME
|
When you first start using TimeBook, a default profile will be created for you!
This default profile will have a default name: |
Examples:
-
Let’s say you want to organise a group meeting for a group named CS2103. Simply enter
show g/CS2103in the command line as shown below Figure 3. Command box
 -
Hit the Enter key and you should see the details of this group in a similar window below.
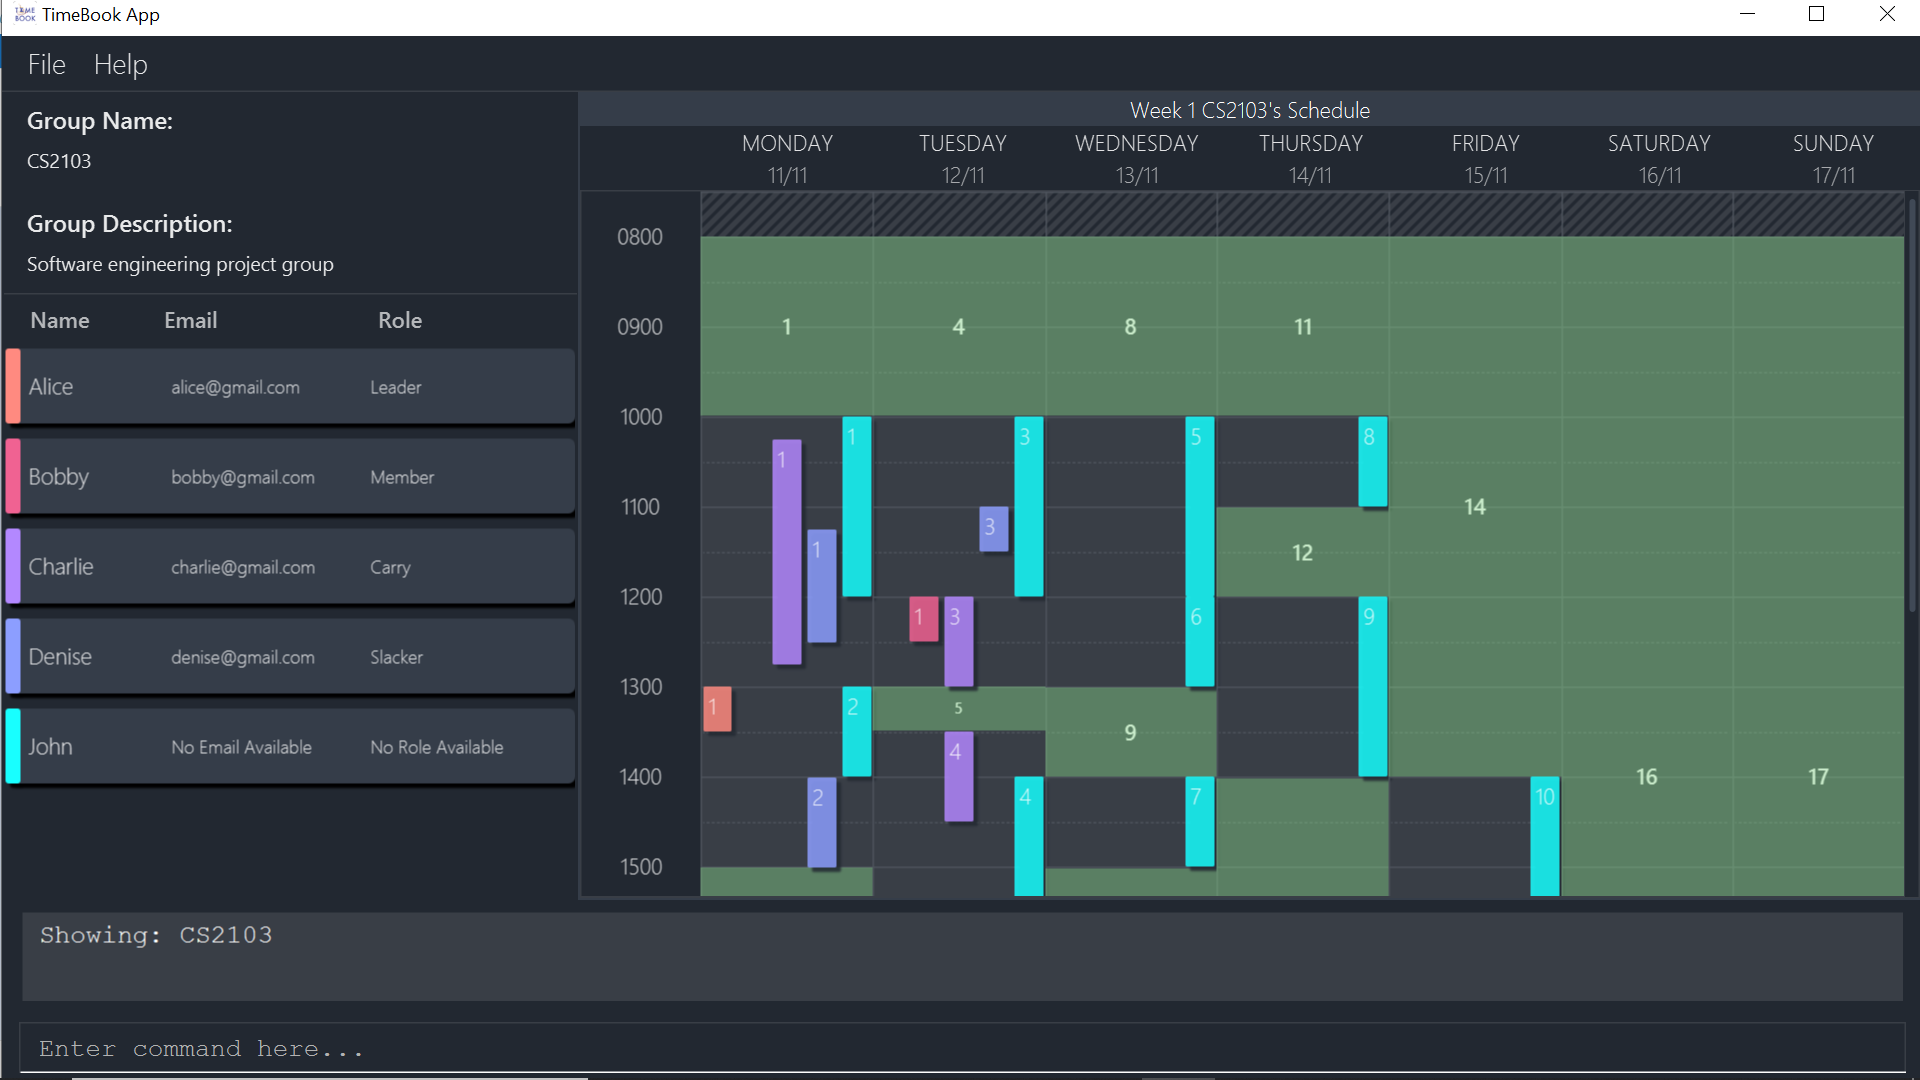 Figure 4. Result after executing
show g/CS2103
![]() You can use the command
You can use the command scroll to help you scroll the schedule view without touching your mouse!
![]() You can use the command
You can use the command togglenext see the schedule for next week! You may see this schedule up to 4 weeks in advance.
After you’ve reached the fourth week’s schedule, the next togglenext command will start back on the first week’s schedule.
![]() Unfortunately, TimeBook does not let you see a schedule that has already passed.
Unfortunately, TimeBook does not let you see a schedule that has already passed.
6.4.7. Look at some members: lookat
Suppose that all of your group members are extremely busy and the common free time is too short to do any productive work,
you may use the lookat command to see if you can meet with some of your group members. You must be viewing a group’s
schedule in order for this command to work.
Format:
-
lookat [n/Name]…
The lookat command takes in any number of n/Name arguments and highlights the group members according to name.
Example:
Let’s use the same schedule exactly like the one shown above.
-
Type
lookat n/Bobby n/Deniseif you are interested to inspect both Bobby’s and Denise’s schedules! You should see that both of these schedules become highlighted.

![]() Empty blocks represent the free time slots for the group members that you are looking at.
The green blocks still represent the common free time slots for the entire group!
Empty blocks represent the free time slots for the group members that you are looking at.
The green blocks still represent the common free time slots for the entire group!
6.5. Advanced Features
6.5.1. Show Module: showmod
Want to know more information about an NUS module? Use showmod to quickly open up the NUSMods page for a specific module on your browser!
Format: showmod m/MODULE_CODE
-
: This command requires internet connection.
Examples:
-
showmod m/CS2103T
Opens up https://nusmods.com/modules/CS2103T on your default browser. -
showmod m/CS2101
Opens up https://nusmods.com/modules/CS2101 on your default browser.
6.5.2. Export: export
Want to share a schedule with your friends?
This command exports a visualisation representation of the schedule (timetable) of a group or person to a PNG file!
![]() Take note when exporting a person’s schedule, sensitive information are omitted. Only the person’s schedule is exported.
Take note when exporting a person’s schedule, sensitive information are omitted. Only the person’s schedule is exported.
![]() Take note that if you are exporting a group’s schedule, the entire group’s schedule will be exported. If you have used the
Take note that if you are exporting a group’s schedule, the entire group’s schedule will be exported. If you have used the lookat command, this command disregards it.
Format:
-
Simply enter the
exportcommand to export the currently shown schedule in TimeBook!
6.5.3. Select Time Slot: select
Want to get more information about a particular time slot? Want to know where the venue of that time slot is? No worries! Simply select the time slot and TimeBook will tell you all about it!
When viewing a schedule on TimeBook, you can select a time slot to get more information out of it!
The select command works when you are viewing a group’s schedule, person’s schedule or home page! The format for this command’s
use are detailed below!
Format (group schedule): select n/NAME [week/WEEK_NUMBER] i/ID
-
Selects a time slot specified by
IDthat belongs to a person specified byNAME, on weekWEEK_NUMBER
Format (person schedule): select [week/WEEK_NUMBER] i/ID
-
Selects a time slot specified by
IDon weekWEEK_NUMBERthat belongs to the current person shown in the schedule -
If a name is specified, TimeBook will ignore it! Because we know you want to view the current person that is shown!
Format (home): select i/ID
-
Selects a time slot specified by
IDon your home page. The home page will not show the ID of the time slot, theIDis ordered with the earliest time slot asID:1 -
If a person name or week is specified, TimeBook will ignore it! Because we know you want to view the time slots on your home page!
Prefixes:
-
n/: specifies the name of a person-
A name must be alphanumeric
-
-
week/specifies the week of the schedule (optional)-
A week must be an interger between 1 and 4 inclusive
-
If no week number is specified, TimeBook will choose the default week 1
-
-
i/: specifies the ID number of the time slot-
An ID must be a positive number.
-
When you execute the select command, it generates a pop up window that shows you the details of the selected time slot!
We have also integrated this service with GoogleMaps and shows you the location of this time slot on the map!
The figure below shows how a pop up window will look like!
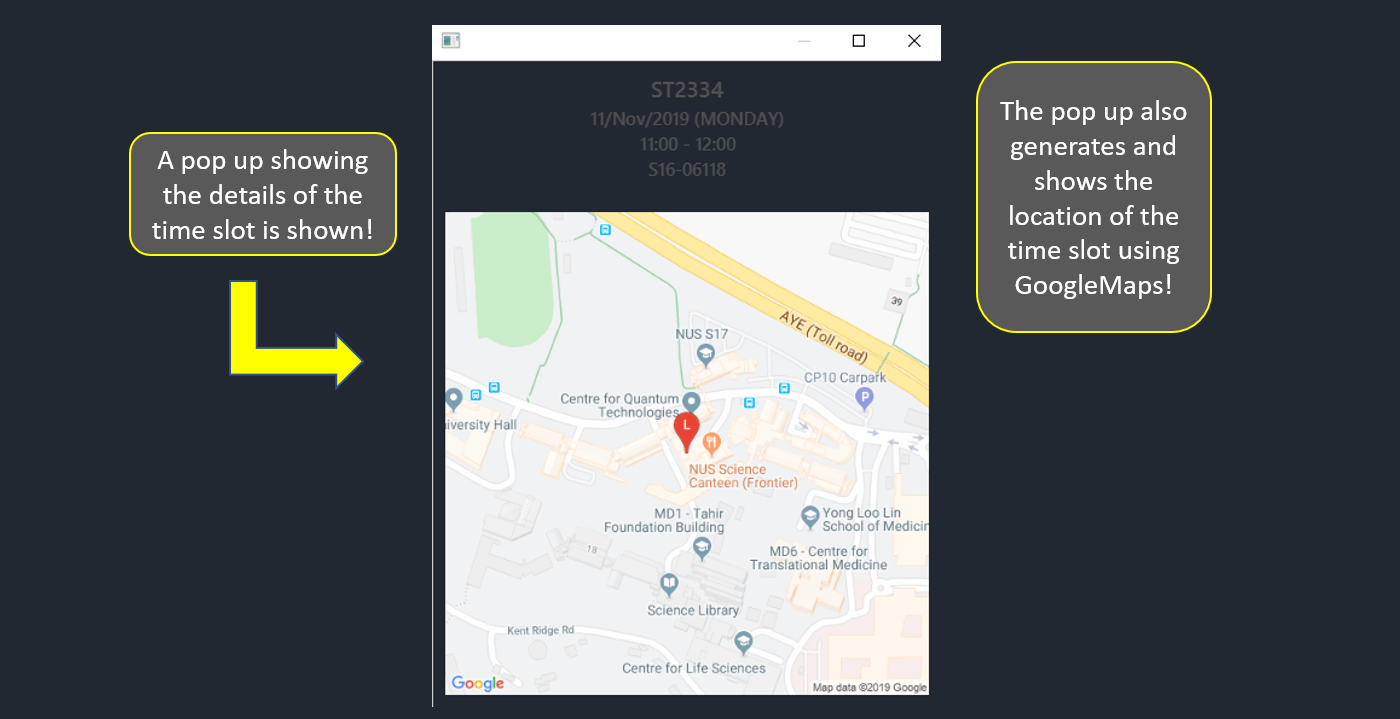
After you have viewed the time slot details, simply press the ESC key on your keyboard, and it will close the pop up!
You will never have to touch your mouse!
| ![]() | When the location of the time slot is not a valid location in NUS, the location
will not be shown on the map!
| When the location of the time slot is not a valid location in NUS, the location
will not be shown on the map!
The following shows some example usage!
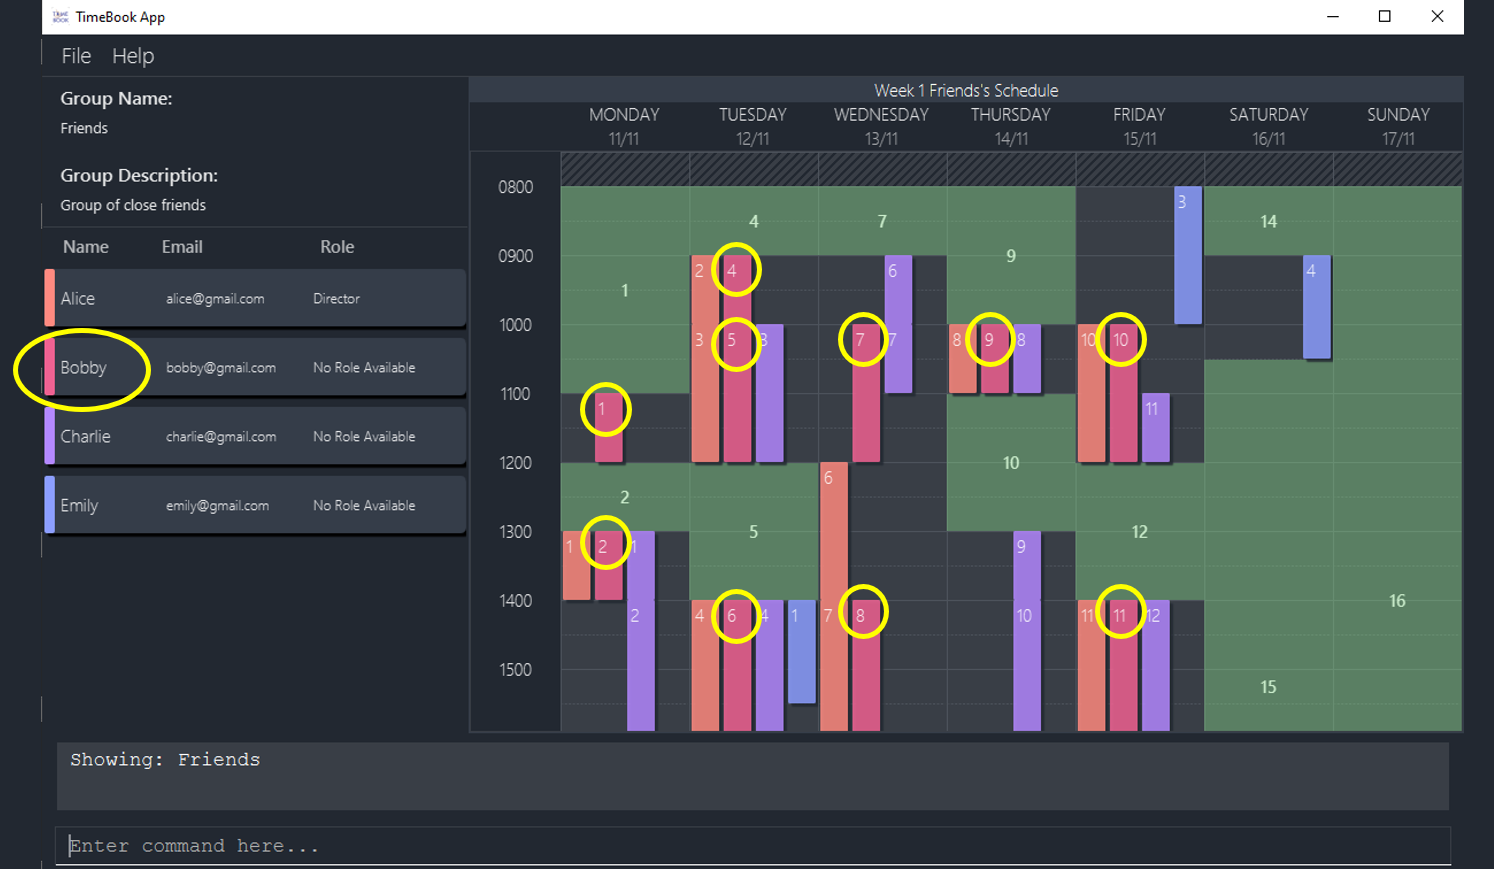
When a group’s schedule is shown, each members time slots are colour coded as shown above. Each time slot is also labeled with an ID for easy reference!
Let us try to select Bobby’s time slot 1. To select it, simply execute the following command!
Example:
-
select n/Bobby i/1
After executing that command, a pop up will be shown just like the one above!
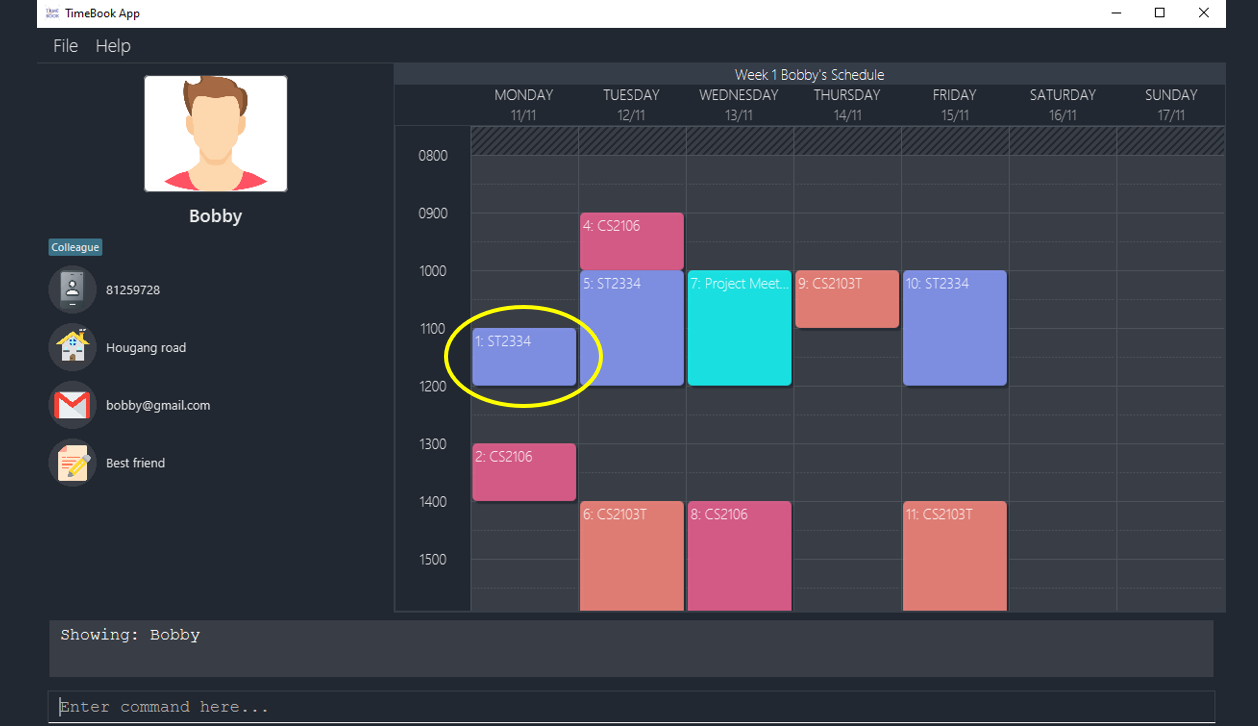
When a person’s schedule is shown, each events are colour coded as shown above. Each time slot is also labeled with an ID for easy reference! The name of the event is also shown!
Let us try to select time slot 1. To select it, simply execute the following command!
Example:
-
select i/1
After executing that command, a pop up will be shown just like the one above!
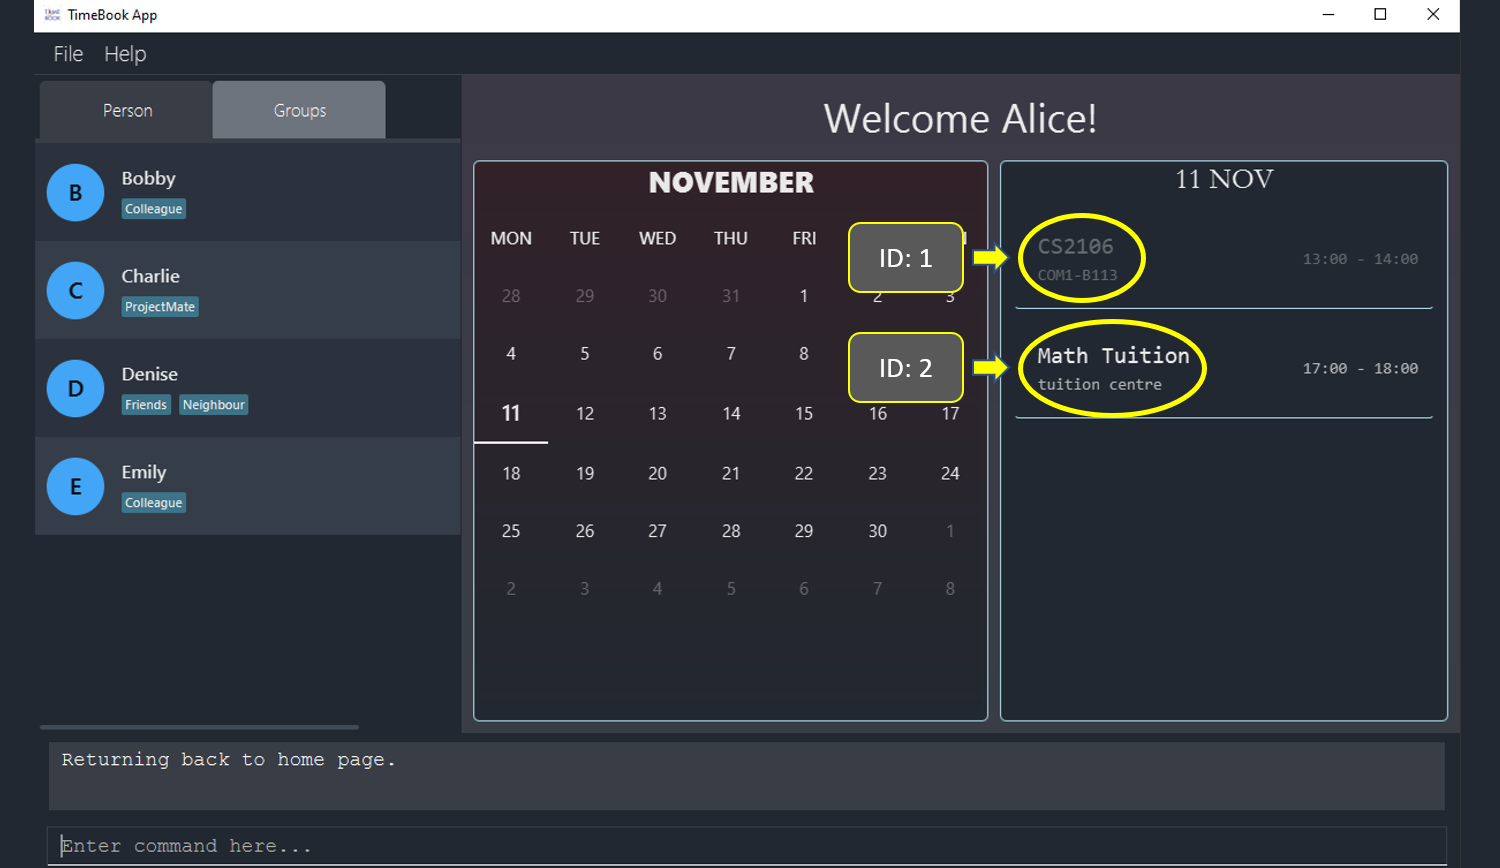
When the home page is shown, you can select each time slot on the list! Do note that the first time slot on the list
will have ID:1 and the following time slots will follow with the next number. We chose to omit the number so you have
a more cleaner home page!
Simply execute the select command and specify the time slot you want to view like so:
Example:
-
select i/1
After executing that command, a pop up will be shown similar to the one above!
6.6. Closest Common Location
TimeBook will also help you to decide where to meet for your project meetings by suggesting to you an optimal location for everyone. The optimal location is the closest location for everyone to meet in NUS based on their schedule. In time book we define the optimal location for everyone as the closest common location.
Steps
-
Set up your group by:
-
Adding your group members to your TimeBook with
addpersoncommand -
Adding your group to TimeBook with
addgroupcommand -
Add your group members to your group with
addtogroupcommand
-
-
Get the relevant information for your group schedule with
show g/[GROUP_NAME]-
Identify the
IDandWeekof the time slot you want to get the closest common location for.
-
-
With the free time slot
idandweekget the details for the closest common location withselectfreetimecommand -
Press
escbutton to close the popup
Constraints
Due to the lack of internet connectivity, TimeBook will only support locations that are in NUSMods and identifiable by Google Maps. The full list of supported locations is below.
Definitions
-
We define closest common location as the location that requires the least average distance to travel to and from different sources by car.
-
Locations that are not supported are voided and are not used for the calculations of the closest common location and average travelling distance.
-
Refer to the
Developer Guideon how we computed the closest common location.
6.6.1. Select Free Time selectfreetime
Select a free time slot to launch a popup window with all the relevant information to help you make decide on the venue to conduct your project meetings at. The image below is an example of the popup.
Below is an example of a popup.
selectfreetime is executedcommand: selectfreetime [week/WEEK_NUMBER] i/FREETIMESLOTID
Examples:
-
selectfreetime i/3 -
selectfreetime week/2 i/3
Description
When the command is executed, a popup will appear that shows all the information of the closest common location for a particular free time slot in a group.
Prerequisite
-
You must be have group on TimeBook with members in it.
-
You must execute
show g/[GROUP NAME]before executingselectfreetimecommand.
Parameters
-
[WEEK_NUMBER]-
Description: The week(1-4) of the group schedule you want to select the free time slot from. If parameter is not stated, it will default to the first week(the default schedule when you execute
show g/GROUP_NAME). -
Type:
Integer -
Enum:
1,2,3,4
-
-
FREETIMESLOTID-
Description: ID of the free time slot in the schedule. You can get this from the number in the free time slot box. You can only enter the
idthat is shown on the screen. -
Type:
Integer
-
Success Response
If you follow the steps above, a popup will appear as seen in the Figure above.
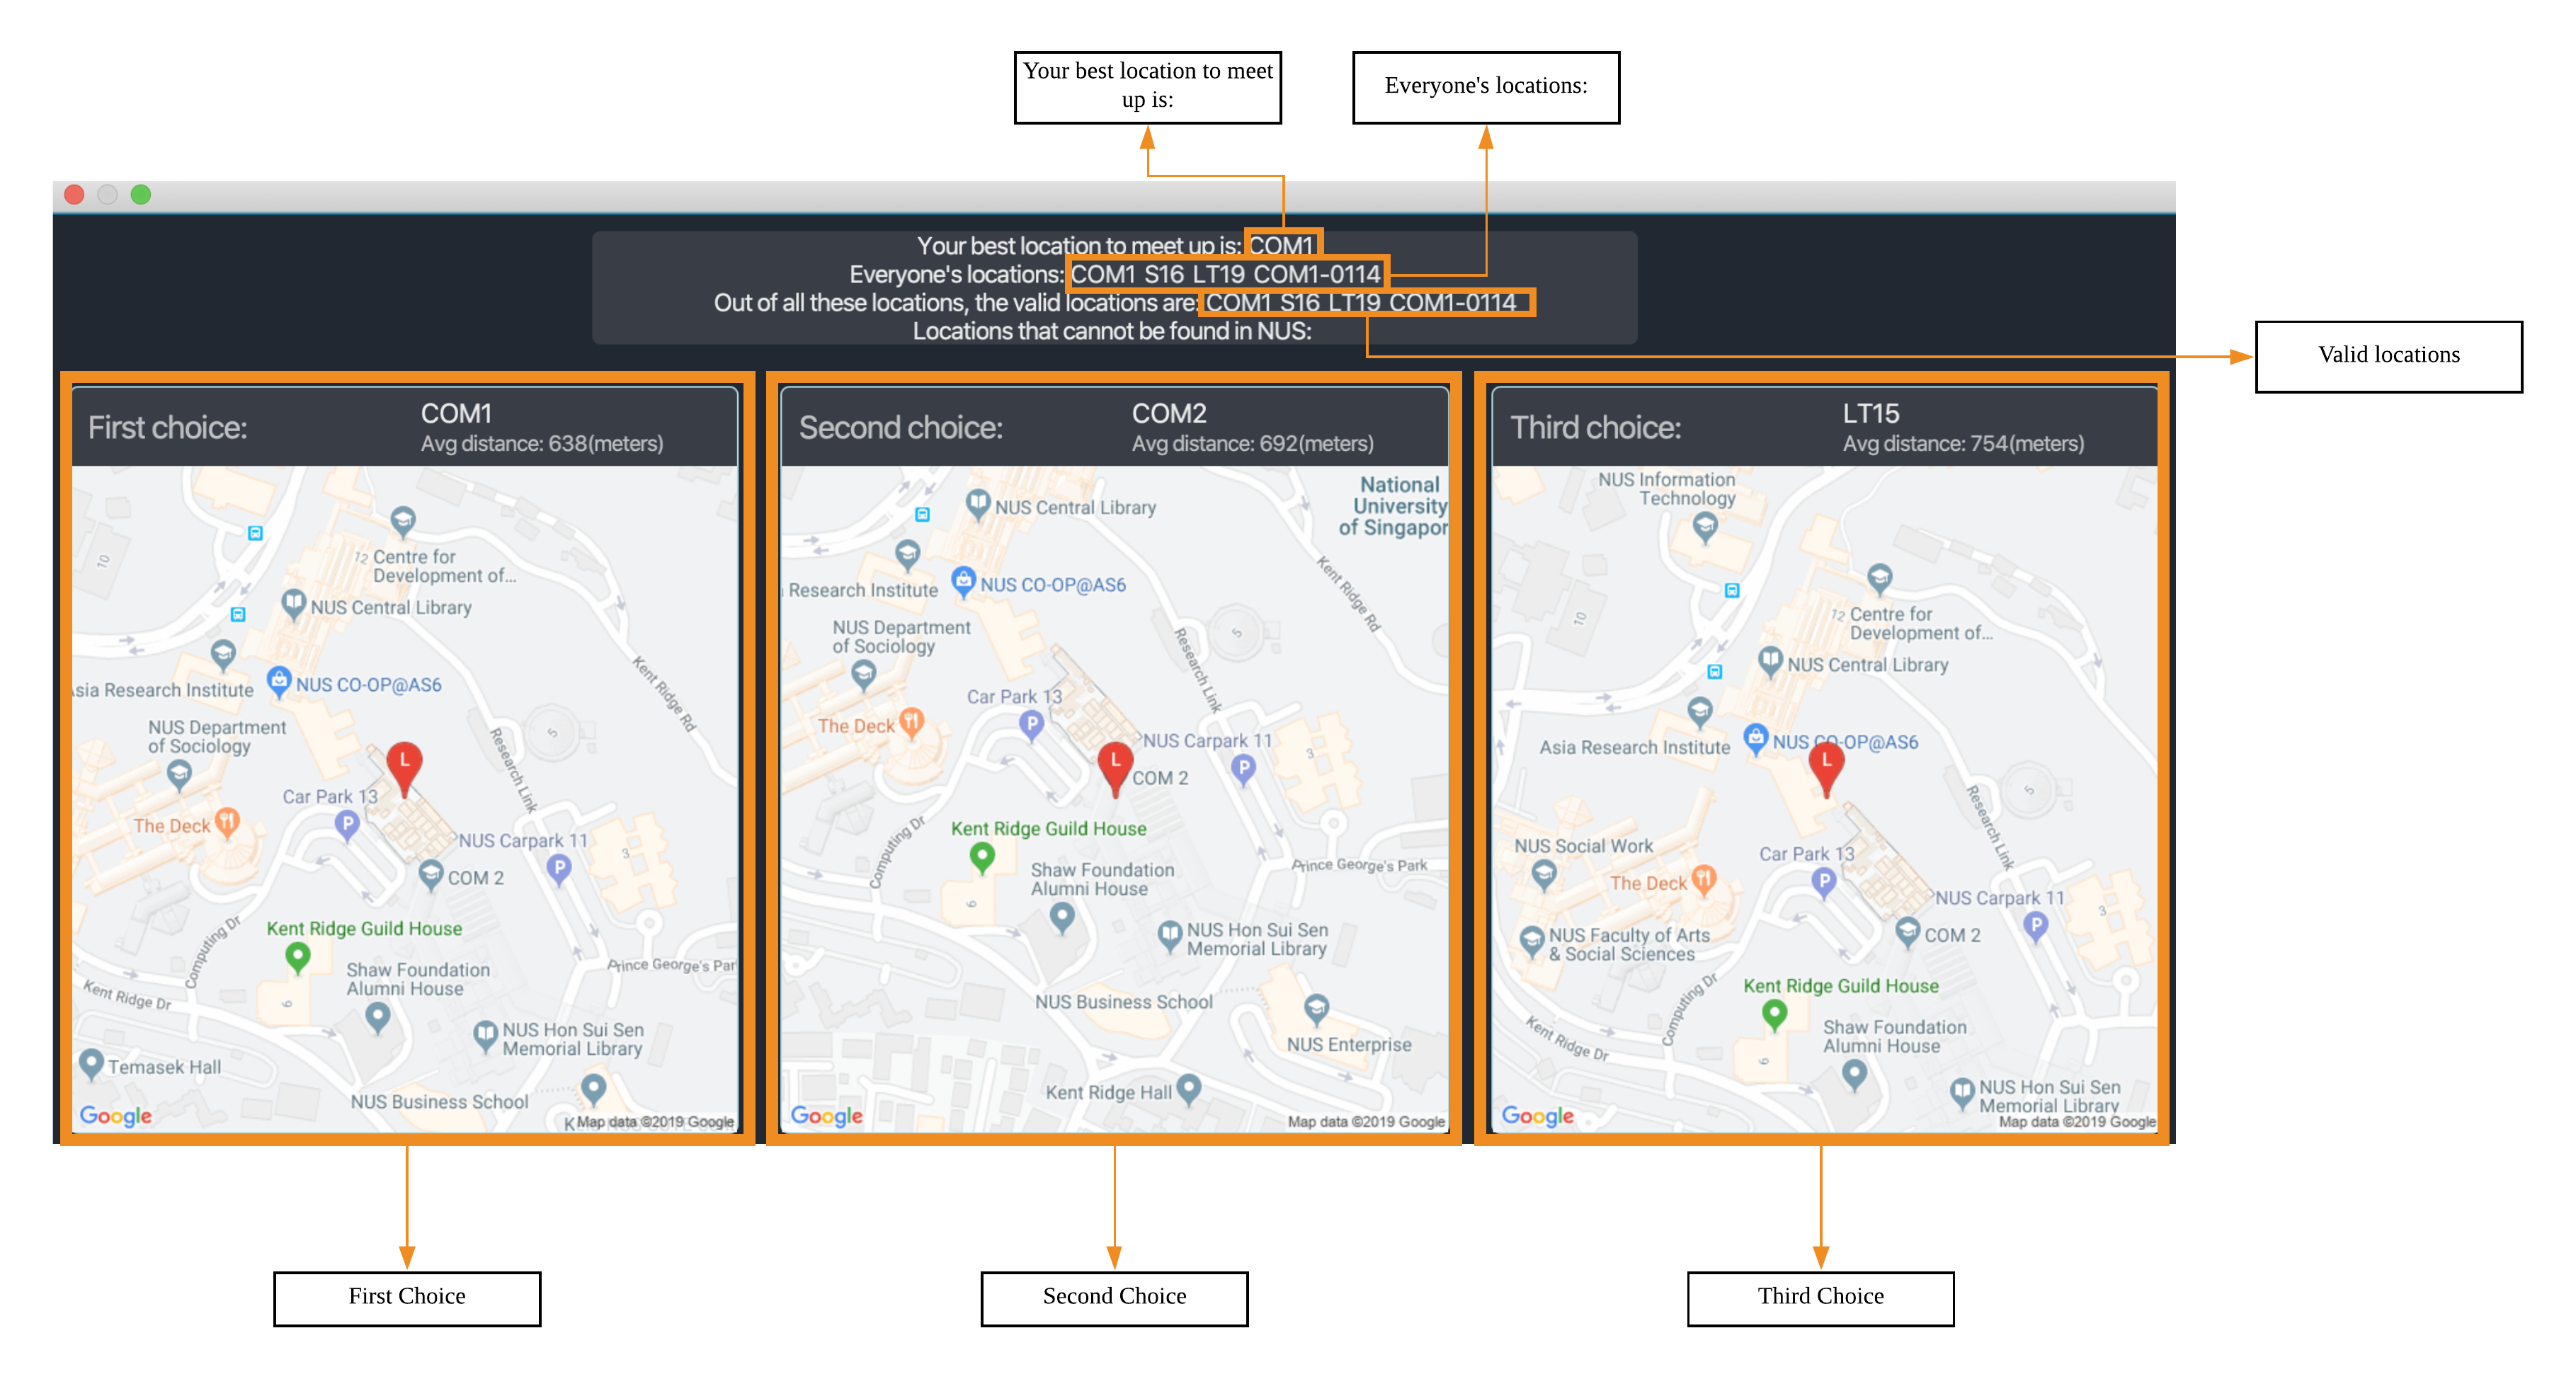
There are two main information that you will see in the popup when you execute the command.
-
The summary of the results that will be
displayedon the top of the popup.-
Your best location to meet up is: The first choice location to meet(closest for everyone).
-
Everyone’s locations: List of locations that the group members will be at before the free time slot.
-
Out of all these locations, the valid locations are: List of TimeBook supported locations that the group members will be at before the free time slot that.
-
Subset of the Everyone’s locations: list
-
-
Locations that cannot be found in NUS: List of locations that the group members will be at before the free time slot but not supported by TimeBook.
-
Subset of the Everyone’s locations: list
-
If all the locations are valid, this attribute will be empty as seen in the Figure above
-
-
-
The full details of the first, second and third closest common location will be shown at the bottom of the popup.
-
First choice represents the first closest and so on and so forth.
-
The average distance(m) to reach the various locations will be displayed below the respective choices.
-
The picture of the location of the venue on Google Maps will be displayed below each choice.
-
For locations that are not supported on Google Maps, a picture of the center of NUS will be displayed.
-
-
Failure Response
-
Errorwhen all the source locations are not recognised by TimeBook, a popup will not appear.
Feedback box will show:
We could not find a common location because all places cannot be found in NUS. The locations are:-
Errorwhen all the group members are not in school before the free time slot, a popup will not appear.
Feedback box will show:
We could not find a common location because:
Everyone has not started their schedule yet. Feel free to meet up any time.-
Errorwhen invalid free time slotIDentered.
Feedback box will show:
Invalid time slot ID: 0. Please enter a valid id as shown in the GUI.-
Errorwhen invalidGROUP_NAMEentered.
Feedback box will show:
Cannot recognise GROUP_NAME. Make sure you entered the correct value.6.6.2. Close popup esc
After you are done with viewing the information on the popup press esc button on your keyboard to close the popup and
and return to the main screen.
Format: esc button on keyboard.
6.7. Upcoming schedule list.
Unsure of what is your next event for the day?
TimeBook’s home page has a list that keeps track of your upcoming events for the day and would automatically tick off events that have past!
Format: home
6.8. Saving the data
TimeBook data are saved in the hard disk automatically after any command that changes the data.
There is no need to save manually.
7. FAQ
-
How do I store my details and schedule?
When you first start using TimeBook, a default profile will be created for you! This default profile will have a default name:
User
To personalize TimeBook and make it yours, renameUserby entering the commandedituser n/Your Name Here. If you’d like to fill in more details, you can do so using theeditusercommand. -
How do I transfer my data to another Computer?
Install the app in the other computer and overwrite the empty data file it creates with the file that contains the data of your previous TimeBook folder.
-
Why can I enter irrelevant arguments?
We understand that users occasionally make error while typing and it is frustrating for the application to fail because of it. Thus for all commands that do not require any arguments(ie
help,homeandexit), TimeBook allows you to enter any value after the command word. For examplehelp 1will executehelpcommand eventhough1is irrelevant to the command. We hope with this feature you will have a seamless and pleasant experience with TimeBook. -
Help! I encountered an error!
We understand that you may encounter a weird error message and are unsure of what it means so we prepared this section that describes the uncommon errors that you may see.
Error message |
|---|
What it means: |
Invalid timing arguments |
Ensure that the time you provide as argument follow the format. Example: 11 Nov 2019, 0800 to 0900 is represented as 11112019-0800-0900 |
Clash in events |
There is already a pre-existing event that is happening at that time slot. |
Duplicate Mapping |
This person is already in the group. |
Cannot find closest location |
The closest common location cannot be determined because everyone is not in NUS. |
XXX does not exist |
This person or group does not exist in TimeBook. Some names are case-sensitive. |
No schedule to XXX |
This error occurs when you use |
No group schedule is shown |
You’ll see this error when you are invoking the |
Internal Error. Please try again later |
You’ll see this error when our remote database cannot handle your requests. |
8. Command Summary
Navigation
-
Return to Home page :
home -
Switch tabs :
switch-tab -
Viewing help :
help -
Exiting the program :
exit
Person Management
-
Edit your details :
edituser -
Add Person
addperson n/NAME [p/PHONE] [em/EMAIL] [a/ADDRESS] [r/REMARK] [tag/TAG]…
e.g.addperson n/James Ho p/22224444 em/jamesho@example.com a/123, Clementi Rd, 1234665 r/Always helpful tag/friend tag/colleague -
Edit Person :
editperson ed/PERSON_NAME [n/NAME] [p/PHONE] [em/EMAIL] [a/ADDRESS] [r/REMARK] [tag/TAG]…
e.g.editperson ed/James Lee em/jameslee@example.com -
Delete Person :
deleteperson n/NAME
e.g.deleteperson n/Benedict -
Show Person :
show n/NAME
e.g.show n/James Jake
Schedule Management
-
Add Module to Person’s Schedule :
addmod n/NAME m/MODULE_CODE class/CLASS_NUMBERS(comma-separated) [ay/ACADEMIC_YEAR] [s/SEMESTER]
e.g.addmod n/John m/CS2103T class/G01,T5 ay/2019/2020 s/1 -
Add Modules to Person’s Schedule via NUSMods Link :
addmods n/NAME l/NUSMODS_SHARE_LINK
e.g.addmods n/John l/https://nusmods.com/timetable/sem-1/share?CS2101=&CS2103T=LEC:G05&CS3230=LEC:1,TUT:08&CS3243=TUT:07,LEC:1&GEQ1000=TUT:D17 -
Show Module Classes Schedule :
showmod m/MODULE_CODE [ay/ACADEMIC_YEAR] [s/SEMESTER]
e.g.showmod m/CS3230 ay/2019/2020 s/2 -
Add Event to Person’s Schedule :
addevent n/NAME e/EVENT_NAME t/DATETIME…
e.g.addevent n/John e/Math Lecture t/26092019-1300-1400 -
Delete Event :
deleteevent [n/NAME] e/EVENT_NAME
e.g.deleteevent n/Bobby e/CS2105 -
Generate Schedule :
schedule n/NAME…
e.g.schedule n/Bobby n/Charlie
Group Management
-
Add Group
addgroup g/GROUP_NAME [d/GROUP_DESCRIPTION] [role/USER_ROLE]
e.g.addgroup g/CS2103 d/A CS2103 project group role/Leader -
Add Person to Group :
addtogroup n/PERSON_NAME g/GROUP_NAME [role/ROLE]
e.g.addtogroup n/Denise g/CS3203 role/Manager -
Edit Group
editgroup ed/GROUP [g/GROUP_NAME] [d/GROUP_DESCRIPTION] [role/USER_ROLE]
e.g.editgroup ed/CS2103 g/CS3203 d/A CS3203 project group role/Member -
Delete Group :
deletegroup g/GROUP_NAME
e.g.deletegroup g/CS2103 -
Show Group Details and Schedule :
show g/GROUP_NAME
e.g.show g/CS2030
Advanced Features
-
Export Visual Representation :
export-vr [n/NAME]… [g/GROUP_NAME]… o/SAVE_LOCATION
e.g.export-vr g/TimeBook o/timetable.jpg -
Select Time slot :
select n/NAME [week/WEEK_NUMBER] i/ID
e.g.select n/Bobby i/1 -
Closest Location :
closestlocation l/LOCATIONA LOCATIONB …
e.g.closestlocation l/LT16 LT15 AS5 -
Select Free Time Slot :
selectfreetime [week/WEEK_NUMBER] i/FREETIMESLOTID
e.g.selectfreetime i/1
9. Supported Locations
| Valid Locations | ||||||||||
|---|---|---|---|---|---|---|---|---|---|---|
AS4-0116 |
AS3-0214 |
AS3-0213 |
AS3-0303 |
AS3-0212 |
AS3-0302 |
AS1-0303 |
AS1-0302 |
AS5-0309 |
LT9 AS1-0304 |
AS6-0214 |
AS5-0205 |
AS2-0413 |
AS3-0215 |
LT12 |
AS7-0119 |
AS4-0118 |
LT11 |
AS1-0209 |
AS4-0109 |
LT14 |
AS6-0212 |
AS1-0203 |
AS1-0208 |
AS4-0601 |
AS5-0202 |
AS4-0206 |
AS7-0102 |
AS8-0402 |
UTSRC-SR5 |
UTSRC-SR2 |
UT-AUD1 |
ERC-SR9CAM |
ERC-SR8 |
ERC-GLR |
AS3-0306 |
ERC-SR10 |
UTSRC-SR3 |
TP-SR1 |
UTSRC-GLR |
UTSRC-SR6 |
UTSRC-SR7 |
TP-GLR |
AS6-0333 |
AS1-0211 |
AS6-0338 |
AS4-0119 |
AS1-0205 |
AS7-0106 |
AS3-0309 |
AS4-0604 |
AS1-0301 |
AS1-0213 |
AS4-0335 |
TP-SR8 |
UTSRC-LT51 |
AS8-0401 |
AS6-0215B |
AS1-0207 |
AS7-0101 |
LT10 |
AS1-0201 |
NAK-AUD |
ERC-SR11 |
UTSRC-SR1 |
UTSRC-LT52 |
AS4-0603 |
ERC-ALR |
UTSRC-SR9 |
UTSRC-SR4 |
LT8 |
S16-0435 |
S16-0437 |
LT7A |
LT28 |
E3-06-02 |
E3-06-03 |
S16-0304 |
AS2-0510 |
UTSRC-SR8 |
AS2-0509 |
AS3-0304 |
AS4-0117 |
AS2-0312 |
AS7-0117 |
AS8-0405 |
AS2-0311 |
AS5-0203 |
LT13 |
AS3-0308 |
AS2-0316 |
AS2-0313 |
AS2-0203 |
AS2-0204 |
AS2-ELAB |
AS2-0302 |
AS1-0524 |
AS3-0307 |
AS4-0602 |
AS8-0646 |
AS1-0204 |
AS3-0305 |
AS3-0523 |
TP-SR2 |
AS7-0201 |
AS4-0208 |
CHPC |
AS7-0201A |
AS4-B107 |
AS4-B109 |
AS4-B110 |
AS1-0212 |
AS4-0115 |
AS1-0210 |
AS8-0647 |
AS3-0209 |
AS4-0519 |
AS4-0318 |
BIZ1-0301 |
BIZ1-0303 |
BIZ1-0302 |
BIZ1-0307 |
BIZ1-0202 |
BIZ1-0204 |
BIZ1-CMRI |
BIZ1-0305 |
BIZ1-0205 |
BIZ1-0201 |
BIZ1-0304 |
BIZ1-0203 |
BIZ2-0413A |
HSSMLCR |
BIZ2-0509 |
BIZ1-SR6-1 |
BIZ2-0510 |
BIZ2-0413C |
BIZ1-0206 |
BIZ2-B104 |
BIZ2-0301 |
BIZ2-0118 |
BIZ2-0114 |
LT17 |
LT16 |
BIZ2-0202 |
BIZ2-0224 |
BIZ2-0404 |
BIZ2-0420 |
BIZ2-0228 |
BIZ2-0117 |
BIZ1-SR6-4 |
LT19 |
LT18 |
BIZ2-0226 |
BIZ2-0227 |
BIZ2-0302 |
BIZ2-0413B |
BIZ2-0303 |
BIZ2-0201 |
BIZ2-0229 |
I3-AUD |
COM1-VCRM |
SR_LT19 |
COM1-0206 |
LT15 |
COM1-0204 |
COM1-0201 |
COM1-0210 |
COM1-B103 |
COM1-0114 |
COM1-0208 |
COM2-0108 |
I3-0336 |
I3-0338 |
I3-0344 |
COM1-B112 |
COM1-0113 |
I3-0339 |
COM1-B108 |
COM1-B111 |
COM1-B110 |
AS6-0421 |
LT7 |
COM1-0209 |
UT-AUD2 |
AS6-0211 |
COM1-0203 |
COM1-0207 |
COM1-0212 |
COM1-B113 |
COM1-B102 |
COM1-0216 |
COM1-0217 |
AS6-0210 |
AS6-0208 |
AS3-0611 |
AS3-0610 |
COM1-0120 |
AS3-0620 |
S16-0436 |
LT26 |
COM1-B109 |
RMI-SR1 |
I3-0337 |
SDE2-ER1 |
SDE-ER5 |
UTSRC-LT53 |
UTSRC-LT50 |
SDE1-ISD-1 |
LAW_SR3 |
NHM-1M-03 |
UT-AUD3 |
AKIMAUD |
UT22-07-02 |
SDE4-GISL1 |
SDE-ER4 |
SDE2-MEZZ |
AKI5B |
SDE2-ES1 |
SDE2-ES2 |
AKIMLA4 |
TP-SR3 |
WT-Lab |
GBT-Lab |
SDE-EXR-2 |
SDE4-EXR1-2 |
SDE4-EXR-2 |
SDE4-EXR-1 |
E2-03-02 |
E1-06-02 |
E1-06-06 |
E1-06-13 |
E5-03-22 |
E3-06-04 |
E5-03-21 |
E3-06-11 |
E3-06-01 |
E4-04-04 |
ENG-AUD |
E2A-03-01 |
E2A-02-02 |
E2A-02-01 |
E2A-03-02 |
E2A-04-02 |
E2A-04-03 |
E3-06-08 |
E1-06-10 |
E3-06-12 |
E3-06-10 |
E3-06-13 |
E5-03-23 |
E1-06-16 |
E3-06-14 |
E1-06-15 |
E1-06-11 |
E1-06-12 |
E4-04-02 |
E2-0308PC5 |
E2-0309PC6 |
LT2 |
E4-02-06 |
EA-06-04 |
EA-02-11 |
EA-06-02 |
EA-06-05 |
EA-06-03 |
LT6 |
E3-06-05 |
E1-06-08 |
E5-03-20 |
E1-06-01 |
LT4 |
E1-06-07 |
E1-06-04 |
E1-06-05 |
E1-06-09 |
EW2-04-02 |
E1-06-03 |
E5-03-19 |
E3-06-07 |
E2-0307PC4 |
LT3 |
E5-03-24 |
E2-0306PC3 |
E3-06-09 |
LT1 |
E4-03-07 |
E4A-06-03 |
E3-06-15 |
E4-02-01 |
E4-04-03 |
E3-05-21 |
E3-03-01 |
EA-06-06 |
E1-0410PC2 |
E3A-05-03 |
E3A-05-04 |
E3A-05-07 |
E5-02-32 |
EA-04-21 |
EA-06-07 |
EA-04-22 |
EA-04-07 |
EA-04-06 |
E3-04-02E |
E3-04-02L |
E1A-01-06 |
EA-02-21 |
EA-04-04 |
E1-06-0506 |
E5-0320-21 |
E3-06-06 |
EW1-03-02 |
EW1-02-03 |
EW1-04-02 |
EW1-01-01 |
EW2-03-14 |
EW1-1M-03 |
EW1-1M-02 |
LAW_SR5-3 |
LAW_SR5-4 |
LAW_SR4-1 |
LAW_SR5-2 |
FED-01-02 |
LAW_SR5-1 |
LAW_ESR |
LAW_SR4-2 |
LAW_SR4-3 |
LAW_SR5-5 |
LAW_CR3-5 |
TB-08-01R |
LAW_SR4-4 |
LAW_CR3-4 |
LAW_LT |
LAW_CR4-2 |
LAW_CR5 |
LAW_CR3-6 |
LAW_CR4-1 |
LAW_CR2-1 |
LAW_CR3-3 |
LAW_CR2-2 |
LAW_CR3-7 |
LT33 |
MD10-01-01 |
LT34 |
S14-0619 |
S16-0430 |
S16-0307 |
LT29 |
MD7_LAB8 |
LT20 |
MD7-02-03 |
MD4-02-03E |
MD4_LAB9 |
S14-0620 |
MD1-03-01B |
MD1-07-01A |
LT21 |
LT32 |
S1A-0217 |
MD9-01-02 |
CELS-04-01 |
LT28-01-01 |
YSTCM-TR |
YSTCM-RS |
YSTCM-SR2 |
YSTCM-SR8 |
YSTCM-WS |
YSTCM-OH |
YSTCM-ER3 |
YSTCM-HALL |
YSTCM-MLAB |
YSTCM-SR4 |
YSTCM-SR7 |
YSTCM-ER2 |
YSTCM-ER6 |
YSTCM-ER1 |
YSTCM-SR1 |
YSTCM-SR5 |
YSTCM-RECS |
YSTCM-SR3 |
YSTCM-SR6 |
YSTCM-ER4 |
S16-03-0506 |
S16-0598 |
S16-0309 |
S2-0414 |
S2-0415 |
S2-04LAB5 |
S1A-03LAB1 |
S1A-04LAB3 |
S2-03LAB7 |
S13-M-08 |
S13-M-09 |
S1A-03LAB2 |
LT31 |
S1A-04LAB4 |
S16-0431 |
S8-0314 |
S5-01PHYS |
S5-0224 |
S5-0410 |
S8-0402 |
S7-0401 |
S14-0503 |
S5-01GEN |
S17-0406 |
S17-0405 |
S17-0512 |
S17-0511 |
S17-0404 |
S17-0611 |
S17-0304 |
S17-0302 |
MD1-06-03M |
MD1-05-01A |
MD1-06-01A |
S4-02LAB |
MD1-05-03K |
S16-0440 |
S4-04LAB |
S12-0403 |
S11-0204 |
S11-0301 |
S12-0402A |
S12-0402B |
S12-0402C |
S12-0402D |
S11-0302A |
S12-0401 |
S11-0401A |
S13-0313 |
S12-0402 |
E4-07-08 |
S11-0302 |
S16-06118 |
S16-05102 |
S16-05101 |
LKY_SR3-5 |
LKY_SR3-1 |
LKY_SR2-1 |
LKY_EA_M |
LKY_SR2-2 |
LKY_SR2-3 |
LKY_SR3-4 |
LKY_TB10SR |
LKY_EE_CSU |
LKY_SR3-3 |
CELS-01-08 |
CQT/SR0315 |
USP-TR1 |
USP-SR1 |
USP-SR2 |
USP-SR3 |
USP-TR2 |
UTSRC-PR1 |
TC-TR2 |
TC-SR6 |
TC-SR3 |
TC-SR4 |
TC-SR5 |
CAPT-SR5 |
CAPT-SR1-2 |
CAPT-SR3 |
CAPT-SR6 |
RC4-SR1-2 |
RC4-SR3 |
RC4-SR5 |
RC4-SR4 |
RVR_MPR1 |
RVR_MPR2 |
RVR-SRM04 |
RVR-SRM03 |
RVR-SRM02 |
RVR-SRM01 |
MD1-08-01E |
MD1-0801AB |
MD1-0903EF |
MD1-09-01A |
MD1-09-01B |
MD1-08-03E |
MD1-08-01B |
Y-CR21 |
Y-CR19 |
Y-CR9 |
Y-GLRm1 |
Y-PracRm6 |
Y-CR13 |
Y-CR18 |
Y-CR22 |
Y-CR17 |
Y-KChanrai |
Y-CR6 |
Y-LT1 |
Y-TCTLT |
Y-CR8 |
Y-CR20 |
Y-CR2 |
Y-CR12 |
Y-CR5 |
Y-CR14 |
Y-CR4 |
Y-CR15 |
Y-GLRm2 |
Y-CR3 |
Y-PgRm1 |
Y-CR7 |
Y-ArtsStud |
Y-PgRm2 |
Y-CompLab |
Y-CR11 |
Y-PerfHall |
Y-AChemLab |
Y-OChemLab |
Y-CR1 |
Y-CR23 |
Y-CR16 |
E3-0605-06 |
E2-03-03 |
E4A-04-08 |
E1-06-14 |
CELC-SR1A |
CELC-TR6 |
BIZ2-0115 |
BIZ2-0116 |
BIZ2-0112 |
CAPT-SR4 |
RC4-SR6 |
TH-SR1 |
KEVII-MR2 |
RH-CONF-RM |
KRH-SR3 |
SH-SR1 |
AS3-0314 |
AS3-0312 |
AS3-0208 |
AS3-0316 |
ISS/3-12 |
ISS/2-9 |
ISS/4-6 |
ISS/3-3 |
ISS/2-1 |
ISS/AUD |
ISS/3-1 |
ISS/3-5 |
ISS/4-4 |
TP-SR7 |
TP-SR4 |
TP-SR5 |
TP-SR6 |
!=== |